
Let’s see how to configure additional resolutions on a Windows computer thanks to the Custom Resolution Utility (CRU) tool.
When you connect a Windows computer, it offers you the most suitable and common resolutions for that monitor.
However, sometimes I need to add a specific additional resolution that I want to use, which are not automatically recognized by the system.
This frequently happens to me when working with embedded displays or uncommon screens, where I want to force a specific resolution that Windows doesn’t offer by default.
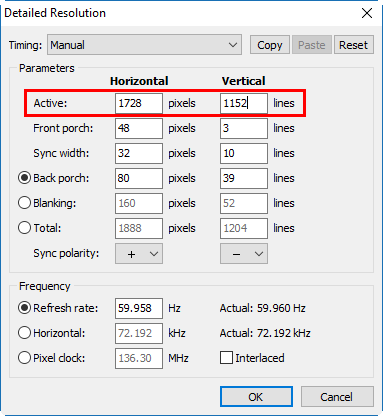
It also happens in the case of very high-resolution displays. Why do I want 2736 x 1824px on a 12” screen? In that case, I prefer to create a lower multiple that (surprise) Windows doesn’t offer me.
In any case, if we need to add additional resolutions to those offered by Windows, we can use a tool like Custom Resolution Utility (CRU).
How to Use Custom Resolution Utility
Custom Resolution Utility (CRU) is a free tool for Windows that allows us to add custom resolutions to our system.
The first step to using this tool is to download and install it. We can download it from this page: https://www.monitortests.com/forum/Thread-Custom-Resolution-Utility-CRU.
Once downloaded, we can unzip the ZIP file and run the “CRU.exe” application.
Once we have opened the CRU application, we can create a new custom resolution by clicking the “Add” button in the “Detailed resolutions” tab.
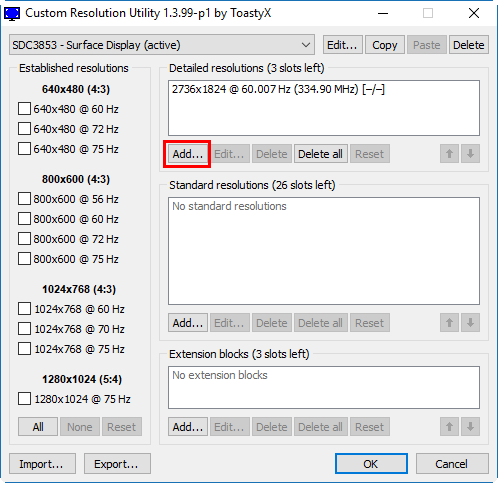
This will allow us to manually enter a new custom resolution. We must ensure we enter the correct values for the resolution and refresh rate, which must be compatible with our monitor.
After entering the values for our new custom resolution, we must click the “OK” button to save it. Finally, we will generally need to restart the system for the changes to take effect.
Once we have restarted the system, we can verify if our new custom resolution is available.
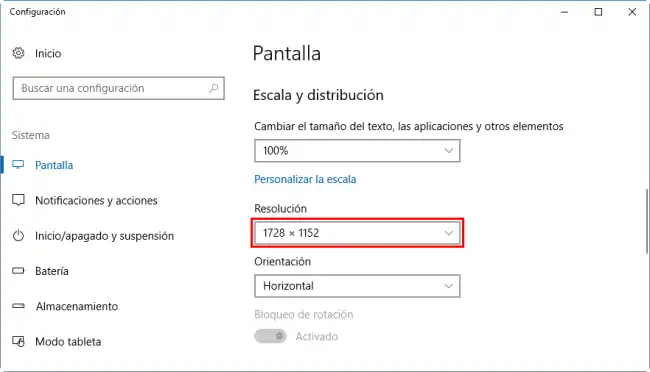
We can do this by opening the display settings in Windows and looking for our new resolution in the list of available resolutions. If the custom resolution is available, we can select it and apply it.
Important, not all the resolutions you set will work. Sometimes Windows will try to apply it but won’t succeed. And sometimes, it will simply ignore the resolution we set entirely and won’t even show it as an option.
However, in general, it works if the resolution we added “makes sense.” With this tool, we can improve the image quality of our monitor and make our system more compatible with old or uncommon monitors.