What is a DHT11 / DHT22?
The DHT11 and the DHT22 (or AM2302) are two models of the same family of sensors, which allow for the simultaneous measurement of temperature and humidity.
These sensors have an internal processor that performs the measurement process, providing the measurement through a digital signal, so it is very simple to obtain the measurement from a microprocessor such as Arduino.
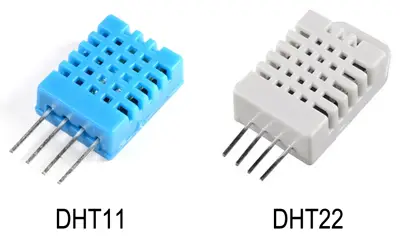
Both sensors have a similar plastic encapsulation. We can distinguish both models by the color of the casing. The DHT11 has a blue casing, while in the case of the DHT22 sensor, the exterior is white.
Of both models, the DHT11 is the little brother of the family and has worse technical characteristics. The DHT22 is the superior model but, in contrast, it has a higher price.
The characteristics of the DHT11 are really scarce, especially in terms of measurement range and precision.
- Temperature measurement between 0 to 50, with a precision of 2ºC
- Humidity measurement between 20 to 80%, with a precision of 5%.
- Sampling frequency of 1 sample per second (1 Hz)
The DHT11 is a very limited sensor that we can use for training, testing, or in projects that do not really require accurate measurement.
On the contrary, the DHT22 model has much more acceptable characteristics.
- Temperature measurement between -40 to 125, with a precision of 0.5ºC
- Humidity measurement between 0 to 100%, with a precision of 2-5%.
- Sampling frequency of 2 samples per second (2 Hz)
The DHT22 (without being an extremely high-precision sensor) has acceptable characteristics to be used in real monitoring or recording projects that require medium precision.
Temperature sensors, and even more so, humidity sensors, have high inertia and response times. That is, they are “slow” to reflect changes in measurement.
Price
The DHT11, the lower-end model in terms of characteristics, is really cheap. We can find it on international sellers on Ebay and AliExpress for €0.70.
Meanwhile, we can find the superior model DHT22 for €2.40, considerably more expensive than its little brother, but still relatively cheap.
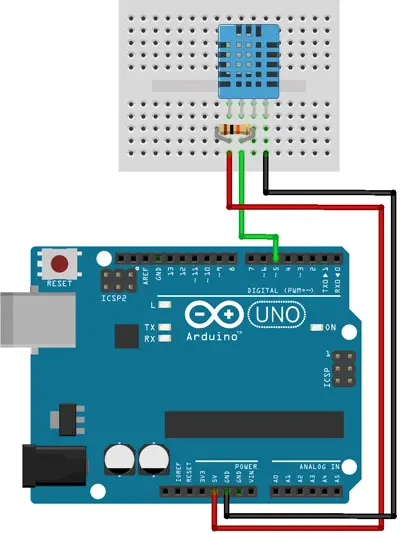
Assembly scheme
The connection of the DH11 and the DHT22 is identical, since as we have mentioned, the only difference between the models is their performance. In both cases, we have 4 pins, of which we will use 3, Vcc, Output, and GND.
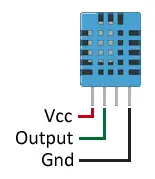
Connecting the sensor is simple, we simply power the sensor from Arduino through the GND and Vcc pins of the sensor. On the other hand, we connect the Output to a digital input of Arduino. We will need to put a 10K resistor between Vcc and the Output Pin.
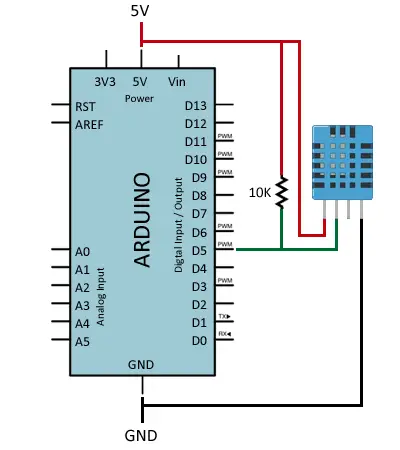
The electrical schematic looks like the following image
While the assembly on a breadboard would be as follows.
Code examples
The DHT11 and DHT22 sensors use their own bidirectional communication system using a single conductor, using timed signals.
In each measurement transmission, the sensor sends a total of 40 bits, in 4ms. These 40 bits correspond to 2 Bytes for humidity measurement, 2 Bytes for temperature measurement, plus a final Byte for error checking (8-bit integral RH data + 8-bit decimal RH data + 8-bit integral T data + 8-bit decimal T data + 8-bit checksum)
For more information on the operation and communication details, refer to the datasheet of the DHTXX series.
We can read the sensor data directly by generating and reading the timed signals according to the DHTXX protocol. In general, it is common to use an existing library to simplify the process.
There are several libraries available. For example, we can use the Adafruit library available at this link.
We download and install the library and load the example code, or the following simplified version
#include "DHT.h"

// Uncomment whatever type you're using!
//#define DHTTYPE DHT11   // DHT 11

#define DHTTYPE DHT22   // DHT 22  (AM2302), AM2321
//#define DHTTYPE DHT21   // DHT 21 (AM2301)

// Connect pin 1 (on the left) of the sensor to +5V
// NOTE: If using a board with 3.3V logic like an Arduino Due connect pin 1
// to 3.3V instead of 5V!
// Connect pin 2 of the sensor to whatever your DHTPIN is
// Connect pin 4 (on the right) of the sensor to GROUND
// Connect a 10K resistor from pin 2 (data) to pin 1 (power) of the sensor

const int DHTPin = 5;     // what digital pin we're connected to

DHT dht(DHTPin, DHTTYPE);

void setup() {
  Serial.begin(9600);
  Serial.println("DHTxx test!");

  dht.begin();
}

void loop() {
  // Wait a few seconds between measurements.
  delay(2000);

  // Reading temperature or humidity takes about 250 milliseconds!
  float h = dht.readHumidity();
  float t = dht.readTemperature();

  if (isnan(h) || isnan(t)) {
    Serial.println("Failed to read from DHT sensor!");
    return;
  }

  Serial.print("Humidity: ");
  Serial.print(h);
  Serial.print(" %\t");
  Serial.print("Temperature: ");
  Serial.print(t);
  Serial.print(" *C ");
}
We load the program on Arduino, and we will start receiving the temperature and humidity values through the serial port.
Download the code
All the code from this post is available for download on Github. 
