A common request we see in Arduino forums and pages is how to get a collection in C++ that changes its size dynamically, allowing adding and removing elements, in an implementation light enough to work properly on a microprocessor like Arduino.
Well, fortunately we are not the first nor the last in the world of programming with this need to create dynamic collections. In fact, this problem has been with us since the world began (or well, at least since the beginnings of computing).
As a result, multiple solutions have been found that different languages have implemented in different collections (trees, dynamic size array, linked list), each with its own advantages and disadvantages.
In this post we are going to implement a dynamic size array, and in the next one we will address the problem from the point of view of a linked list.
What is a dynamic size array?
First of all… impossible! You’ll tell me, an array cannot change its size once created. When instantiating an array, space is reserved in memory to store its elements, and once created it is impossible to change its size (among other things because it may not have room to grow where it is stored)
And you are absolutely right, an array cannot change its size once created. But nothing prevents us from creating a new array with the desired size (larger or smaller), copying the content of the original array, and finally deleting it. This is precisely how a dynamic size array works.
First we create an array with a certain capacity. When we save elements, we count the number of elements we have in the array.
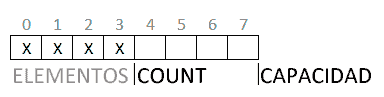
As long as the number of elements is less than the capacity of the array, the dynamic size array behaves the same as a normal array.
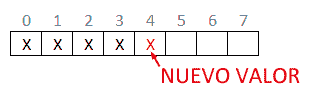
If we keep adding elements, at some point we will exhaust the array’s capacity.
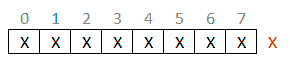
At that moment we generate a new array, copy the elements, and delete the old array.
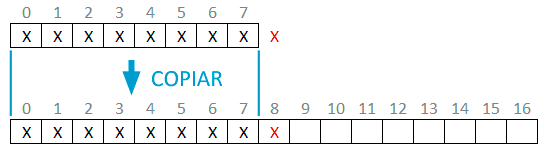
The rule usually taken is that the new array has twice the capacity of the original array (2N). However, any other rule is possible (for example 1.2N, N+10…).
If we want to reduce the array to decrease the amount of memory occupied by it, we generate a new array that has the number of stored elements as its capacity, and similarly copy and delete the original. If we prefer we can leave a certain margin, although, in general, it is not customary.
In terms of efficiency, the dynamic size array behaves the same as a normal array (because it actually is one). In particular, indexed reads are O(1), and indexed writes are O(1). Element insertions are O(n). Adding an element (at the end of the collection) is O(1), unless, if there is remaining capacity.
If it is necessary to expand (change the size of the array) the operations slow down, because it is necessary to generate the new array, and copy all the elements, which is a relatively slow process.
Avoiding array expansion is the reason why doubling the capacity is usually taken as the rule. However, on a micro with little memory like Arduino it might be excessive, and it might be preferable to sacrifice some speed by decreasing the growth factor.
Implementing a dynamic array in Arduino
Below we have a very basic implementation of a dynamic size array to illustrate its operation.
We only have two methods, AddItem() and RemoveTail() which, respectively, add or remove the last elements of the dynamic array.
On the other hand, we have the resize() method, which performs the resizing of the array, and the Trim() method which reduces the size of the array to the number of elements to reduce the memory consumed.
int* list;
size_t count;
size_t capacity;
// Create a new list
void CreateList(size_t _capacity)
{
list = new int[_capacity];
capacity = _capacity;
count = 0;
}
// Add element to the end of the list
void AddItem(int item)
{
++count;
if (count > capacity)
{
size_t newSize = capacity * 2;
resize(newSize);
}
list[count - 1] = item;
}
// Remove last element from the list
void RemoveTail()
{
--count;
}
// Reduce list capacity to the number of elements
void Trim()
{
resize(count);
}
// Resize list
void resize(size_t newCapacity)
{
int* newList = new int[newCapacity];
memmove(newList, list, count * sizeof(int));
delete[] list;
capacity = newCapacity;
list = newList;
}
// Show the list by Serial for debugging
void printList()
{
Serial.print("Capacity:");
Serial.print(capacity);
Serial.print(" Count:");
Serial.print(count);
Serial.print(" Items:");
for (size_t index = 0; index < count; index++)
{
Serial.print(list[index]);
Serial.print(' ');
}
Serial.println();
}
void setup()
{
Serial.begin(9600);
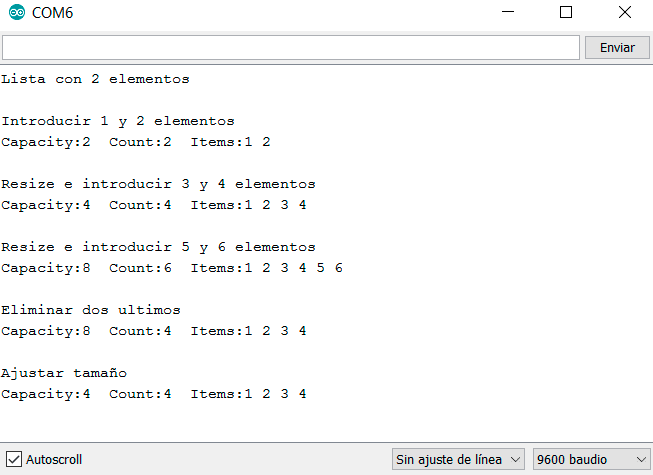
Serial.println("List with 2 elements");
CreateList(2);
Serial.println();
Serial.println("Enter 1 and 2 elements");
AddItem(1);
AddItem(2);
printList();
Serial.println();
Serial.println("Resize and enter 3 and 4 elements");
AddItem(3);
AddItem(4);
printList();
Serial.println();
Serial.println("Resize and enter 5 and 6 elements");
AddItem(5);
AddItem(6);
printList();
Serial.println();
Serial.println("Remove last two");
RemoveTail();
RemoveTail();
printList();
Serial.println();
Serial.println("Adjust size");
Trim();
printList();
}
void loop()
{
}
If we run the code, we will see the following output.
Dynamic array in a library
Of course this couldn’t end here. Here is the link to the List library, a complete implementation of a dynamic list, with adding, inserting, deleting elements, reversing order, converting from/to an array, etc…
While still being simple enough to work on a processor like Arduino. Enjoy!
Download the code
All the code from this post is available for download on Github. 
