
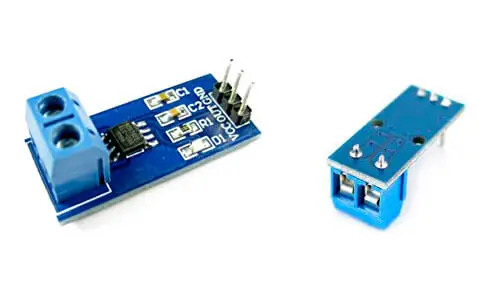
What is the ACS712?
The ACS712 is a current sensor for both AC and DC, which allows measuring the electrical intensity passing through a conductor. We can use the ACS712 together with a processor like Arduino to measure the intensity or power consumed by a load.
Internally, the ACS712 consists of a precision hall sensor and low offset along with a conduction channel located near the surface of the integrated circuit. When the current flows through the copper channel, it generates a magnetic field that is detected by the Hall sensor and converted into a voltage.
The sensor output is a voltage proportional to the current and highly independent of temperature. The sensor comes factory calibrated, although an adjustment of the calibration will be necessary for precision measurement.
The conduction path is galvanically isolated from the IC, guaranteeing a minimum of 2.1 kVRMS. Its resistance is very low, 1.2 mO, which translates to small losses.
There are models for ranges of 5A, 20A, 30A. The sensor supports currents up to 5x the sensor’s measurement range. Exceeding the limit will damage the ACS712.
The biggest disadvantage of the ACS712 is that it is an intrusive sensor, meaning it needs to be inserted into a conductor, which may require cutting a cable. This is a major disadvantage compared to non-intrusive sensors like the STC-013 current transformer.
Typical applications of the ACS712 include motor control, load control, power supplies, and overvoltage protection.
We can use it in our DIY electronics and Arduino projects, for example, to measure the intensity powering a load, to measure its consumption, or as protection for devices such as motors.
Price
The ACS712 is an inexpensive sensor. We can find modules with the ACS712 in its different versions 5A, 20A, and 30A, ready to connect easily with Arduino, for €1.25 from international sellers on eBay or AliExpress.
Assembly diagram
The modules with the ACS712 are very easy to connect. This is precisely one of their great advantages. The ACS712 provides a voltage output proportional to the intensity passing through the sensor.
Therefore, we simply power the module by connecting Gnd and Vcc, respectively, to Gnd and 5V on Arduino, and connect the sensor output to an analog input on Arduino.
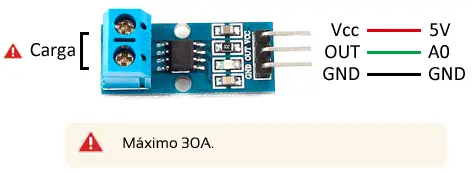
While the connection, seen from Arduino, would be as follows.
Code examples
As we have mentioned, the voltage at the output of the ACS712 is proportional to the intensity passing through the sensor. An offset of 2.5V is included so that the reference is centered, allowing measurement of positive and negative intensities.
The proportionality factor and resolution depend on the sensor model, for ranges of 5A, 20A, and 30A.
| Max Intensity | Sensitivity | Voltage Output | Resolution |
|---|---|---|---|
| ±5A | 185 mV/A | 1.575V to 3.425V | 26mA |
| ±20A | 100 mV/A | 0.5V to 4.5V | 49mA |
| ±30A | 66 mV/A | 0.52V to 4.48V | 74mA |
The following code performs the current measurement using the ACS712. To reduce the measurement noise, several measurements are taken and the average is calculated.
// Sensor sensitivity in V/A
float SENSIBILITY = 0.185;   // 5A model
//float SENSIBILITY = 0.100; // 20A model
//float SENSIBILITY = 0.066; // 30A model

int SAMPLESNUMBER = 100;

void setup()
{
  Serial.begin(9600);
}

void printMeasure(String prefix, float value, String postfix)
{
  Serial.print(prefix);
  Serial.print(value, 3);
  Serial.println(postfix);
}

void loop()
{
  float current = getCorriente(SAMPLESNUMBER);
  float currentRMS = 0.707 * current;
  float power = 230.0 * currentRMS;

  printMeasure("Intensidad: ", current, "A ,");
  printMeasure("Irms: ", currentRMS, "A ,");
  printMeasure("Potencia: ", power, "W");
  delay(1000);
}

float getCorriente(int samplesNumber)
{
  float voltage;
  float corrienteSum = 0;
  for (int i = 0; i < samplesNumber; i++)
  {
    voltage = analogRead(A0) * 5.0 / 1023.0;
    corrienteSum += (voltage - 2.5) / SENSIBILITY;
  }
  return(corrienteSum / samplesNumber);
}Download the code
All the code from this post is available for download on Github.

