What is an electromagnet?
An electromagnet is a device that allows attracting ferromagnetic objects by using a magnetic field. Sometimes these devices are called magnetic suction cups.
An electromagnet behaves similarly to a permanent magnet, but has the great advantage that it can be activated or deactivated at will and quickly, simply by acting on the supplied current.
On the other hand, conventional electromagnets have the disadvantage of requiring a continuous supply of current to maintain the force it exerts.
A variant of electromagnets uses a combination with permanent magnets, whose effect is counteracted by the electromagnet. In this way, the device exerts attractive force when disconnected, and the current is applied to separate it. This behavior is opposite to that of a conventional electromagnet. These devices are called negative electromagnets or lapa.
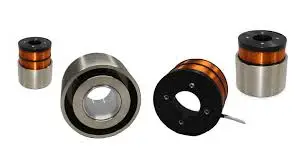
Electromagnets are widely used devices in the industry to operate mechanisms, lift loads, move objects. There are all kinds of sizes, from those that can move objects of a few grams, to large cranes like the ones we can see in scrapyards.
They are also fundamental components of a large number of everyday objects, such as doorbells, hard drives, motors, generators, speakers, relays, among many others.
We can use electromagnets in our electronics and robotics projects, for example, to incorporate them into a robotic arm, to build a small crane, or to attach them to a robot so that it can manipulate objects.
Price
We can find a wide variety of electromagnets and prices, depending on the force they are capable of exerting, from international sellers on eBay or AliExpress.
Thus, we find small electromagnets of 25N (2.5Kg) for about 3€, 50N (5Kg) for 5€, 100N (10Kg) for 6.5€, up to the largest ones of 800 (80Kg) or 1000 (100Kg) for 12 or 20€

How does an electromagnet work?
It has been known since ancient times that certain materials have the ability to attract or repel other objects. These materials are called natural magnets, and their discovery led to the study of magnetism.
Materials attracted by natural magnets are called ferromagnetic materials, and among them we have Iron, Cobalt, Nickel, and most of their alloys.
In reality, magnetic fields influence all types of material, but in the case of paramagnetic and diamagnetic materials, the effect is very small, so it is not appreciable except in enormous magnetic fields.
In 1820, the Dane Hans Christian Orsted discovered that electric currents can generate magnetic fields. Shortly thereafter, in 1824, the Briton William Sturgeron manufactured the first electromagnet, which was perfected by the American Joshep Henry in 1930.
Physically, an electromagnet consists of a coil wound around a ferromagnetic core. Usually, there is a large number of turns very close together. The turns are usually made of copper or aluminum, and have an insulating varnish to prevent electrical contact between them.
When a current is passed through a coil, a magnetic field is generated inside it, similar to what happens naturally in permanent magnets.
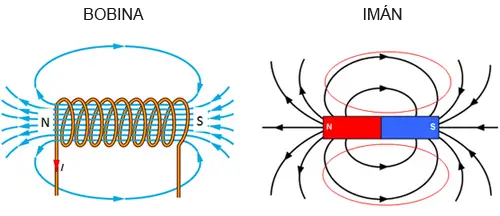
The ferromagnetic core of the electromagnet increases the effect of the magnetic field, as well as concentrating it and reducing losses due to dispersion.
Ferromagnetic materials are made up of magnetic domains, whose origin is the rotation of the electrons that make it up. At rest, these domains are randomly oriented, with the overall effect being zero.
In the presence of a magnetic field, the domains are oriented in the same direction, so the material begins to behave similarly to a natural magnet, enhancing the effects of the applied magnetic field.
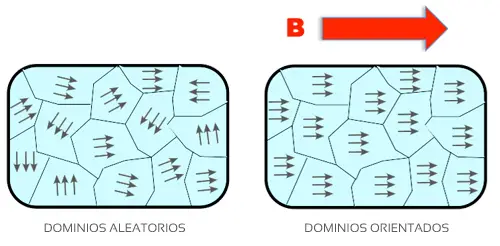
After a certain point of magnetic field intensity, all the domains are oriented. It is said that the material has reached saturation. After this point, increasing the current of the electromagnet results in a slight increase in the force exerted by the electromagnet.
On the other hand, when the magnetic field ceases, the domains tend to return to a random orientation, but they still have a certain preferred orientation. This residual magnetic field is called remanent magnetism. To eliminate this residual magnetism, it is necessary to apply a coercive field in the opposite direction, or to raise the temperature of the material above the Curie temperature.
Assembly diagram
The assembly diagram is not too complicated, we are simply going to use a MOSFET such as the IRF520N as a switch to control the activation of the electromagnet.
There are electromagnet models with nominal voltages of 6V, 12V, or 24V. The most common ones are 12V, but you should adjust this value for the component you have purchased.
We must also take into account the current required by the electromagnet. If it consumes more than 1A, we must add a heat sink to the IRF520N, or use another model of MOSFET or even a relay output.
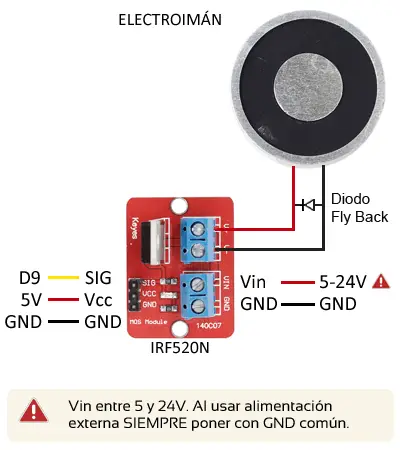
On the one hand, we power the module with a voltage between 6V to 24V, depending on our electromagnet model, using GND and Vin.
On the other hand, we connect the load using the connection terminal. Since the electromagnet is an inductive load, we must add a flyback protection diode, as we saw in the MOSFET entry.
Finally, we power the module’s electronics by connecting Vcc and GND to 5V and GND on Arduino, and connect the SIG Pin to any of the digital outputs of Arduino.
Code Example
The necessary code is simple, as to control the electromagnet we only need to use a digital output, as we saw in the digital outputs entry.
For example, the following code would simply turn the electromagnet on and off every 10 seconds.
const int pin = 9;

void setup() {
  pinMode(pin, OUTPUT);  //define pin as output
}

void loop(){
  digitalWrite(pin, HIGH);   // set Pin to HIGH
  delay(10000);               // wait for a second
  digitalWrite(pin, LOW);    // set Pin to LOW
  delay(10000);               // wait for a second
}Download the code
All the code from this post is available for download on Github.

