What is the ENC28J60?
The ENC28J60 is an Ethernet controller designed for embedded systems manufactured by Microchip Technology Inc. We can use the ENC28J60 together with a processor like Arduino to connect our electronics and robotics projects to the Internet.
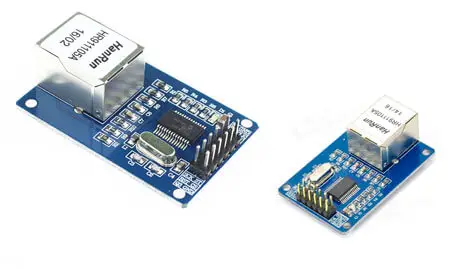
The ENC28J60 is controlled via the SPI bus, so the connection to Arduino is very simple. The ENC28J60 operates at 3.3V, but it is tolerant to 5V signals, making its integration even easier.
The ENC28J60 supports speeds of 10 Mbit/s and Full-Duplex and Half-Duplex modes with automatic polarity detection and correction. The ENC28J60 complies with the IEEE 802.3 10BASE-T specifications.
The ENC28J60 incorporates packet filtering to limit the number of incoming packets, an internal DMA module to facilitate data flow, and specific hardware for calculating IP checksums.
The ENC28J60 is one of the cheapest processors to provide connectivity to our projects, and it is cheaper than other alternatives such as the W5100.
However, the ENC28J60 lacks a hardware TCP/IP stack, as included in the W5100. Therefore, its use is more complex and requires a higher processor load.
Price
The ENC28J60 is a very cheap module, precisely one of its main advantages. We can find it for about €2.10, looking at international sellers on eBay or AliExpress.
Assembly diagram
The connection of an ENC28J60 Ethernet module is very simple since communication is done through SPI, as we saw in this post.
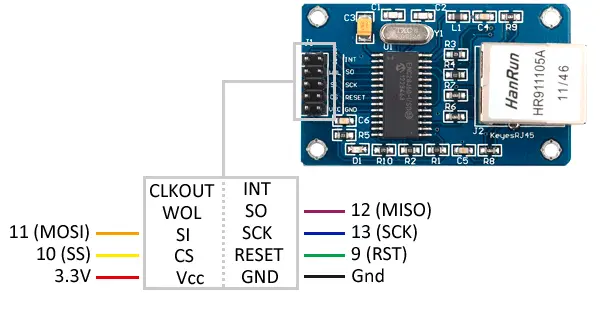
The connection in this case, seen from Arduino, would be as follows.
Code examples
To control the Ethernet ENC28J60 modules, we will use the Ethercard.h library available at this link.
The library provides several examples of ENC28J60 usage that it is advisable to review. The following examples are modifications based on those available in the library.
Ethernet Client - Read web pages
In this example, Arduino acts as a client, i.e., it connects to a web page to read it. Reading a complete page and dumping it into the serial port is very slow, and it is one of the examples of the limitations of Arduino compared to a computer.
However, it can be useful for Arduino to capture information from a server. For example, we can have it synchronize the time, read a series of parameters from a text file, perform a certain action if a file exists, etc.
To show in this example this capability to read data from a server on the Internet, we will use www.pasted.co, one of many web pages that allow us to add text to share with more people.
On the page http://www.pasted.co/2434bc64, I have pasted the text 1.2.3.4.5. We will use the ‘~’ as separators to find the desired text ‘1.2.3.4.5’, which simulates a series of parameters that we want to capture from a server.
The following example connects to this address and searches for the text 1.2.3.4.5, which it shows via the serial port. In a real example, we would use these values, for example, to control a robot, change the measurement parameters of a station, turn a device on or off, etc.
Arduino does not have enough power to manage the necessary encryption on https pages, so we can only read http pages.
#include <EtherCard.h>

static byte mymac[] = { 0xDD, 0xDD, 0xDD, 0x00, 0x01, 0x05 };
static byte myip[] = { 192, 168, 1, 177 };

byte Ethernet::buffer[700];
static uint32_t timer;

const char website[] PROGMEM = "www.pasted.co";
const char dataLocationC[] = "/2434bc64";

// called when the client request is complete
static void my_callback (byte status, word off, word len) {
  Serial.println(">>>");
  Ethernet::buffer[off+300] = 0;
  Serial.print((const char*) Ethernet::buffer + off);
  Serial.println("...");
}

void setup () {
  Serial.begin(57600);
  Serial.println(F("\n[webClient]"));

  if (ether.begin(sizeof Ethernet::buffer, mymac) == 0)
    Serial.println(F("Failed to access Ethernet controller"));
  if (!ether.dhcpSetup())
    Serial.println(F("DHCP failed"));

  ether.printIp("IP:  ", ether.myip);
  ether.printIp("GW:  ", ether.gwip);
  ether.printIp("DNS: ", ether.dnsip);

  if (!ether.dnsLookup(website))
    Serial.println("DNS failed");

  ether.printIp("SRV: ", ether.hisip);
}

void loop () {
  ether.packetLoop(ether.packetReceive());

  if (millis() > timer) {
    timer = millis() + 5000;
    Serial.println();
    Serial.print("<<< REQ ");

    // ether.browseUrl(PSTR(dataLocationC), "", website, my_callback); // No funciona en IDE Standard
    ether.browseUrl(PSTR("/2434bc64"), "", website, my_callback);  // En entorno IDE
  }
}
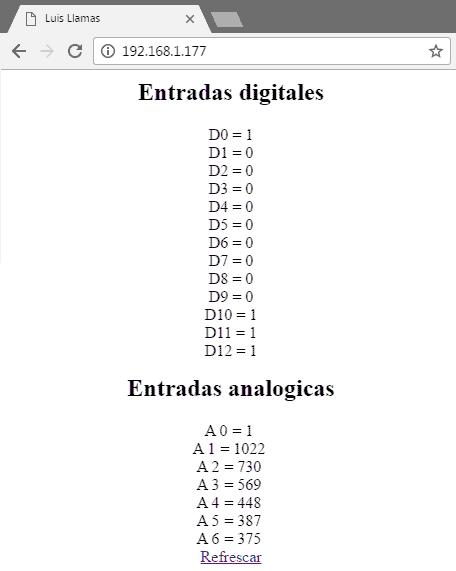
Ethernet Server - Visualize inputs
In the following Arduino code, it also acts as a server, i.e., it returns a web page when a client (a PC, a mobile, another Arduino, etc.) connects to it.
In this case, we are going to show a web page with the state of the digital and analog inputs of Arduino. To do this, we simply serve a text string in html, including the values of the inputs.
#include <EtherCard.h>

static byte mymac[] = { 0xDD, 0xDD, 0xDD, 0x00, 0x01, 0x05 };
static byte myip[] = { 192, 168, 1, 177 };
byte Ethernet::buffer[700];

void setup() {

  Serial.begin(9600);

  if (!ether.begin(sizeof Ethernet::buffer, mymac, 10))
    Serial.println("No se ha podido acceder a la controlador Ethernet");
  else
    Serial.println("Controlador Ethernet inicializado");

  if (!ether.staticSetup(myip))
    Serial.println("No se pudo establecer la dirección IP");
  Serial.println();
}

static word mainPage()
{
  BufferFiller bfill = ether.tcpOffset();
  bfill.emit_p(PSTR("HTTP/1.0 200 OKrn"
    "Content-Type: text/htmlrnPragma: no-cachernRefresh: 5rnrn"
    "<html><head><title>Luis Llamas</title></head>"
    "<body>"
    "<div style='text-align:center;'>"
    "<h1>Entradas digitales</h1>"
    "Tiempo transcurrido : $L s"
    "<br /><br />D00: $D"
    "<br /><br />D01: $D"
    "<br /><br />D02: $D"
    "<br /><br />D03: $D"
    "<br /><br />D04: $D"
    "<br /><br />D05: $D"
    "<br /><br />D06: $D"
    "<br /><br />D07: $D"
    "<br /><br />D08: $D"
    "<br /><br />D09: $D"
    "<br /><br />D10: $D"
    "<br /><br />D11: $D"
    "<br /><br />D12: $D"
    "<br /><br />D13: $D"

    "<h1>Entradas analogicas</h1>"
    "<br /><br />AN0: $D"
    "<br /><br />AN1: $D"
    "<br /><br />AN2: $D"
    "<br /><br />AN3: $D"
    "<br /><br />AN4: $D"
    "<br /><br />AN5: $D"
    "<br /><br />AN6: $D"
    "<br /><br />"
    "</body></html>"),
    millis() / 1000,
    digitalRead(0),
    digitalRead(1),
    digitalRead(2),
    digitalRead(3),
    digitalRead(4),
    digitalRead(5),
    digitalRead(6),
    digitalRead(7),
    digitalRead(8),
    digitalRead(9),
    digitalRead(10),
    digitalRead(11),
    digitalRead(12),
    digitalRead(13),
    analogRead(0),
    analogRead(1),
    analogRead(2),
    analogRead(3),
    analogRead(4),
    analogRead(5),
    analogRead(6));

  return bfill.position();
}

void loop()
{
  // wait for an incoming TCP packet, but ignore its contents
  if (ether.packetLoop(ether.packetReceive()))
  {
    ether.httpServerReply(mainPage());
  }
}
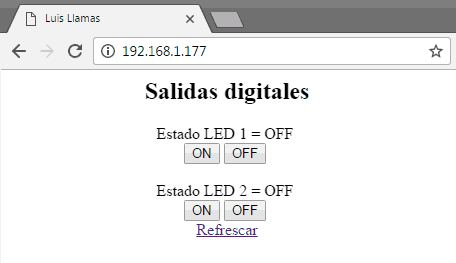
Ethernet Server - Control outputs
In this example, Arduino also acts as a server, but this time we want the user to be able to take actions on Arduino through the web page we serve.
In this case, we are going to control two digital outputs, to which we can connect a Led to visualize the response.
To do this, we first serve the web page similarly to the previous example, but in this one, we include two buttons for each output.
#include <EtherCard.h>

static byte mymac[] = { 0xDD, 0xDD, 0xDD, 0x00, 0x01, 0x05 };
static byte myip[] = { 192, 168, 1, 177 };
byte Ethernet::buffer[700];

const int pinLed1 = 13;
const int pinLed2 = A0;
char* statusLed1 = "OFF";
char* statusLed2 = "OFF";

void setup() {

  Serial.begin(9600);

  if (!ether.begin(sizeof Ethernet::buffer, mymac, 10))
    Serial.println("No se ha podido acceder a la controlador Ethernet");
  else
    Serial.println("Controlador Ethernet inicializado");

  if (!ether.staticSetup(myip))
    Serial.println("No se pudo establecer la dirección IP");
  Serial.println();

  pinMode(pinLed1, OUTPUT);
  pinMode(pinLed2, OUTPUT);
  digitalWrite(pinLed1, LOW);
  digitalWrite(pinLed2, LOW);
}

static word mainPage()
{
  BufferFiller bfill = ether.tcpOffset();
  bfill.emit_p(PSTR("HTTP/1.0 200 OKrn"
    "Content-Type: text/htmlrnPragma: no-cachernRefresh: 5rnrn"
    "<html><head><title>Luis Llamas</title></head>"
    "<body>"
    "<div style='text-align:center;'>"
    "<h1>Salidas digitales</h1>"
    "<br /><br />Estado LED 1 = $S<br />"
    "<a href='./?data1=0'><input type='button' value='OFF'></a>"
    "<a href='./?data1=1'><input type='button' value='ON'></a>"
    "<br /><br />Estado LED 2 = $S<br />"
    "<a href='./?data2=0'><input type='button' value='OFF'></a>"
    "<a href='./?data2=1'><input type='button' value='ON'></a>"
    "<br /></div>\n</body></html>"), statusLed1, statusLed2);

  return bfill.position();
}

void loop()
{
  word len = ether.packetReceive();
  word pos = ether.packetLoop(len);

  if (pos)
  {
    if (strstr((char *)Ethernet::buffer + pos, "GET /?data1=0") != 0) {
      Serial.println("Led1 OFF");
      digitalWrite(pinLed1, LOW);
      statusLed1 = "OFF";
    }

    if (strstr((char *)Ethernet::buffer + pos, "GET /?data1=1") != 0) {
      Serial.println("Led1 ON");
      digitalWrite(pinLed1, HIGH);
      statusLed1 = "ON";
    }

    if (strstr((char *)Ethernet::buffer + pos, "GET /?data2=0") != 0) {
      Serial.println("Led2 OFF recieved");
      digitalWrite(pinLed2, LOW);
      statusLed2 = "OFF";
    }

    if (strstr((char *)Ethernet::buffer + pos, "GET /?data2=1") != 0) {
      Serial.println("Led2 ON");
      digitalWrite(pinLed2, HIGH);
      statusLed2 = "ON";
    }

    ether.httpServerReply(mainPage());
  }
}
Download the code
All the code from this post is available for download on Github. 
