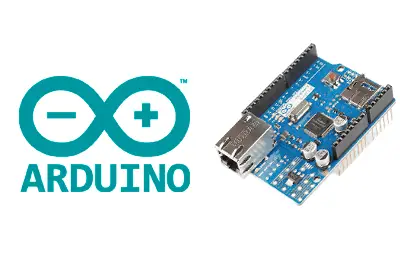
What is the W5100?
The W5100 is an Ethernet controller manufactured by Wiznet, specially designed for embedded applications. We can use this controller with a processor like Arduino to implement internet communication.
The W5100 is designed to facilitate the implementation of internet connectivity without the need for an operating system, making it interesting for MCUs and IoT applications.
It includes a hardware TCP/IP stack and an internal 16 Kbyte buffer for Tx/Rx. This allows the processor to be freed from these tasks, being one of its main advantages over other Ethernet controllers such as the ENC28J60.
The W5100 can be connected via SPI, making the connection with most processors very simple. Some modules incorporate an SD card reader, where we can store files (html, txt, jpg, png) to work with when acting as a server.
It supports speeds of 10/100 Mbits/s, supporting Full-Duplex and Half-Duplex modes with automatic polarity detection and correction. It complies with the IEEE 802.3 10BASE-T and 802.3u 100BASE-TX specifications. The TCP/IP stack supports TCP, UDP, IPv4, ICMP, ARP, IGMP, and PPPoE connections, and up to 4 simultaneous connections.
The W5100 is a widely used chip in connected devices in industrial applications, home automation, and IoT. For example, among many others, smart screens and TVs, internet-activated relays, printers, IP cameras, or network storage devices.
We can use an Ethernet module with W5100 in our projects to send or receive information from the Internet or an internal network, for example, to read a sensor, or to activate, control, or deactivate any device.
However, it should be noted that Arduino, due to its limited memory and processor capabilities, is not the best machine for performing complex operations such as serving web pages. For this, it is better to consider the use of more powerful processors such as the STM32 or the ESP8266, or even a microcomputer like the Orange Pi, Raspberry Pi.
Price
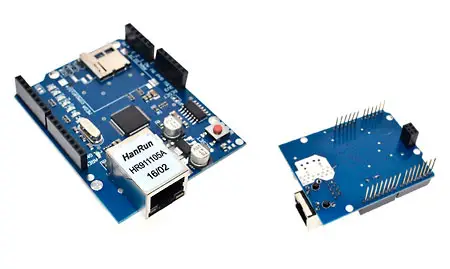
There are different modules that mount the W5100. These modules have the necessary electronics to connect to Arduino easily, and a standard RJ45 connector for Ethernet.
The most common is the Ethernet Shield, which has the advantage of being very easy to connect since it is stackable. These modules usually include a micro SD reader. As a disadvantage, they will only serve us if we use an Arduino UNO or Mega. We can find it for 4.80€, looking at international sellers on eBay or AliExpress.
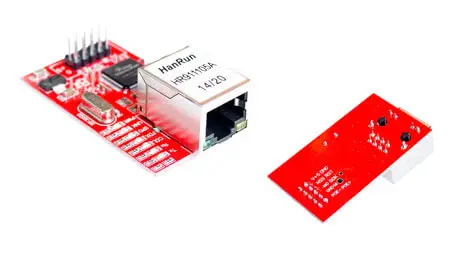
There are also independent modules with W5100. They have the advantage of being more compact and can be used with all kinds of MCUs, such as Arduino Mini and Nano, Teensy, or STM32. As a disadvantage, we will logically have to wire the connection. They are slightly cheaper, we can find them for 4.00€
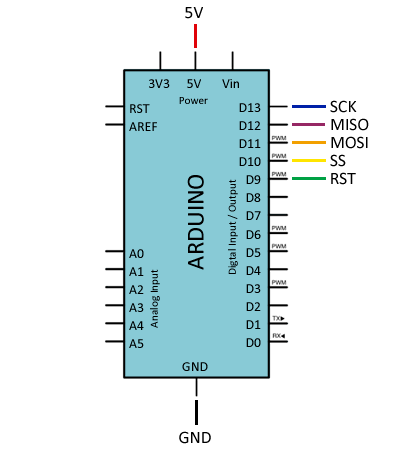
Assembly diagram
The connection will depend on the model we are using. In the case of using an Ethernet Shield with W5100, the connection is immediate. We only have to attach it to Arduino Uno or Mega.
If we use an independent module with W5100, we will have to make the wiring, but it is equally simple since the connection is made through SPI as we saw in this post.
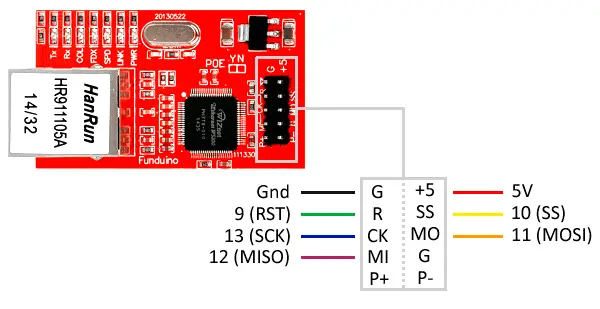
The connection in this case, seen from Arduino, would be as follows.
Code examples
To control the Ethernet modules with W5100, we will use the Ethernet.h library, which is integrated into the Arduino IDE itself.
The library provides several examples of W5100 usage that it is advisable to review. The following examples are modifications based on those available in the library.
Ethernet Client - Read web pages
In this example, Arduino acts as a client, i.e., it connects to a web page to read it. Reading a complete page and dumping it through the serial port is very slow, and it is one of the demonstrations of Arduino’s limitations compared to a computer.
However, it can be useful for Arduino to capture information from a server. For example, we can make it synchronize the time, read a series of parameters from a text file, perform a certain action if a file exists, etc.
To show in this example this capability of reading data from a server on the Internet, we are going to use www.pasted.co, one of many websites that allow us to add a text to share with more people.
On the page http://www.pasted.co/2434bc64, I have pasted the text 1.2.3.4.5. The ’~’ will be used as separators to find the desired text ‘1.2.3.4.5’, which simulates a series of parameters that we want to capture from a server.
The following example connects to this address and searches for the text 1.2.3.4.5, which it shows via the serial port. In a real example, we would use these values, for example, to control a robot, change the measurement parameters of a station, turn a device on or off, etc.
Arduino does not have enough power to handle the encryption required on https pages, so we can only read http pages.
#include <SPI.h>
#include <Ethernet.h>

byte mac[] = { 0xDE, 0xAD, 0xBE, 0xEF, 0xFE, 0xED };
IPAddress ip(192, 168, 1, 177);
EthernetClient client;

char serverC[] = "www.pasted.co";
char dataLocationC[] = "/2434bc64 HTTP / 1.1";

void setup()
{
   Serial.begin(9600);

   if (Ethernet.begin(mac) == 0)
   {
      Serial.println("Failed to configure Ethernet using DHCP");
      Ethernet.begin(mac, ip);
   }

   delay(1000);
   Serial.println("connecting...");

   if (client.connect(serverC, 80))
   {
      Serial.println("connected");
      client.print("GET ");
      client.println(dataLocationC);
      client.print("Host: ");
      client.println(serverC);
      client.println();
   }
   else
   {
      Serial.println("connection failed");
   }
}

void loop()
{
   if (client.available())
   {
      char c = client.read();
      if (c == '~')
      {
         while (client.available())
         {
            c = client.read();
            if (c == '~')
            {
               client.stop();
               client.flush();
               break;
            }
            Serial.print(c);
         }

      }
   }

   if (!client.connected())
   {
      Serial.println();
      Serial.println("disconnecting.");
      client.stop();

      // do nothing
      while (true);
   }
}
Ethernet Server - View inputs
In the following Arduino code acts as a server, i.e., it returns a web page when a client (a PC, a mobile, another Arduino…) connects to it.
In this case, we are going to show a web page with the status of the digital and analog inputs of the Arduino. To do this, we simply serve a text string in html, in which we include the input values.
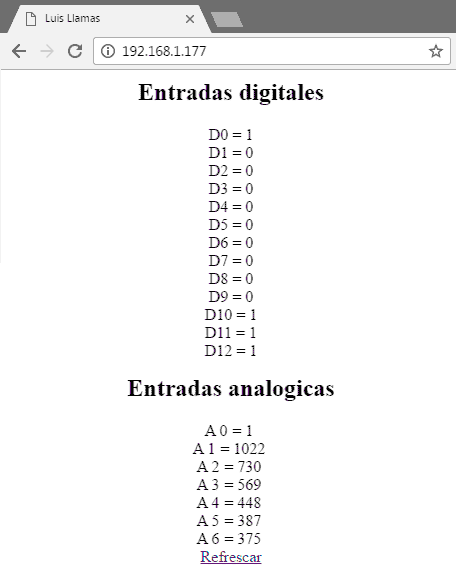
To view the page, simply access the Arduino’s IP address (192.168.1.177 in the example) from any browser. The computer must be connected to the same local network as the Arduino. If we want to connect from the Internet, we must define a bridge connection in the router that directs the external IP to the Arduino’s local IP.
#include <SPI.h>
#include <Ethernet.h>

byte mac[] = { 0xDE, 0xAD, 0xBE, 0xEF, 0xFE, 0xED };
IPAddress ip(192, 168, 1, 177);
EthernetServer server(80);

void setup()
{
  Serial.begin(9600);

  Ethernet.begin(mac, ip);
  server.begin();

  Serial.print("server is at ");
  Serial.println(Ethernet.localIP());
}

void loop()
{
  EthernetClient client = server.available();
  if (client)
  {
    Serial.println("new client");
    bool currentLineIsBlank = true;
    String cadena = "";
    while (client.connected())
    {
      if (client.available())
      {
        char c = client.read();
        Serial.write(c);

        // Upon receiving a blank line, serve the page to the client
        if (c == '\n' && currentLineIsBlank)
        {
          client.println(F("HTTP/1.1 200 OK\nContent-Type: text/html"));
          client.println();

          client.println(F("<html>\n<head>\n<title>Luis Llamas</title>\n</head>\n<body>"));
          client.println(F("<div style='text-align:center;'>"));

          client.println(F("<h2>Digital inputs</h2>"));
          for (int i = 0; i < 13; i++)
          {
            client.print("D");
            client.print(i);
            client.print(" = ");
            client.print(digitalRead(i));
            client.println(F("<br />"));
          }
          client.println("<br /><br />");

          client.println(F("<h2>Analog inputs</h2>"));
          for (int i = 0; i < 7; i++)
          {
            client.println("A");
            client.println(i);
            client.println(" = ");
            client.println(analogRead(i));
            client.println(F("<br />"));
          }

          client.println(F("<a href='http://192.168.1.177'>Refresh</a>"));
          client.println(F("</div>\n</body></html>"));
          break;
        }
        if (c == '\n')
        {
          currentLineIsBlank = true;
        }
        else if (c != '\r')
        {
          currentLineIsBlank = false;
        }
      }
    }

    delay(1);
    client.stop();
  }
}
Ethernet Server - Control outputs
In this example, Arduino also acts as a server, but this time we want the user to be able to perform actions on Arduino through the web page we serve.
In this case, we are going to control two digital outputs, to which we can connect an LED to visualize the response.
To do this, first we serve the web page in a similar way to the previous example, but this time we include two buttons for each output.
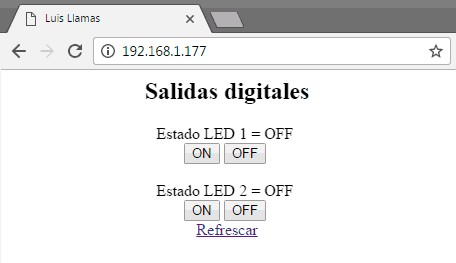
When clicking on each button, a new request is made to Arduino, with a different URL than the original. Arduino captures the new request and uses the received URL to perform the necessary actions.
#include <SPI.h>
#include <Ethernet.h>

byte mac[] = { 0xDE, 0xAD, 0xBE, 0xEF, 0xFE, 0xED };
IPAddress ip(192, 168, 1, 177);
EthernetServer server(80);

const int pinLed1 = A0;
const int pinLed2 = 3;

void setup()
{
  Serial.begin(9600);

  Ethernet.begin(mac, ip);
  server.begin();

  Serial.print("server is at ");
  Serial.println(Ethernet.localIP());

  pinMode(pinLed1, OUTPUT);
  pinMode(pinLed2, OUTPUT);
  digitalWrite(pinLed1, LOW);
  digitalWrite(pinLed2, LOW);
}

void loop()
{
  EthernetClient client = server.available();
  if (client)
  {
    Serial.println("new client");
    bool currentLineIsBlank = true;
    String cadena = "";
    while (client.connected())
    {
      if (client.available())
      {
        char c = client.read();
        Serial.write(c);

        if (cadena.length()<50)
        {
          cadena.concat(c);

           // Search for data field
          int position = cadena.indexOf("data");
          String command = cadena.substring(position);

          if (command == "data1=0")
          {
            digitalWrite(pinLed1, HIGH);
          }
          else if (command == "data1=1")
          {
            digitalWrite(pinLed1, LOW);
          }
          else if (command == "data2=0")
          {
            digitalWrite(pinLed2, LOW);
          }
          else if (command == "data2=1")
          {
            digitalWrite(pinLed2, HIGH);
          }
        }

        // Upon receiving a blank line, serve the page to the client
        if (c == '\n' && currentLineIsBlank)
        {
          client.println(F("HTTP/1.1 200 OK\nContent-Type: text/html"));
          client.println();

          client.println(F("<html>\n<head>\n<title>Luis Llamas</title>\n</head>\n<body>"));
          client.println(F("<div style='text-align:center;'>"));
          client.println(F("<h2>Digital outputs</h2>"));

          client.print(F("LED 1 state = "));
          client.println(digitalRead(pinLed1) == LOW ? "OFF" : "ON");
          client.println(F("<br/>"));
          client.println(F("<button onClick=location.href='./?data1=0'>ON</button>"));
          client.println(F("<button onClick=location.href='./?data1=1'>OFF</button>"));
          client.println(F("<br/><br/>"));

          client.print(F("LED 2 state = "));
          client.println(digitalRead(pinLed2) == LOW ? "OFF" : "ON");
          client.println(F("<br/>"));
          client.println(F("<button onClick=location.href='./?data2=0'>ON</button>"));
          client.println(F("<button onClick=location.href='./?data2=1'>OFF</button>"));
          client.println(F("<br/>"));

          client.println(F("<a href='http://192.168.1.177'>Refresh</a>"));
          client.println(F("</div>\n</body></html>"));
          break;
        }
        if (c == '\n')
        {
          currentLineIsBlank = true;
        }
        else if (c != '\r')
        {
          currentLineIsBlank = false;
        }
      }
    }

    delay(1);
    client.stop();
  }
}
Download the code
All the code from this post is available for download on Github. 
