What is an external EEPROM AT24C256?
The AT24C256 is an integrated circuit that incorporates an EEPROM (Electrically Erasable and Programmable Read Only Memory) that can be accessed through the I2C bus.
We can connect this external EEPROM to processors such as Arduino to store variables that persist between reboots or when power is lost.
The AT24C256 EEPROM has 256 Kb, organized in 32,768 one-byte cells. Up to 4 devices can be connected on the same I2C bus for a total of 1 Mbit (128 KBytes).
The AT24C256 is part of a family of external EEPROMs manufactured by Atmel which includes the models AT24C256 (256 Kb), AT24C512 (512 Kb), and AT24C1024 (1024 Kb). All models are incorporated in the form of an 8-pin integrated circuit.
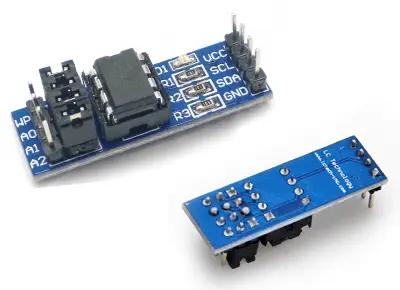
One of the advantages of the AT24C256 compared to the rest of the modules in the family is that there are commercial modules that integrate this EEPROM, designed to connect easily with Arduino. These modules include a socket where any integrated circuit from the family can be easily mounted.
Like all EEPROMs, the AT24C256 has a lifespan that depends on the number of write cycles. In the AT24C256, this lifespan is very high, with 1,000,000 guaranteed write cycles (compared to 100,000 for the Arduino internal EEPROM). The writing time is 5ms.
The AT24C256 EEPROM is a low-power device. The consumption during writing is 3mA, during reading 400 µA, and 500 nA in Standby. There are two models with different power supply voltages, one from 2.7 to 5.5V, and the other from 1.8V to 3.6V.
We can use the AT24C256 to store variables that need to persist between reboots, such as calibration values, detect when Arduino has lost power, save a counter, or make a datalogger.
Remember that Arduino has its own integrated EEPROM memory. For more information, see the entry Save variables in Arduino’s non-volatile EEPROM memory
Price
The external EEPROM AT24C256 is an inexpensive device. It can be found integrated into a module for easy connection to Arduino for 0.75€, by searching international sellers on eBay or AliExpress.
If instead of acquiring the module, we want to acquire the independent integrated circuit, we can find the AT24C256 for 0.20€, the AT24C512 for 0.40€, and the AT24C1024 for 1.15€.
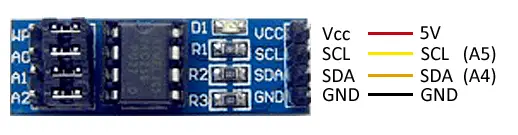
Connection scheme
The connection is simple, we simply power the module from Arduino using GND and 5V and connect the SDA and SCL pins of Arduino to the corresponding pins of the sensor.
While the connection seen from the Arduino side would look like this.
On Arduino Uno, Nano, and Mini Pro, SDA is pin A4 and SCK is pin A5. For other Arduino models, consult the corresponding pinout diagram
Verify that your EEPROM model is compatible with 5V before connecting it to Arduino. If not, you will have to use a level shifter.
Code examples
The following example shows the process of reading and writing to the external EEPROM AT24C256 via the I2C bus.
//Vcc - 5V
//GND - GND
//SDA - A4
//SCL - A5

#include <Wire.h>
const int eepromAddress = 0x50;

// Read functions based on the work of
// Author: hkhijhe
// Date : 01 / 10 / 2010
void i2c_eeprom_write_byte(int deviceaddress, unsigned int eeaddress, byte data) {
  int rdata = data;
  Wire.beginTransmission(deviceaddress);
  Wire.write((int)(eeaddress >> 8)); // MSB
  Wire.write((int)(eeaddress & 0xFF)); // LSB
  Wire.write(rdata);
  Wire.endTransmission();
}

// WARNING: address is a page address, 6-bit end will wrap around
// also, data can be maximum of about 30 bytes, because the Wire library has a buffer of 32 bytes
void i2c_eeprom_write_page(int deviceaddress, unsigned int eeaddresspage, byte* data, byte length) {
  Wire.beginTransmission(deviceaddress);
  Wire.write((int)(eeaddresspage >> 8)); // MSB
  Wire.write((int)(eeaddresspage & 0xFF)); // LSB
  byte c;
  for (c = 0; c < length; c++)
    Wire.write(data[c]);
  Wire.endTransmission();
}

byte i2c_eeprom_read_byte(int deviceaddress, unsigned int eeaddress) {
  byte rdata = 0xFF;
  Wire.beginTransmission(deviceaddress);
  Wire.write((int)(eeaddress >> 8)); // MSB
  Wire.write((int)(eeaddress & 0xFF)); // LSB
  Wire.endTransmission();
  Wire.requestFrom(deviceaddress, 1);
  if (Wire.available()) rdata = Wire.read();
  return rdata;
}

// maybe let's not read more than 30 or 32 bytes at a time!
void i2c_eeprom_read_buffer(int deviceaddress, unsigned int eeaddress, byte *buffer, int length) {
  Wire.beginTransmission(deviceaddress);
  Wire.write((int)(eeaddress >> 8)); // MSB
  Wire.write((int)(eeaddress & 0xFF)); // LSB
  Wire.endTransmission();
  Wire.requestFrom(deviceaddress, length);
  int c = 0;
  for (c = 0; c < length; c++)
    if (Wire.available()) buffer[c] = Wire.read();
}

void setup()
{
  Wire.begin();
  Serial.begin(9600);

  // Example data
  char somedata[] = "data stored in the EEPROM";

  // Write example to memory
  i2c_eeprom_write_page(eepromAddress, 0, (byte *)somedata, sizeof(somedata));
  delay(10);

  Serial.println(F("Initial write completed"));
}

void loop()
{
  // Read the first byte of memory
  int addr = 0;
  byte value = i2c_eeprom_read_byte(eepromAddress, addr);

  // Read and print the character as long as it is not '0'
  while (value != 0)
  {
    Serial.print((char)value);
    addr++;
    value = i2c_eeprom_read_byte(0x50, addr);
  }
  Serial.println(" ");
  delay(20000);
}
Download the code
All the code from this post is available for download on Github. 
