What is an MQ gas sensor?
MQ gas sensors are a family of devices designed to detect the presence of various chemical components in the air. We can connect these devices to a controller or processor such as Arduino.
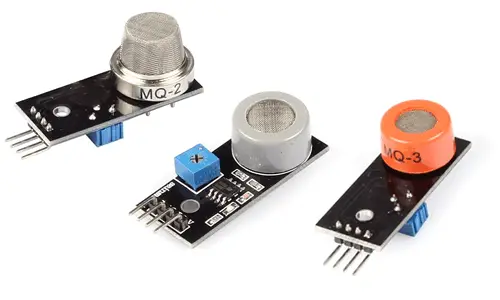
There is a wide variety of MQ sensors. Each model is designed to detect one or more substances, intended for specific uses, such as detecting flammable gases, air quality, or alcohol detection in exhaled air.
MQ gas sensors are usually provided with a standard measuring board with the LMC662 comparator or similar, which allows obtaining the reading as both an analog value and a digital value when a certain threshold regulated through a potentiometer on the board is exceeded.
Gas sensors must be calibrated before obtaining an accurate measurement. Even calibrated, these sensors do not provide the necessary guarantee to be part of a safety system.
Do not use these sensors in applications that depend on the safety of people or equipment.
Despite their limitations, MQ gas sensors are widely used in DIY electronics projects with Arduino. For example, we can turn on or off a fan based on air quality, create a small breathalyzer, or a smoke alarm.
Price
MQ gas sensors are relatively inexpensive devices. The price varies from one model to another but, in general, ranges between 1 to 1.5€, from international sellers on eBay and AliExpress.
How does a gas sensor work?
MQ sensors are composed of an electrochemical sensor that changes its resistance when in contact with substances.
Gas sensors are devices with high inertia, meaning the response requires long times to stabilize after a change in the concentration of the measured gases. This is due to the physical need for the gas to leave the sensitive material, which is a slow process.
All MQ models have a heater necessary to raise the sensor’s temperature, and for its materials to become sensitive. Until the heater reaches the operating temperature, the sensor’s reading will not be reliable.
The warm-up time depends on each sensor model. In most models, a few minutes are sufficient, but some models require up to 12 and 48 hours to obtain stable measurements.
On the other hand, each model requires its own voltage to power the heater. In many models, this voltage is 5V, but some models have special power supply requirements.
The consumption of MQ sensors can be high due to the heat necessary to operate the heater, which can reach up to 800 mW in some models. This is higher than the power that the Arduino regulator can supply, so an external power source will be necessary.
Below is a summary table with the different sensor models available, the gases they are sensitive to, and some data about the heater.
However, it is advisable to consult the Datasheet of each particular MQ sensor before using it to detail its technical specifications, especially the heater’s supply voltage, warm-up time, and the sensor’s sensitivity curve.
| Modelo | Sustancias detectadas | Calentador |
| MQ-2 | Metano, butano, GLP, humo | 5V |
| MQ-3 | Alcohol, Etanol, humo | 5V |
| MQ-303A | Alcohol, etanol, humo | 0.9V |
| MQ-4 | Metano, gas natural comprimido (GNP) | 5V |
| MQ-5 | Gas natural, GLP | 5V |
| MQ-6 | Butano, GLP | 5V |
| MQ-306A | Butano, GLP | 0.9V |
| MQ-7 | Monóxido de carbono | Alternado 5V y 1.4V |
| MQ-307A | Monóxido de carbono | Alternado 0.2 y 0.9V |
| MQ-8 | Hidrógeno | 5V |
| MQ-9 | Monóxido de carbono, gases inflamables | Alternado 5V y 1.5V |
| MQ-309A | Monóxido de carbono, gases inflamables | Alternado 0.2 y 0.9V |
| MQ-131 | Ozono | 6V |
| MQ-135 | Benceno, alcohol, humo, calidad del aire | 5V |
| MQ-136 | Ácido sulfhídrico | 5V |
| MQ-137 | Amoniaco | 5V |
| MQ-138 | Benceno, tolueno, alcohol, acetona, propano, formaldeido, hidrógeno | 5V |
| MQ-214 | Metano, gas natural | 5V |
| MQ-216 | Gas natural, gas carbón | 6V |
| MG-811 | Dióxido de cargono | 6V |
| AQ-104 | Calidad del aire * | |
| AQ-2 | Gases inflamables, humo | |
| AQ-3 | Alcohol, Benceno | |
| AQ-7 | Monóxido de carbono |
* Amplification is recommended
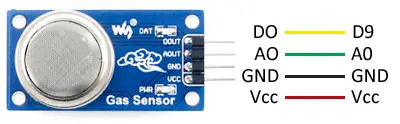
Assembly diagram
The electrical schematic is simple. We power the module by connecting GND and 5V to the corresponding pins on Arduino.
Now, if we want to use the digital reading, we connect the DO output to one of the digital inputs of Arduino.
Optionally, we can calibrate the digital output trigger threshold with the potentiometer installed on the module.
The connection from Arduino would look like this,
If we wanted to use the analog value, we would simply connect the sensor’s AO output to an analog input of Arduino.
Code examples
Digital reading
The following example shows the digital reading of the sensor. The code is very simple; we just use a digital input to check the sensor’s state, using the serial port to report the detection. In a real example, we would take the appropriate actions upon detection.
const int MQ_PIN = 2;
const int MQ_DELAY = 2000;

void setup()
{
  Serial.begin(9600);
}

void loop()
{
  bool state= digitalRead(MQ_PIN);

  if (!state)
  {
    Serial.println("Detection");
  }
  else
  {
    Serial.println("Not detected");
  }
  delay(MQ_DELAY);
}
Analog reading
In the following example, we perform the analog reading of the sensor. Like the previous one, the code is very simple. We just use any analog input to read the sensor’s analog output and display the result via the serial port.
const int MQ_PIN = A0;
const int MQ_DELAY = 2000;

void setup()
{
  Serial.begin(9600);
}

void loop()
{
  int raw_adc = analogRead(MQ_PIN);
  float value_adc = raw_adc * (5.0 / 1023.0);

  Serial.print("Raw:");
  Serial.print(raw_adc);
  Serial.print("    Voltage:");
  Serial.println(value_adc);

  delay(MQ_DELAY);
}
Reading the concentration
In the following example, we use analog reading to determine the concentration of the gas, usually in ppm (parts per million), but some sensors use other units such as mg/L or ppb (parts per billion).
The Datasheet of each sensor provides graphs that allow obtaining the gas concentration from the relationship between the sensor’s resistance R0 and the measured resistance Rs. It is also necessary to know the resistance Rl used in the module to read the MQ sensor.
For example, the following image shows the concentration curves of each gas measured in an MQ-2 sensor
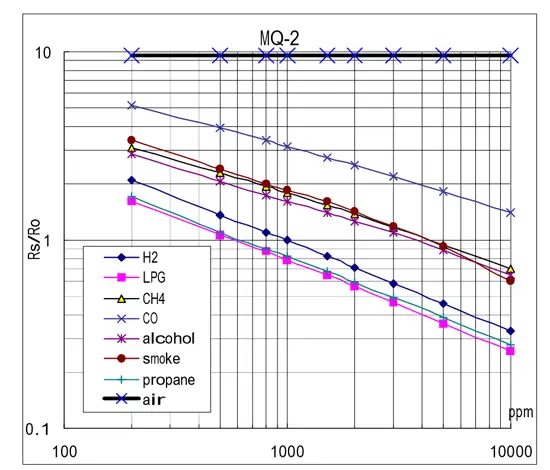
You will need to refer to the concentration curves in the Datasheet of the sensor you are using.
The graphs are plotted on a logarithmic scale for both axes and, in general, are approximately straight under these scales. So, the concentration will be,
To determine the concentration, we need the line that approximates it, for which we must take any two points from the graphs P0 = {X0, Y0} and P1 = {X1, Y1}, resulting in the equation of the line
Where
const int MQ_PIN = A0;    // Sensor pin
const int RL_VALUE = 5;    // RL resistance of the module in Kilo ohms
const int R0 = 10;          // Sensor R0 resistance in Kilo ohms

// Data for multiple readings
const int READ_SAMPLE_INTERVAL = 100;    // Time between samples
const int READ_SAMPLE_TIMES = 5;     // Number of samples

// Adjust these values for your sensor according to the Datasheet
// (optionally, according to the calibration you have performed)
const float X0 = 200;
const float Y0 = 1.7;
const float X1 = 10000;
const float Y1 = 0.28;

// Concentration curve points {X, Y}
const float point0[] = { log10(X0), log10(Y0) };
const float point1[] = { log10(X1), log10(Y1) };

// Calculate slope and abscissa coordinate
const float scope = (point1[1] - point0[1]) / (point1[0] - point0[0]);
const float coord = point0[1] - point0[0] * scope;

void setup()
{
  Serial.begin(9600);
}

void loop()
{
  float rs_med = readMQ(MQ_PIN);    // Get the average Rs
  float concentration = getConcentration(rs_med/R0);  // Get the concentration

  // Display the concentration value via serial
  Serial.println("Concentration: ");
  Serial.println(concentration);
}

// Get the average resistance in N samples
float readMQ(int mq_pin)
{
  float rs = 0;
  for (int i = 0;i<READ_SAMPLE_TIMES;i++) {
    rs += getMQResistance(analogRead(mq_pin));
    delay(READ_SAMPLE_INTERVAL);
  }
  return rs / READ_SAMPLE_TIMES;
}

// Get resistance from analog reading
float getMQResistance(int raw_adc)
{
  return (((float)RL_VALUE / 1000.0*(1023 - raw_adc) / raw_adc));
}

// Get concentration 10^(coord + scope * log (rs/r0)
float getConcentration(float rs_ro_ratio)
{
  return pow(10, coord + scope * log(rs_ro_ratio));
}
Download the code
All the code from this post is available for download on Github. 
