What is an infrared remote control?
A remote control is a control device that uses an infrared LED to send a signal to the receiver. The signal can be detected to control a robot or processor like Arduino.
We are all used to using infrared remote controls for television, DVD, music equipment… In fact, it is possible to emulate any of these controls, which allows us to control these devices from Arduino.
A remote control uses a light emitter in the near-infrared, invisible to the human eye, but easily detected by an infrared receiver.
It is possible to see the light of the remote control by looking at the infrared LED with a digital camera, for example a mobile phone. The LED light appears as a purple glow. This can be useful to detect if the remote control is working correctly.
By using light as a transmission medium, remote controls need a direct line of sight with the receiver. The beam can be reflected by reflective surfaces, such as mirrors.
The range is limited, typically less than 3m. The distance strongly depends on the emission angle, decreasing rapidly as we deviate from the front direction.
We can use a remote control as a remote control to control Arduino. We can, for example, turn a lighting or sound system on or off, turn a device on or off via a relay, or control a robot or vehicle.
On the other hand, it is also possible to use Arduino to clone a remote control and, for example, turn on the television via a smartphone, time the turn-on of a music equipment, or turn on the air conditioning via the internet.
Price
In the field of hobbies and DIY electronics, we can find kits specially designed for Arduino, which include an HX1838 or similar remote control and receiver installed in a module to easily connect to Arduino.
We can find this type of kits for 0.75 by searching from international sellers on eBay or AliExpress.
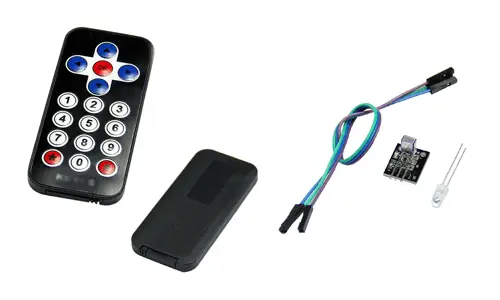
If we only want the receiver, for example, because we want to control more than one device or because we want to use the control of some device (TV, DVD, etc), we can purchase only the HX1838 receiver for about 0.10€.
How does an infrared remote control work?
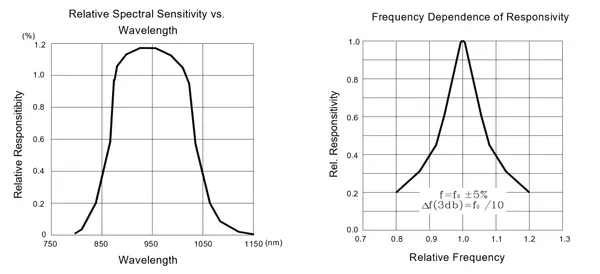
A remote control transmits a certain message to the receiver using infrared light as a transmission system. The light used is typically in the 940 nm range.
As in any transmission, the message has to follow certain rules (pulse shape, duration, content…) that must be known both by the transmitter and the receiver for the communication to be correct.
However, there is no single protocol adopted as a standard. Instead, each manufacturer has developed their own. Thus, we have Philips’ RC-5 and RC-6, Sony’s SIRC, Nippon Electronic Company’s NEC protocol, among many others.
On the other hand, the message is never sent directly as a pulse, but it is sent modulated on a carrier wave. This is done to improve noise rejection and the control signal is sent modulated on a carrier wave. The carrier wave frequency depends on the protocol used but, in general, varies between 36-50 kHz, with the most common around 38 kHz.
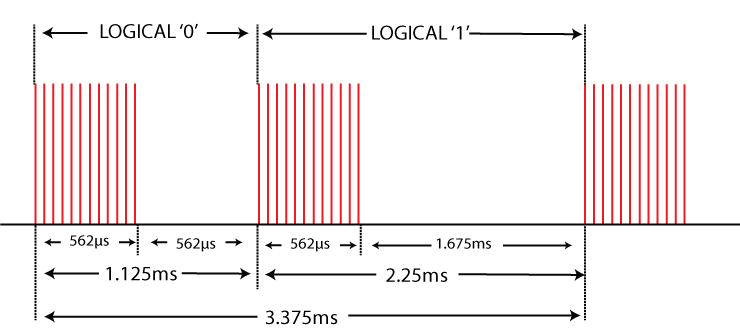
One of the most common protocols, which is the one we will use with Arduino, is the NEC protocol, which uses a 38 kHz carrier wave and pulse distance modulation (PDM).
The carrier wave has a period of 26µs, and the transmitted signal distinguishes between 0 and 1 by the duration of the pulses, being:
- Logical 0 - A pulse of 562.5µs followed by a space of 562.5µs.
- Logical 1 - A pulse of 562.5µs followed by a space of 1.675µs.
As for the content of the sent message, the NEC protocol sends an 8-bit address and an 8-bit command. This means that up to 256 devices can be controlled without interfering with each other, and up to 256 different commands can be sent.
A peculiarity of the NEC protocol is that each block is sent twice, once normal and once negated, as error prevention systems. The transmission begins with a 9ms signal, followed by a 4.5ms space.
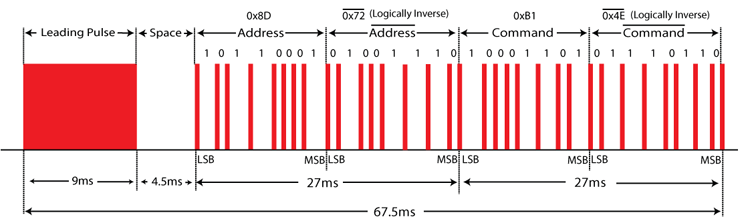
Therefore, the complete signal is the complete signal:
- Pulse 9ms + space 4.5ms
- 8 bits, receiver address
- 8 bits, inverted receiver address
- 8 bits, sent command
- 8 bits, inverted sent command
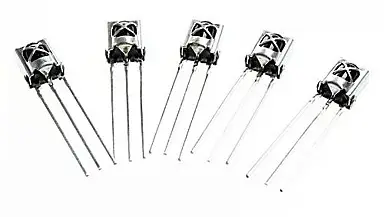
Finally, to receive the control signal, specific receivers such as the AX-1838HS (HX1838) are used. These receivers are normally three-terminal devices, consisting of an infrared sensor that includes a demodulator in the 36-38kHz band, a PCM (Pulse Code Modulation) filter, and preamplification for rejection of ambient light.
In this way, the output that reaches Arduino is the already demodulated digital signal, which greatly simplifies the process compared to having to use a photodiode and perform the calculations ourselves.
Assembly diagram
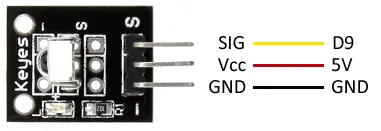
If we use a module with the integrated receiver, the connection is simple. We power the module by connecting Vcc and Gnd, respectively, to 5V and Vcc of Arduino.
On the other hand, we connect the Sig output of the module to any digital input of Arduino. In the example, we will use D9, but you can use any digital input.
Therefore, the connection is as shown in the following diagram,
Which, when viewed from the Arduino side, results in,
If you want to use the receiver directly, you should consult the datasheet of the receiver to verify its assembly diagram. In the case of the AX-1838HS (HX1838), it is as follows, where, at least, the 100Ω resistor is mandatory and the rest are optional (commercial modules only incorporate the 100Ω resistor).
Code examples
There are multiple libraries for using remote controls with Arduino. We will use the Arduino-IRremote library developed by Rafi Khan (z3t0) available at this link.
The following code reads the value received by the remote control and displays it on the screen. The code is shown in hexadecimal format.
#include <IRremote.h>

const int RECV_PIN = 9;

IRrecv irrecv(RECV_PIN);
decode_results results;

void setup()
{
  Serial.begin(9600);
  irrecv.enableIRIn();
}

void loop()
{
  if (irrecv.decode(&results))
  {
    Serial.println(results.value, HEX);
    irrecv.resume();
  }
}
The following example uses the hexadecimal command to print the pressed key to the serial port. The key will depend on the remote control we are using, but it serves as an example of how to act if different codes are received.
#include <IRremote.h>

const int KEY_UP = 0xFF629D;
const int KEY_LEFT = 0xFF22DD;
const int KEY_OK = 0xFF02FD;
const int KEY_RIGHT = 0xFFC23D;
const int KEY_DOWN = 0xFFA857;
const int KEY_1 = 0xFF6897;
const int KEY_2 = 0xFF9867;
const int KEY_3 = 0xFFB04F;
const int KEY_4 = 0xFF30CF;
const int KEY_5 = 0xFF18E7;
const int KEY_6 = 0xFF7A85;
const int KEY_7 = 0xFF10EF;
const int KEY_8 = 0xFF38C7;
const int KEY_9 = 0xFF5AA5;
const int KEY_0 = 0xFF4AB5;
const int KEY_ASTERISK = 0xFF42BD;
const int KEY_POUND = 0xFF52AD;
const int KEY_REPEAT = 0xFFFFFFFF;

const int RECV_PIN = 9;

IRrecv irrecv(RECV_PIN);
decode_results results;

void setup()
{
  Serial.begin(9600);
  irrecv.enableIRIn();
}

void loop()
{
  if (irrecv.decode(&results))
  {
    switch (results.value)
    {
    case KEY_UP:
      Serial.println("KEY_UP");
      break;
    case KEY_LEFT:
      Serial.println("KEY_LEFT");
      break;
    case KEY_OK:
      Serial.println("KEY_OK");
      break;
    case KEY_RIGHT:
      Serial.println("KEY_RIGHT");
      break;
    case KEY_DOWN:
      Serial.println("KEY_DOWN");
      break;
    case KEY_1:
      Serial.println("KEY_1");
      break;
    case KEY_2:
      Serial.println("KEY_2");
      break;
    case KEY_3:
      Serial.println("KEY_3");
      break;
    case KEY_4:
      Serial.println("KEY_4");
      break;
    case KEY_5:
      Serial.println("KEY_5");
      break;
    case KEY_6:
      Serial.println("KEY_6");
      break;
    case KEY_7:
      Serial.println("KEY_7");
      break;
    case KEY_8:
      Serial.println("KEY_8");
      break;
    case KEY_9:
      Serial.println("KEY_9");
      break;
    case KEY_0:
      Serial.println("KEY_0");
      break;
    case KEY_ASTERISK:
      Serial.println("KEY_ASTERISK");
      break;
    case KEY_POUND:
      Serial.println("KEY_POUND");
      break;
    case KEY_REPEAT:
      Serial.println("KEY_REPEAT");
      break;
    }
    irrecv.resume();
  }
}
Download the code
All the code from this post is available for download on Github. 
