
In this post, we will see how to work (serialize and deserialize) with Json files on a microprocessor compatible with the Arduino ecosystem thanks to the brilliant Arduino Json library.
Most languages have libraries for writing (serializing) or reading/parsing (deserializing) Json files (for example, we already saw an example in C#). The Arduino environment is no exception, and we have Arduino Json which includes functions for serializing and deserializing objects easily.
Exchanging information as plain text may seem strange because it implies additional work of interpreting (parsing) the data compared to, for example, receiving a binary stream directly. However, it provides the advantage of making different systems compatible. No more worrying about “my integer is 32 bits, and your integer is 16 bits”.
Arduino Json is compatible with multiple development boards (Arduino Uno, Nano, Mega, Micro, Leonardo, Due, ESP8266, ESP32…). On the smaller (8-bit) boards, it’s “a bit tight”. But, for example, it fits perfectly with the ESP8266 and the ESP32.
The Arduino Json library is Open Source and you can add it to your project conveniently from the library manager in the Arduino IDE. Its code is available at https://arduinojson.org.
Let’s delve deeper and see examples of this interesting library, which will allow us to use the Json format in our Arduino projects.
What is a Json File?
Json (JavaScript Object Notation) is a plain text format for storing structured data that has become the “almost” standard system for exchanging information in communication systems. In fact, it is a common component in the operation of most web pages.
Json has gained presence over other formats like XML due to its lightness and simplicity. This translates into lower bandwidth consumption and less load for the server and client. Furthermore, it is a format that is “more or less” easy to read even for a person.
In summary, Json has 4 basic object types (numbers, booleans, text, and null), which can be grouped into arrays or objects.
An object is a collection of “key/value” pairs. That is, a collection of objects identified by a text key. Access to the objects is done through their key.
{ “id”: 12, “description”: “demoItem”, “value”: 50.4 }
On the other hand, an array is a list of objects ordered sequentially. Access to the objects is done through their position.
[ “banana”, 12, 3.1416 ]
Of course, both types (array and objects) can be composed to create nested objects. For example, the following Json represents a person object with Id 12, name Peter, with an array of fruits they like, and a nested object with their address.
{ “id”: 12, “name”: “peter”, “fruits”: [ “banana”, “orange”, “raspberry” ], “house”: { “address”: “white citadel”, “city”: “gondor” } }
Using Arduino Json
The “magic” of Arduino Json, in its version 6, lies in the JsonDocument object which abstracts a Json document and provides the tools to facilitate its serialization and deserialization.
Internally, the library has objects to represent Arrays (JsonArray), objects (JsonObject), and key/value pairs (JsonVariant) that support String, integers, floating-point numbers, booleans, and null. However, in most cases, it is transparent during use.
First, we create a JsonDocument which can be of type StaticJsonDocument or DynamicJsonDocument (we will see the difference below).
StaticJsonDocument<200> doc;
DynamicJsonDocument doc(1024);
Working with JsonDocument
When generating a JsonDocument file, it is “empty”. Internally, it will become an Array or an Object depending on how we use it for the first time.
Thus, if we use a key/value property, the JsonDocument becomes an object,
doc["hello"] = "world";
While if we use ‘add()’ to add an object, the JsonDocument becomes an array,
doc.add("hello world");
Likewise, we can create nested objects or arrays. So we would create a nested object like this,
JsonObject obj = doc.createNestedObject();
obj["hello"] = "world";
Or nested arrays in the following way. In this case, the provided parameter is optional and represents the name we want the array to have within the “parent” object.
JsonArray obj = doc.createNestedArray("nested");
obj.add("hello world");
In this case, the provided parameter is optional and represents the name we want the array to have within the “parent” object.
Dynamic or Static JsonDocument
A common question when using Arduino Json is the difference and when to use StaticJsonDocument or DynamicJsonDocument.
StaticJsonDocument is generated during compilation and stored on the stack. To generate it, templating is used to indicate the memory available for the Json file.
StaticJsonDocument<200> doc;
While DynamicJsonDocument uses dynamic memory and is stored in the variable memory (‘heap’). To generate it, the constructor is used, which receives as a parameter the maximum memory available for the Json.
DynamicJsonDocument doc(1024);
This difference has considerations for its use. In summary, they are:
- DynamicJsonDocument is a bit slower
- DynamicJsonDocument allows generating larger files
Therefore, the Arduino Json developer himself advises using StaticJsonDocument for files smaller than 1KB, and DynamicJsonDocument for documents larger than 1KB.
JsonDocument Memory
As we have seen, when generating either variant of JsonDocument we have to indicate the maximum available memory. This must be greater than the size of the object we want to encode and, in general, it is difficult to calculate because it depends on the type of variable, the nesting, and the board being used.
For its exact calculation, we have three options. In summary, one is to use a larger size and use the ‘memoryUsage()’ function to determine the real size. Another is to use certain constants provided by the library and “do the sum”. And finally, the preferred one is to use the assistant provided by the developer available at https://arduinojson.org/v6/assistant/.
However, during the development phase, don’t worry too much about it and simply use a sufficiently large size and adjust the size later when you move past the prototype phase and if your project really needs it.
The assistant provides many more tools, such as a code “generator” for serializing and deserializing code.
Serialize and Deserialize
We can serialize the JsonDocument using one of the overloads of the ‘serializeJson(…)’ method.
serializeJson(const JsonDocument& doc, char* output, size_t outputSize);
serializeJson(const JsonDocument& doc, char output[size]);
serializeJson(const JsonDocument& doc, Print& output);
serializeJson(const JsonDocument& doc, String& output);
serializeJson(const JsonDocument& doc, std::string& output);
serializeJson(const JsonDocument& doc, std::ostream& output);
Or deserialize a Json file into an object using one of the overloads of the ‘deserializeJson(…)’ method, which returns a value indicating whether the conversion was successful.
DeserializationError deserializeJson(JsonDocument& doc, const char* input);
DeserializationError deserializeJson(JsonDocument& doc, const char* input, size_t inputSize);
DeserializationError deserializeJson(JsonDocument& doc, const __FlashStringHelper* input);
DeserializationError deserializeJson(JsonDocument& doc, const __FlashStringHelper* input, size_t inputSize);
DeserializationError deserializeJson(JsonDocument& doc, const String& input);
DeserializationError deserializeJson(JsonDocument& doc, const std::string& input);
DeserializationError deserializeJson(JsonDocument& doc, Stream& input);
DeserializationError deserializeJson(JsonDocument& doc, std::istream& input);
Additional Configuration
The Arduino Json library has various options that we can modify during compilation to change its behavior.
- ARDUINOJSON_DECODE_UNICODE Allows using unicode characters (\uXXXX)
- ARDUINOJSON_DEFAULT_NESTING_LIMIT: Defines the nesting limit
- ARDUINOJSON_ENABLE_NAN Use ‘NaN’ or ‘null’
- ARDUINOJSON_ENABLE_INFINITY Use ‘Infinity’ or ‘null’
- ARDUINOJSON_NEGATIVE_EXPONENTIATION_THRESHOLD Use scientific notation for small numbers
- ARDUINOJSON_POSITIVE_EXPONENTIATION_THRESHOLD Use scientific notation for large numbers1
- ARDUINOJSON_USE_LONG_LONG Use ‘long’ or ‘long long’ for integers
- ARDUINOJSON_USE_DOUBLE Use ‘float’ or ‘double’ for floating-point numbers
For more information read the library documentation
Arduino Json Examples
As usual, it’s best to see a few examples to illustrate the use of Arduino Json. Let’s look at three simple ones, one to illustrate use as objects, another for use as an array, and a final more complex example showing the use of nested properties.
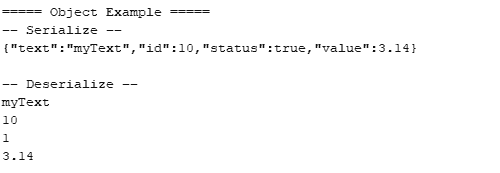
Object Example
The following code shows the serialization and deserialization of a simple Json as an object.
#include <ArduinoJson.hpp>
#include <ArduinoJson.h>

void SerializeObject()
{
    String json;
    StaticJsonDocument<300> doc;
    doc["text"] = "myText";
    doc["id"] = 10;
    doc["status"] = true;
    doc["value"] = 3.14;

    serializeJson(doc, json);
    Serial.println(json);
}

void DeserializeObject()
{
    String json = "{\"text\":\"myText\",\"id\":10,\"status\":true,\"value\":3.14}";

    StaticJsonDocument<300> doc;
    DeserializationError error = deserializeJson(doc, json);
    if (error) { return; }

    String text = doc["text"];
    int id = doc["id"];
    bool stat = doc["status"];
    float value = doc["value"];

    Serial.println(text);
    Serial.println(id);
    Serial.println(stat);
    Serial.println(value);
}

void setup()
{
    Serial.begin(115200);

    Serial.println("===== Object Example =====");
    Serial.println("-- Serialize --");
    SerializeObject();
    Serial.println();
    Serial.println("-- Deserialize --");
    DeserializeObject();

}

void loop()
{
}
The Json file we have generated/read is the following.
{ “text”: “myText”, “id”: 10, “status”: true, “value”: 3.14 }
If we run the code we will see the following result on the serial port.
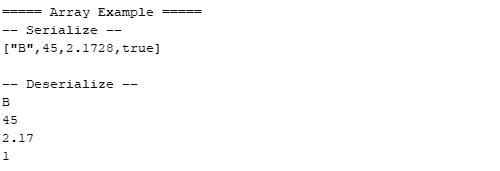
Array Example
The following code shows the serialization and deserialization of a simple Json as an array.
#include <ArduinoJson.hpp>
#include <ArduinoJson.h>

void SerializeArray()
{
    String json;
    StaticJsonDocument<300> doc;
    doc.add("B");
    doc.add(45);
    doc.add(2.1728);
    doc.add(true);

    serializeJson(doc, json);
    Serial.println(json);
}

void DeserializeArray()
{
    String json = "[\"B\",45,2.1728,true]";

    StaticJsonDocument<300> doc;
    DeserializationError error = deserializeJson(doc, json);
    if (error) { return; }

    String item0 = doc[0];
    int item1 = doc[1];
    float item2 = doc[2];
    bool item3 = doc[3];

    Serial.println(item0);
    Serial.println(item1);
    Serial.println(item2);
    Serial.println(item3);
}

void setup()
{
    Serial.begin(115200);

    Serial.println("===== Array Example =====");
    Serial.println("-- Serialize --");
    SerializeArray();
    Serial.println();
    Serial.println("-- Deserialize --");
    DeserializeArray();
    Serial.println();
}

void loop()
{
}
The Json file we have generated/read is the following.
[“B”, 45, 2.1728, true]
If we run the code we will see the following result on the serial port.
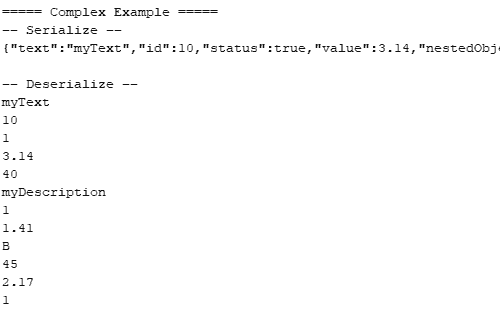
Complex Example
The following code shows the serialization and deserialization of a Json with a nested array and a nested object.
#include <ArduinoJson.hpp>
#include <ArduinoJson.h>

void SerializeComplex()
{
    String json;
    StaticJsonDocument<300> doc;
    doc["text"] = "myText";
    doc["id"] = 10;
    doc["status"] = true;
    doc["value"] = 3.14;

    JsonObject obj = doc.createNestedObject("nestedObject");
    obj["key"] = 40;
    obj["description"] = "myDescription";
    obj["active"] = true;
    obj["qty"] = 1.414;

    JsonArray arr = doc.createNestedArray("nestedArray");
    arr.add("B");
    arr.add(45);
    arr.add(2.1728);
    arr.add(false);

    serializeJson(doc, json);
    Serial.println(json);
}

void DeserializeComplex()
{
    String json = "{\"text\":\"myText\",\"id\":10,\"status\":true,\"value\":3.14,\"nestedObject\":{\"key\":40,\"description\":\"myDescription\",\"active\":true,\"qty\":1.414},\"nestedArray\":[\"B\",45,2.1728,true]}";

    StaticJsonDocument<300> doc;
    DeserializationError error = deserializeJson(doc, json);
    if (error) { return; }

    String text = doc["text"];
    int id = doc["id"];
    bool stat = doc["status"];
    float value = doc["value"];

    Serial.println(text);
    Serial.println(id);
    Serial.println(stat);
    Serial.println(value);

    int key = doc["nestedObject"]["key"];
    String description = doc["nestedObject"]["description"];
    bool active = doc["nestedObject"]["active"];
    float qty = doc["nestedObject"]["qty"];

    Serial.println(key);
    Serial.println(description);
    Serial.println(active);
    Serial.println(qty);

    String item0 = doc["nestedArray"][0];
    int item1 = doc["nestedArray"][1];
    float item2 = doc["nestedArray"][2];
    bool item3 = doc["nestedArray"][3];

    Serial.println(item0);
    Serial.println(item1);
    Serial.println(item2);
    Serial.println(item3);
}

void setup()
{
    Serial.begin(115200);

    Serial.println("===== Complex Example =====");
    Serial.println("-- Serialize --");
    SerializeComplex();
    Serial.println();
    Serial.println("-- Deserialize --");
    DeserializeComplex();
    Serial.println();
}

void loop()
{
}
The Json file we have generated/read is the following.
{ “text”: “myText”, “id”: 10, “status”: true, “value”: 3.14, “nestedObject”: { “key”: 40, “description”: “myDescription”, “active”: true, “qty”: 1.414 }, “nestedArray”: [“B”, 45, 2.1728, true] }
If we run the code we will see the following result on the serial port.
Conclusion
The Arduino Json library is a little Open Source marvel. Arduino Json stands out in projects that incorporate Web communication. But it is not exclusively restricted to that and we can use it, for example, to send a robot’s position information via Bluetooth, the records of a datalogger, or the configuration or commands to a system.
However, despite the developers’ efforts to create a very powerful and efficient library, the conversion process will always imply memory and processor consumption. Therefore, its use may not be suitable for all projects. In particular, it will not be a good solution for applications with high transmission speeds.
Even so, it should be one of your first options when exchanging information, especially between different systems, and one of your favorite libraries. In the future, we will use it intensively in the section on the ESP8266 to process information in web communications.
Download the Code
All the code from this post is available for download on Github. 
