In the previous post, we saw how to address a common problem in computer science, the need to generate a collection that allows modifying the number of stored elements, using a dynamic-sized array.
In this post, we will see another classic and very common way to solve this problem, by using a Linked List.
What is a Linked List?
A Linked List is a collection of nodes, each of which contains the stored element and a reference (a pointer) to another node.
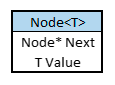
These nodes are linked together forming a kind of “chain”, so that each node points to the next node.

This type of structure of nodes pointing to other nodes is very powerful and common in computer science, and is used for both dynamic lists and trees.
The main advantage of a Linked List is that element insertions are, in general, very efficient. We only have to create a new node, change the references of the previous node (if it exists) to point to our new node, and point the new node to the next node (if it exists). So to speak, we “break the chain” and insert a new node.
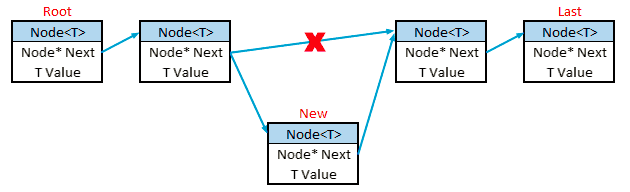
Therefore, insertions at the beginning and end of the Linked List are O(1). Insertions in the middle of a Linked List are also O(1), although we must consider that finding the insertion point can be costly, as we will see later.
A Linked List has the advantage of being able to add elements as long as there is memory available in the system. Furthermore, we will only use the memory we are actually using, unlike a dynamic array where we usually have excess capacity to accommodate new elements without needing to resize.
Of course, a Linked List also has certain disadvantages. The main one, compared to an array, is that we lose the ability to access an intermediate element by its index, which forces us to traverse the entire Linked List “jumping” from node to node until we reach the desired element. Therefore, index-based accesses for reading, writing, or insertion are O(n) and, to make things worse, the “jump” operation from node to node is relatively slow.
Another disadvantage is that it requires more memory than a simple array because, instead of elements, we store nodes that contain the element and a reference. If we store large-sized elements it is not too important, but in simple cases (like numbers) the size required by a Linked List can be more than double that required by the elements.
Therefore, a Linked List is suitable when we need to add elements to the beginning or end of the list (queues and stacks) and element access is mainly sequential. They are not suitable when we frequently need to access an element by its index, in which case an array-based solution or a hybrid solution is more convenient.
However, there are ways to improve the performance of a Linked List. One of them is to apply a “cache”, that is, a node that points to the last position we accessed. If we perform an operation at an index after the cache index, the iteration starts from the cached node, avoiding having to traverse the entire Linked List.
This way, the performance of certain operations is considerably improved. For example, if we have to perform multiple reads or writes at the same index, the cache allows them to be done with O(n).
Other possible variants of a Linked List are a doubly linked list in which each node contains references to the previous and next node, allowing traversal of the Linked List in both directions, with the disadvantage of increasing the size of each node. Or the Jump List, which is a Linked List that has a layer of nodes that allow fast access to any element, with the disadvantage of requiring double the nodes to perform the mapping.
Implementing a Linked List in Arduino
Here we have a lightweight implementation of a Linked List to illustrate its basic operation.
On one hand, we have the definition of the node as a structure that contains the element (in this example an int) and a pointer to the next node.
The functions InsertHead() and InsertTail() insert a node at the beginning or end of the Linked List, respectively. On the other hand, the functions RemoveHead() and RemoveTail() remove the first or last node.
struct node {
  int value;
  node *next;
};

node *head;
size_t listSize;

// Crea una linkedlist con un único elemento
void createLinkedList(int value)
{
  listSize = 1;
  head = new node();
  head->next = nullptr;
  head->value = value;
}

// Añade un elemento al principio de la linkedlist
void insertHead(int value)
{
  node* newHead = new node();
  newHead->next = head;
  newHead->value = value;
  head = newHead;
  listSize++;
}

// Añade un elemento al final de la linkedlist
void insertTail(int value)
{
  node* newTail = new node();
  newTail->next = nullptr;
  newTail->value = value;

  node *enumerator =  head;
  for (size_t index = 0; index < listSize - 1; index++)
     enumerator = enumerator->next;

  enumerator->next = newTail;
  listSize++;
 }

 void removeHead()
 {
   if(listSize <= 1) return;

    node* newHead = head->next;
    delete(head);
    head = newHead;
    listSize--;

 }

 void removeTail()
 {
     if(listSize <= 1) return;

    node *enumerator =  head;
      for (size_t index = 0; index < listSize - 2; index++)
        enumerator = enumerator->next;

    delete enumerator->next;
    enumerator->next = nullptr;
    listSize--;
 }

// Muestra la linkedlist por Serial
void printLinkedList()
{
  Serial.print("Size:");
  Serial.print(listSize);

  Serial.print("  Items:");
  node *enumerator;
  enumerator = head;

  for (size_t index = 0; index < listSize; index++)
  {
    Serial.print(enumerator->value);
    Serial.print(' ');
    enumerator = enumerator->next;
  }
  Serial.println();
}

void setup()
{
  Serial.begin(9600);

  Serial.println("Lista con elemento 3");
  createLinkedList(3);
  printLinkedList();

  Serial.println();
  Serial.println("Añadir 4 y 5 al final");
  insertTail(4);
  insertTail(5);
  printLinkedList();

  Serial.println();
  Serial.println("Añadir 1 y 2 al principio");
  insertHead(2);
  insertHead(1);
  printLinkedList();

  Serial.println();
  Serial.println("Eliminar 1 y 5");
  removeHead();
  removeTail();
  printLinkedList();
}

void loop()
{
}
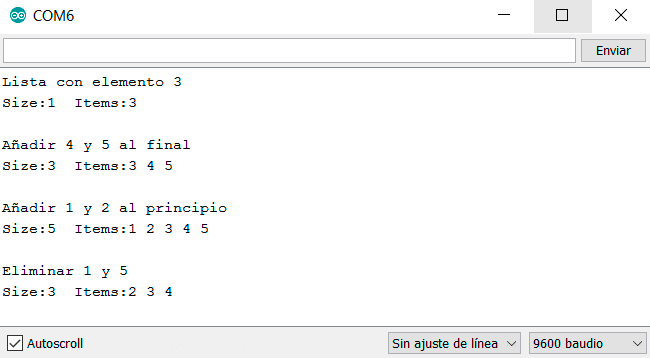
If we run this code, the result is as follows.
Linked List in a Library
As usual, we can’t leave it at that. Here is the LinkedList library, which implements a complete Linked List in Arduino.
This library allows storing any type of objects, has methods to add, insert, and delete any node, and includes a cache to improve efficiency. Enjoy!
Download the Code
All the code from this post is available for download on Github. 
