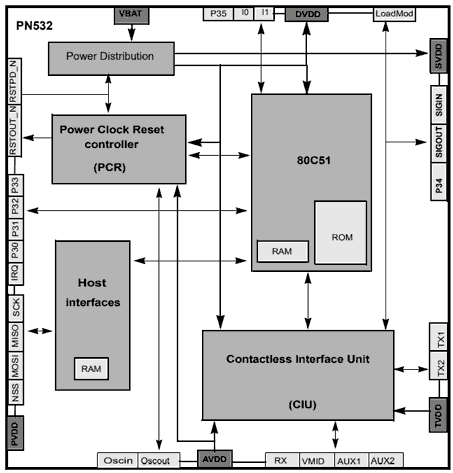
The PN532 is an NFC chip that we can connect to a processor like Arduino to read and write NFC cards, communicate with mobile phones, or even act as an NFC tag. It is a widely used integrated circuit in all kinds of commercial devices that implement NFC.
Remember that NFC is a superset of RFID, which is a wireless communication system. NFC adds security features, especially limiting the reading and writing range to 50-100mm.
For more information about RFID, you can check the post Reading RFID cards with Arduino and MIFARERC522 reader.
NFC has become popular as a communication system due to its increased security and the ability to act as Peer-to-Peer, meaning that an NFC device can act as both a receiver and a tag. This has led to devices such as smartphones incorporating an NFC chip, both to read cards and to act as a tag in services, for example, for authentication or payment.
Communication is very simple, as we can communicate through SPI, I2C or HSU (High Speed UART). The PN532 operates at 3.3V, but it has level conversion so it can be connected to a 5V processor.
Price
The PN532 is slightly more expensive than the MIFARE RC522, but it is also a much superior device. However, it is an affordable device. It can be found for around 3.5€ from international sellers on AliExpress or Ebay.
How does the PN532 work?
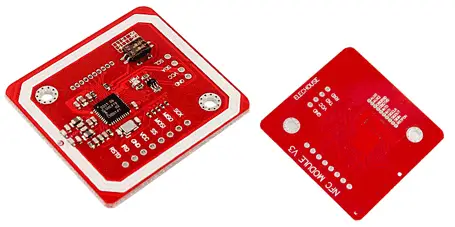
The PN532 includes an 80C51 processor with 40 KB ROM and 1 KB RAM, along with the necessary elements to properly operate NFC communication. The available Maker modules include an antenna on the PCB.
It supports 6 operating modes:
- ISO/IEC 14443A/MIFARE Reader/Writer.
- ISO/IEC 14443A/MIFARE Card MIFARE Classic 1K and MIFARE Classic 4K Card.
- ISO/IEC 14443B Reader/Writer.
- FeliCa Reader/Writer.
- FeliCa Card emulation.
- ISO/IEC 18092, ECMA 340 Peer-to-Peer
Typical operating distances are 50mm for reading and writing, and 100mm for emulation. The reading speed is up to 212 kbits/s and the writing speed is up to 424kbts/s. These values depend, among other things, on the antenna integrated in the module. In Maker modules, the typical range is 30mm to 50mm.
The PN532 operates at 3.3V but accepts supply voltages from 2.7V to 5.4V. The I2C/UART communication lines operate at 3.3V to 24V TTL. However, the SPI interface operates at 3.3V, but incorporates 100 Ohm series resistors so it can also be connected to 5V.
The power consumption is 100mA in Stand-By mode and 120mA during reading and writing. Additionally, it has two low-power modes, one Soft-Power-Down mode with a consumption of 22uA, and a Hard-Power-Down mode with a consumption of 1uA.
The PN532 can also be used with computers and microcomputers such as Raspberry Pi with the libnfc library.
NDEF Format (NFC Data Exchange Format)
The NFC Data Exchange Format (NDEF) is a standardized way to exchange information between compatible NFC devices. The NDEF format is used to store exchange information, such as URIs, plain text, etc.
An NDEF message consists of two components, messages and records. A message is composed of one or more records. Each of the records consists of a record type, an ID, and the actual data (payload), along with the length fields of each of the previous ones.
NFC tags like Mifare Classic cards can be configured as NDEF tags. NDEF messages can also be used to exchange data between two active NFC devices (Peer-to-Peer mode).
The standard is maintained by the NFC Forum, and is available for free consultation, subject to acceptance of the license conditions.
Assembly diagram
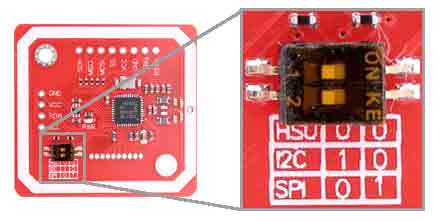
The PN532 can be connected by I2C, SPI, or UART. The communication interface is chosen using jumpers located on the board.
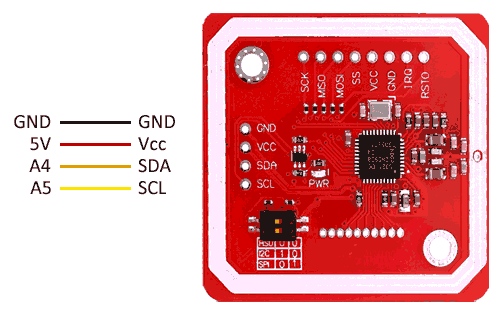
Connection via I2C
The I2C connection would be as follows
Which, seen from Arduino, would look like this.
Connection via SPI
On the other hand, the connection via SPI is as follows
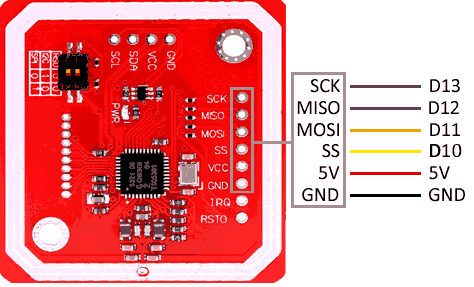
Which, seen from Arduino, would look like this
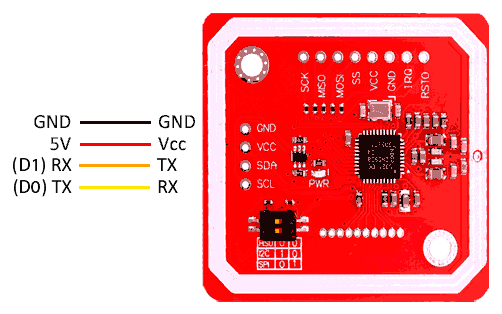
Connection via HSU (High Speed UART)
Finally, the connection via HSU (High Speed UART) is as follows
Which, seen from Arduino, would look like this
The I2C and SPI pins indicated are valid for the Arduino Uno, Nano, and Mini Pro models. For other Arduino models, check the corresponding pinout diagram.
Code examples
To program the PN532, we will use the library developed by Adafruit available at this link. This library only allows working with I2C and SPI communication, but not UART.
The library provides code examples, which it is advisable to review. The following examples are modifications based on those available in the library.
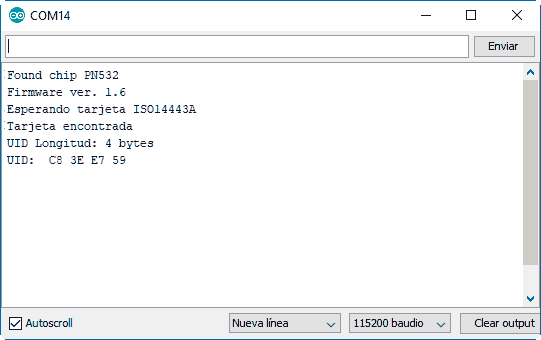
Display data and UID
In this example, we display the data from the PN532 reader and from the tags we approach.
#include <Wire.h>
#include <SPI.h>
#include <Adafruit_PN532.h>


#define PN532_IRQ   (2)

#define PN532_RESET (3)  // Not connected by default on the NFC Shield

Adafruit_PN532 nfc(PN532_IRQ, PN532_RESET);

void setup(void) {
  Serial.begin(115200);

  nfc.begin();

  uint32_t versiondata = nfc.getFirmwareVersion();
  if (!versiondata) {
    Serial.print("PN53x not found");
    while (1); // halt
  }

  // Display sensor data
  Serial.print("Found chip PN5"); Serial.println((versiondata>>24) & 0xFF, HEX);
  Serial.print("Firmware ver. "); Serial.print((versiondata>>16) & 0xFF, DEC);
  Serial.print('.'); Serial.println((versiondata>>8) & 0xFF, DEC);

  // Configure to read RFID tags
  nfc.setPassiveActivationRetries(0xFF);
  nfc.SAMConfig();

  Serial.println("Waiting for ISO14443A card");
}

// Auxiliary function to display the buffer
void printArray(byte *buffer, byte bufferSize) {
   for (byte i = 0; i < bufferSize; i++) {
      Serial.print(buffer[i] < 0x10 ? " 0" : " ");
      Serial.print(buffer[i], HEX);
   }
}


void loop(void) {
  boolean success;
  uint8_t uid[] = { 0, 0, 0, 0, 0, 0, 0 };
  uint8_t uidLength;

  success = nfc.readPassiveTargetID(PN532_MIFARE_ISO14443A, &uid[0], &uidLength);

  if (success) {
    Serial.println("Card found");
    Serial.print("UID Length: ");Serial.print(uidLength, DEC);Serial.println(" bytes");
    Serial.print("UID: "); printArray(uid, uidLength);
    Serial.println("");

    delay(1000);
  }
  else
  {
    Serial.println("Card not found");
  }
}
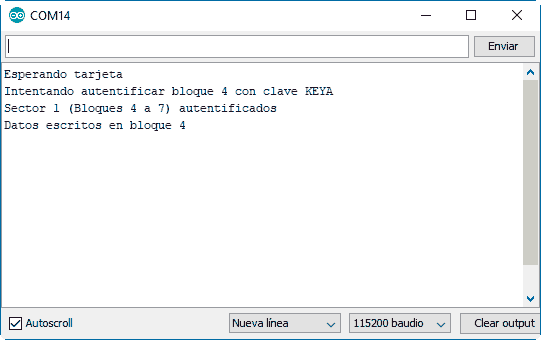
Write data
In this example, we show how to write data to the memory of a tag.
#include <Wire.h>
#include <SPI.h>
#include <Adafruit_PN532.h>


#define PN532_IRQ   (2)

#define PN532_RESET (3)

Adafruit_PN532 nfc(PN532_IRQ, PN532_RESET);

void setup(void)
{
  Serial.begin(115200);

  // Configure to read RFID tags
  nfc.begin();
  nfc.setPassiveActivationRetries(0xFF);
  nfc.SAMConfig();

  Serial.println("Waiting for card");
}

void loop(void)
{
  uint8_t success;
  uint8_t uid[] = { 0, 0, 0, 0, 0, 0, 0 };
  uint8_t uidLength;

  success = nfc.readPassiveTargetID(PN532_MIFARE_ISO14443A, uid, &uidLength);
  if (success) {
      Serial.println("Attempting to authenticate block 4 with key KEYA");
      uint8_t keya[6] = { 0xFF, 0xFF, 0xFF, 0xFF, 0xFF, 0xFF };

      success = nfc.mifareclassic_AuthenticateBlock(uid, uidLength, 4, 0, keya);
      if (success)
      {
        Serial.println("Sector 1 (Blocks 4 to 7) authenticated");
        uint8_t data[16];

        memcpy(data, (const uint8_t[]){ 'l', 'u', 'i', 's', 'l', 'l', 'a', 'm', 'a', 's', '.', 'e', 's', 0, 0, 0 }, sizeof data);
        success = nfc.mifareclassic_WriteDataBlock (4, data);

        if (success)
        {
          Serial.println("Data written to block 4");
          delay(10000);
        }
        else
        {
          Serial.println("Failed to write card");
          delay(1000);
        }
      }
      else
      {
        Serial.println("Failed to authenticate card");
        delay(1000);
      }
    }
}
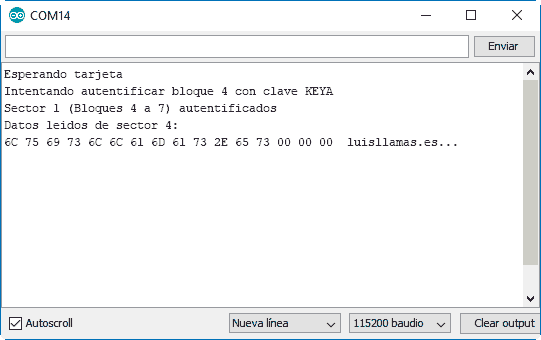
Read data
In this example, we see how to read previously written data from the memory of a tag.
#include <Wire.h>
#include <SPI.h>
#include <Adafruit_PN532.h>


#define PN532_IRQ   (2)

#define PN532_RESET (3)

Adafruit_PN532 nfc(PN532_IRQ, PN532_RESET);

void setup(void)
{
  Serial.begin(115200);

  // Configure to read RFID tags
  nfc.begin();
  nfc.setPassiveActivationRetries(0xFF);
  nfc.SAMConfig();

  Serial.println("Waiting for card");
}

void loop(void)
{
  uint8_t success;
  uint8_t uid[] = { 0, 0, 0, 0, 0, 0, 0 };
  uint8_t uidLength;

  success = nfc.readPassiveTargetID(PN532_MIFARE_ISO14443A, uid, &uidLength);
  if (success)
  {
      Serial.println("Attempting to authenticate block 4 with key KEYA");
      uint8_t keya[6] = { 0xFF, 0xFF, 0xFF, 0xFF, 0xFF, 0xFF };

      success = nfc.mifareclassic_AuthenticateBlock(uid, uidLength, 4, 0, keya);
      if (success)
      {
        Serial.println("Sector 1 (Blocks 4 to 7) authenticated");
        uint8_t data[16];

        success = nfc.mifareclassic_ReadDataBlock(4, data);
        if (success)
        {
      Serial.println("Data read from sector 4:");
          nfc.PrintHexChar(data, 16);
          Serial.println("");
          delay(5000);
        }
        else
        {
          Serial.println("Failed to read card");
        }
      }
      else
      {
        Serial.println("Failed to authenticate card");
      }
    }
}
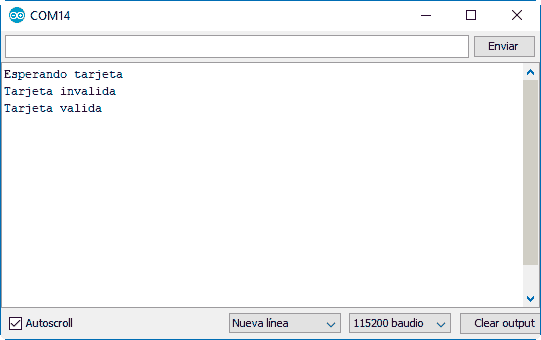
Check UID
In this example, we validate whether a card is valid by checking its UID.
#include <Wire.h>
#include <SPI.h>
#include <Adafruit_PN532.h>


#define PN532_IRQ   (2)

#define PN532_RESET (3)

Adafruit_PN532 nfc(PN532_IRQ, PN532_RESET);

void setup(void) {
  Serial.begin(115200);

  // Configure to read RFID tags
  nfc.begin();
  nfc.setPassiveActivationRetries(0xFF);
  nfc.SAMConfig();

  Serial.println("Waiting for card");
}

const uint8_t validUID[4] = { 0xC8, 0x3E, 0xE7, 0x59 };  // Example of a valid UID

// Function to compare two arrays
bool isEqualArray(uint8_t* arrayA, uint8_t* arrayB, uint8_t length)
{
  for (uint8_t index = 0; index < length; index++)
  {
    if (arrayA[index] != arrayB[index]) return false;
  }
  return true;
}

void loop(void)
{
  uint8_t success;
  uint8_t uid[] = { 0, 0, 0, 0, 0, 0, 0 };
  uint8_t uidLength;

  success = nfc.readPassiveTargetID(PN532_MIFARE_ISO14443A, uid, &uidLength);
  if (success)
  {
    uint8_t keya[6] = { 0xFF, 0xFF, 0xFF, 0xFF, 0xFF, 0xFF };

    if (isEqualArray(uid, validUID, uidLength))
    {
      Serial.println("Valid card");
      delay(5000);
    }
    else
    {
      Serial.println("Invalid card");
      delay(5000);
    }
  }
}
Check data
In this example, we validate whether a card is valid by checking data that we have previously written.
#include <Wire.h>
#include <SPI.h>
#include <Adafruit_PN532.h>


#define PN532_IRQ   (2)

#define PN532_RESET (3)

Adafruit_PN532 nfc(PN532_IRQ, PN532_RESET);

void setup(void) {
  Serial.begin(115200);

  // Configure to read RFID tags
  nfc.begin();
  nfc.setPassiveActivationRetries(0xFF);
  nfc.SAMConfig();

  Serial.println("Waiting for card");
}

const uint8_t validData[16] = { 'l', 'u', 'i', 's', 'l', 'l', 'a', 'm', 'a', 's', '.', 'e', 's', 0, 0, 0 };  // Example of valid data

// Function to compare two arrays
bool isEqualArray(uint8_t* arrayA, uint8_t* arrayB, uint8_t length)
{
  for (uint8_t index = 0; index < length; index++)
  {
    if (arrayA[index] != arrayB[index]) return false;
  }
  return true;
}

void loop(void) {
  uint8_t success;
  uint8_t uid[] = { 0, 0, 0, 0, 0, 0, 0 };
  uint8_t uidLength;

  success = nfc.readPassiveTargetID(PN532_MIFARE_ISO14443A, uid, &uidLength);
  if (success)
  {
    uint8_t keya[6] = { 0xFF, 0xFF, 0xFF, 0xFF, 0xFF, 0xFF };

    success = nfc.mifareclassic_AuthenticateBlock(uid, uidLength, 4, 0, keya);
    if (success)
    {
      uint8_t data[16];

      success = nfc.mifareclassic_ReadDataBlock(4, data);
      if (success)
      {
        if (isEqualArray(data, validData, sizeof validData))
        {
          Serial.println("Valid card");
          delay(5000);
        }
        else
        {
          Serial.println("Invalid card");
          delay(5000);
        }
      }
    }
    else
    {
      Serial.println("Failed to authenticate card");
      delay(5000);
    }
  }
}
Emulate a tag
To emulate a tag (NFC Type 4), we can use the Seed-Studio library available at this link. The library has an example that shows the emulation of a tag. However, the actual functionality is limited.
Download the code
All the code from this post is available for download on Github.

