What is a rain sensor?
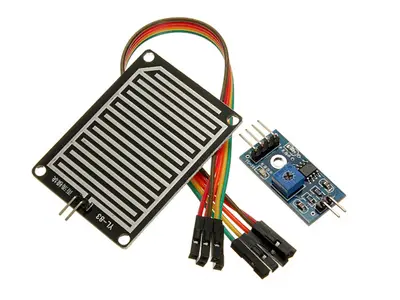
This type of sensor detects the presence of rain by the variation in conductivity of the sensor when it comes into contact with water. There are several models of similar sensors, such as the FC-37 and the YL-83.
Constructively, they are simple sensors. There are two contacts, connected to interlaced conductive tracks at a small distance from each other, without there being contact between both. When water is deposited on the surface, both conductors are electrically connected, which can be detected by a sensor.
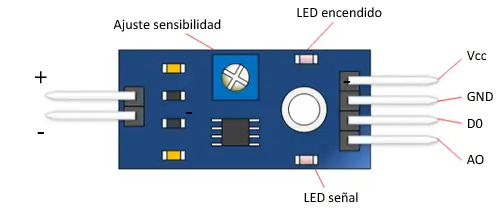
Both models come with a standard measuring plate with the LM393 comparator, which allows obtaining the reading both as an analog value and in digital form when a certain threshold is exceeded, which is regulated through a potentiometer located on the plate itself.
The measured analog values range from 0 for a completely soaked plate, to 1023 for a completely dry plate.
The digital output triggers when the humidity value exceeds a certain value, which we adjust using the potentiometer. Therefore, we will obtain a LOW signal in the absence of rain, and HIGH with the presence of rain.
In the case of the rain sensor, the analog signal is of no interest, since the sensor does not have the necessary precision to measure the amount of accumulated water. In any case, it would be difficult to extrapolate the measurement to a value in liters per hour. That is, we cannot measure the amount of rain, only its presence.
The rain sensor can be used, for example, to extend an awning or activate some other mechanism, sound an alarm, or record the amount of time (days, hours) in which precipitation occurs in a certain area.
The rain sensor can also be used to detect floods, placing it on the floor of a basement or boiler room, for example. It can also be useful for detecting when the water in a tank exceeds a certain level.
When using the sensor in the presence of water, make sure to protect the contacts and electrical parts of the circuit, and expose only the sensor plate. Otherwise, you can cause a short circuit and damage some of the electrical components.
Price
Rain sensors are really cheap. We can find a YL-83 or FC-37 type sensor, including the measuring plate, for €0.65 from international sellers on Ebay and Aliexpress.
Both models, YL-80 and FC-37, are sold in small variations of geometry (larger, smaller) and color. But beyond these differences, all the variants you see are identical in behavior.
Assembly scheme
The electrical scheme is simple. We connect the sensor to the measuring plate. The sensor has no polarity, so it can be connected in any direction.
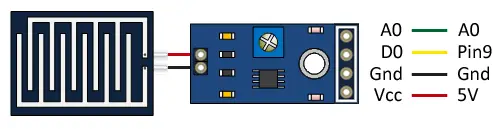
On the other hand, we power the measuring plate by connecting the GND and 5V pins to the corresponding pins of the Arduino.
Finally, we connect the digital output of the sensor to a digital input to read the state of the sensor, as we saw in the post Digital Inputs in Arduino.
If we wanted to obtain the analog value of the measurement, we would connect the analog output of the sensor to an analog input of the Arduino, although as we have said, this sensor does not have the necessary precision for the analog value to be really useful.
Optionally, we can calibrate the trigger threshold of the digital output with the potentiometer, pouring water in a small experiment. But it is usually sufficient to leave the potentiometer at a medium value.
Code examples
The code is equally simple. We simply read the state of the digital input. If the sensor is triggered, we execute the necessary actions.
const int sensorPin = 9;

void setup() {
  Serial.begin(9600);   //start serial port
  pinMode(pin, INPUT);  //define pin as input
}

void loop(){
  int value = 0;
  value = digitalRead(sensorPin);  //digital pin read

  if (value == LOW) {
      Serial.println("Rain detected");
  }
  delay(1000);
}
We can also read the state of the sensor using interrupts. For more information, check the post What are and how to use interrupts in Arduino and Reading a button with interrupts in Arduino
Download the code
All the code in this post is available for download on Github. 
