What is RFID?
RFID (Radio Frequency Identifier) is a set of technologies designed to read tags wirelessly from a distance. RFID readers can be connected to a controller or processor such as Arduino.
RFID tags are available in a variety of formats, such as adhesive stickers, cards, keychains, can be integrated into a specific product, or even inserted under the skin in an animal or human.
RFID is widely used, for example, in alarm systems, commercial applications as a replacement for barcodes, electronic locks, payment systems, personal cards, access control for facilities such as gyms or pools, employee time tracking in companies, among many other applications.
In our electronic projects with Arduino, we can use RFID, for example, in commercial applications to display data on a screen when approaching a product, change light or illumination, open a door with a personal card, or make a robot behave differently by passing a card to it.
Be cautious in security applications, such as locks. The cards we use in our home projects ARE NOT CONSIDERED SECURE and cannot be part of a genuine security system.
Price
In the world of home electronics and Arduino projects, the MFRC522 reader/writer is very common.
We can find kits that include the MFRC522, with a card and a MIFARE CLASSIC S50 keychain for 1.45€, looking for international sellers on eBay or AliExpress.
If we want more receiver tags, we can find cards or keychains for about 0.25€ each, or adhesive tags for about 0.15€.
How does RFID work?
RFID is a set of wireless technologies designed to obtain information stored in a device called a tag.
The reader (transceiver) is actually a transceiver that, first, emits a signal to initiate communication with the tags (transponders). This signal is captured by the tags within range, which respond by transmitting the stored information, which is finally captured and decoded by the RFID reader.
RFID can operate in four frequency bands, with 13.56 MHz being the most common.
- Low frequency 125-134.2 kHz. Animal control, car keys…
- High frequency 13.56 MHz. Access control, item control in stores…
- Ultra-high frequency (UHF) 868 - 956 GHz
- Microwaves, 2.45 GHz
There are read-only RFID tags, in which the information they contain is recorded during their manufacture and cannot be modified, and read-write tags, in which we can overwrite the tag’s information.
Regarding power supply, there are active RFID tags that have their own power source (e.g., a battery). The reading range can be from 10m to 100m.
In contrast, passive RFID tags obtain their energy through induction of the electromagnetic wave emitted by the reader. Therefore, they do not require a power source. However, the reading range is reduced to a few centimeters.
NFC, a subset of RFID
RFID technology can have ranges of 10-100m. This has important considerations about security and privacy. For example, imagine the dangers of being able to read personal or payment information at these distances.
NFC (Near Field Communication) is a subset of RFID technology that by design establishes methods to limit the transmission distance to less than 10 cm. NFC is experiencing great development due to its inclusion in smartphones and possible payment methods.
However, although closely related, RFID and NFC should not be confused. In particular, not all RFID and NFC systems will be compatible, meaning we will not always be able to read an RFID card with the NFC reader of a smartphone.
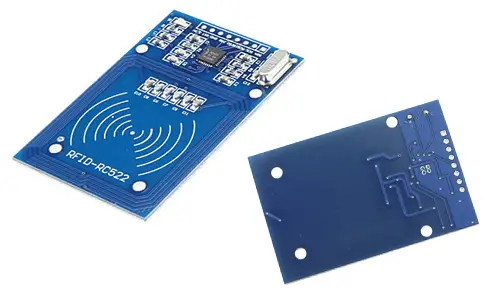
The MIFARE MFRC522 reader
MIFARE is a wireless card technology owned by NXP Semiconductors. It is one of the most widespread standards for contactless smart cards (CSC).
The Mifare MFRC522 is an RFID card reader that incorporates SPI bus communication, I2C bus, and UART, making it easy to connect to Arduino. The MFRC522 supports Mifare S50, Mifare S70, Mifare UltraLight, Mifare Pro, and Mifare Desfire cards.
The MFRC522 reader operates at a frequency of 13.56Mhz and has a reading range of 0 to 60. The MFRC522 has a consumption of 13-26 mA during writing, 10-13mA in standby, and less than 80uA in sleep mode. The supply voltage is 3.3V.
The MFRC522 is usually supplied with MIFARE Classic 1K cards or keychains. This type of card is essentially a storage system where the memory is divided into blocks, with simple mechanisms for accessing the information.
The MIFARE Classic 1K has 1024 bytes of memory divided into 16 sectors of 64 bytes, each protected by two keys called A and B. Each one can be programmed individually to allow or block read or write operations.
Each sector reserves a certain amount of memory for keys A and B, so this space normally cannot be used to store data, reducing the amount of available memory in a MIFARE Classic 1K to 752 bytes.
The EEPROM memory of MIFARE Classic cards can withstand more than 100,000 writing cycles and can retain the memory for more than 10 years without receiving power.
Unfortunately, MIFARE Classic cards use the ISO/IEC 14443 Type A standard, which the NFC Forum decided to stop supporting in 2014. For that reason, modern mobile phones will not be able to read this type of card.
MIFARE Classic cards use a proprietary encryption system from NXP that is currently not considered secure.
Wiring diagram
The connection is simple. We simply power the module from Arduino using 3.3V and Gnd. On the other hand, we connect the pins of the SPI bus to the corresponding ones on Arduino.
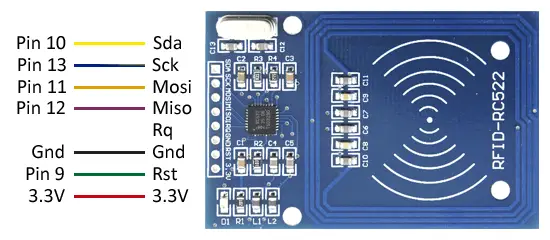
While the connection seen from the Arduino side would be like this.
The SPI pins indicated are valid for the Arduino Uno, Nano, and Mini Pro models. For other Arduino models, consult the corresponding pinout diagram.
Verify that your board is tolerant to a 5V bus before connecting it to Arduino. If not, you will have to use a logic level adapter.
Code examples
To read the RC522, we will use the library developed by Miguel Balboa, available at this link. The library provides code examples, which is advisable to review. The following examples are modifications based on those available in the library.
Display the card’s ID
The following example detects an RFID card and displays its identifier through the serial port.
//RST          D9
//SDA(SS)      D10
//MOSI         D11
//MISO         D12
//SCK          D13

#include <SPI.h>
#include <MFRC522.h>

const int RST_PIN = 9;        // Pin 9 for RC522 reset
const int SS_PIN = 10;        // Pin 10 for RC522 SS (SDA)
MFRC522 mfrc522(SS_PIN, RST_PIN);   // Create MFRC522 instance

void printArray(byte *buffer, byte bufferSize) {
  for (byte i = 0; i < bufferSize; i++) {
    Serial.print(buffer[i] < 0x10 ? " 0" : " ");
    Serial.print(buffer[i], HEX);
  }
}

void setup()
{
  Serial.begin(9600);    //Initialize Serial speed
  SPI.begin();      //Function that initializes SPI
  mfrc522.PCD_Init();     //Function that initializes RFID
}

void loop()
{
  // Detect card
  if (mfrc522.PICC_IsNewCardPresent())
  {
    if (mfrc522.PICC_ReadCardSerial())
    {
      Serial.print(F("Card UID:"));
      printArray(mfrc522.uid.uidByte, mfrc522.uid.size);
      Serial.println();

      // End current reading
      mfrc522.PICC_HaltA();
    }
  }
  delay(250);
}
Validate the card’s ID
The following example reads a card and checks the ID to determine if the card is accepted or not.
//RST          D9
//SDA(SS)      D10
//MOSI         D11
//MISO         D12
//SCK          D13

#include <SPI.h>
#include <MFRC522.h>

const int RST_PIN = 9;        // Pin 9 for RC522 reset
const int SS_PIN = 10;        // Pin 10 for RC522 SS (SDA)
MFRC522 mfrc522(SS_PIN, RST_PIN);   // Create MFRC522 instance

byte validKey1[4] = { 0xA0, 0xB1, 0xC2, 0xD3 };  // Example of valid key

//Function to compare two arrays
bool isEqualArray(byte* arrayA, byte* arrayB, int length)
{
  for (int index = 0; index < length; index++)
  {
    if (arrayA[index] != arrayB[index]) return false;
  }
  return true;
}

void setup() {
  Serial.begin(9600); // Start serial
  SPI.begin();        // Start SPI
  mfrc522.PCD_Init(); // Start MFRC522
}

void loop() {
  // Detect card
  if (mfrc522.PICC_IsNewCardPresent())
  {
    //Select a card
    if (mfrc522.PICC_ReadCardSerial())
    {
      // Compare ID with valid keys
      if (isEqualArray(mfrc522.uid.uidByte, validKey1, 4))
        Serial.println("Valid card");
      else
        Serial.println("Invalid card");

      // End current reading
      mfrc522.PICC_HaltA();
    }
  }
  delay(250);

}
Data writing
In the last example, we use the writing and reading functions to record a text string in the memory of the Mifare card.
//RST          D9
//SDA(SS)      D10
//MOSI         D11
//MISO         D12
//SCK          D13

#include <SPI.h>
#include <MFRC522.h>

const int RST_PIN = 9;
const int SS_PIN = 10;

//Declaration of character string
unsigned char data[16] = {'T', 'E', 'S', 'T', ' ', 'R', 'F', 'I', 'D', ' ', 'M', 'F', 'R', '5', '5', '2'};
unsigned char *writeData = data;
unsigned char *str;

MFRC522 mfrc522(SS_PIN, RST_PIN);

MFRC522::MIFARE_Key key;

void printArray(byte *buffer, byte bufferSize) {
  for (byte i = 0; i < bufferSize; i++) {
    Serial.print(buffer[i] < 0x10 ? " 0" : " ");
    Serial.print(buffer[i], HEX);
  }
}

void setup()
{
  Serial.begin(9600);
  SPI.begin();
  mfrc522.PCD_Init();

  for (byte i = 0; i < 6; i++) {
    key.keyByte[i] = 0xFF;
  }
}

void loop()
{
  if (!mfrc522.PICC_IsNewCardPresent())
    return;

  if (!mfrc522.PICC_ReadCardSerial())
    return;

  MFRC522::StatusCode status;
  byte trailerBlock = 7;
  byte sector = 1;
  byte blockAddr = 4;

  status = (MFRC522::StatusCode) mfrc522.PCD_Authenticate(MFRC522::PICC_CMD_MF_AUTH_KEY_A, trailerBlock, &key, &(mfrc522.uid));
  if (status != MFRC522::STATUS_OK) {
    Serial.print(F("PCD_Authenticate() failed: "));
    Serial.println(mfrc522.GetStatusCodeName(status));
    return;
  }

  // Write data to the block
  Serial.print(F("Write data to sector "));
  Serial.print(blockAddr);
  Serial.println(F(" ..."));
  printArray((byte *)data, 16);
  Serial.println();
  status = (MFRC522::StatusCode) mfrc522.MIFARE_Write(blockAddr, (byte *)data, 16);
  if (status != MFRC522::STATUS_OK) {
    Serial.print(F("MIFARE_Write() failed: "));
    Serial.println(mfrc522.GetStatusCodeName(status));
  }
  Serial.println();

  byte buffer[18];
  byte size = sizeof(buffer);

  // Read data from the block (again, should now be what we have written)
  Serial.print(F("Read data from sector "));
  Serial.print(blockAddr);
  Serial.println(F(" ..."));
  status = (MFRC522::StatusCode) mfrc522.MIFARE_Read(blockAddr, buffer, &size);
  if (status != MFRC522::STATUS_OK) {
    Serial.print(F("MIFARE_Read() failed: "));
    Serial.println(mfrc522.GetStatusCodeName(status));
  }
  Serial.print(F("Data in block "));
  Serial.print(blockAddr);
  Serial.println(F(":"));
  printArray(buffer, 16);
  Serial.println();

  // Halt PICC
  mfrc522.PICC_HaltA();
  // Stop encryption on PCD
  mfrc522.PCD_StopCrypto1();
}
Download the code
All the code from this post is available for download on GitHub. 
