
What is a WS2812B?
WS2811, WS2812, and WS2812B are LEDs that have integrated logic, so it is possible to vary the color of each LED individually (unlike conventional RGB strips in which all LEDs change color simultaneously).
They are based on the 5050 LED, named because it has a size of 5.0 x 5.0 mm. It is a low-consumption, high-brightness LED that incorporates the 3 RGB colors in a single package.
The great novelty of the WS2812B (and the rest of the family) is to add an integrated circuit inside each LED, which allows access to each pixel individually. For this reason, this type of LED is called “individually addressable”.
This opens the door to a myriad of applications and combinations, ranging from providing different lighting to different areas with a single strip, complex animations, or even generating entire high-brightness screens.
From now on, we will focus on the WS2812B, as it is the most modern of the family, but everything exposed applies to the WS2811 and WS2812 models as well.
The WS2812B LEDs are also called NeoPixel
Price
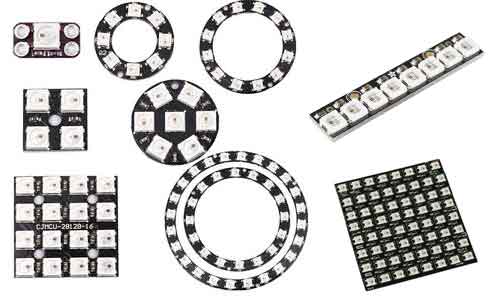
We can find WS2812B sets in a wide variety of formations, including strips, panels, and rings.
We find strips of different lengths, ranging from 1 to 5m. In terms of density, we can find strips of 30, 60, and 144 LEDs per meter. In addition, there are non-waterproof (IP30) and waterproof (IP67) strips, which wrap a protective plastic around the PCB. Prices vary greatly between these factors, from about 5€ for a 1m IP30 30 LED/m strip, to 30€ for a 5M IP67 60 LED/m strip.
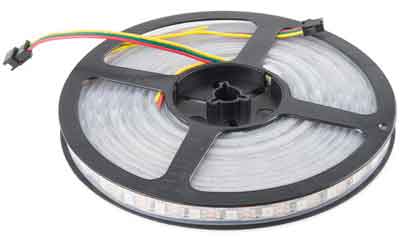
As for ring arrangement, we can find rings of 16 LEDs for 3€ and 24 LEDs for 4€.
In panels, we find both flexible and non-flexible panels. We can find flexible panels of 8x8 for 15€, 16x16 for 35€, and 8x32 for 50€.
How does a WS2812b work?
The operation of a WS2812b is truly ingenious. Each LED has an integrated circuit that stores 3 bytes (24 bits), which correspond to the 3 RGB colors. Each pixel can have 256 levels in 3 colors, which adds up to a total of 16,777,216 possible colors.
When an LED receives a stream of bytes, it stores the last received bytes and transmits the ones it contained to the next LED. Finally, with a “reset code” signal, each LED displays the last stored value.
This great idea allows for configurations of multiple LEDs, in which we only have to communicate with the first one and each LED acts as a transmitter of the sequence to the subsequent LEDs. It also allows us to chain or divide LED strips, and any segment will continue to function because all the LEDs have exactly the same behavior.
Each time a point transmits a signal to the next one, it performs a reconstruction so that distortion and noise do not accumulate. This allows strips of more than 5m to be powered without the need for additional devices.
The transmission of 0 and 1 and reset code is done through timed pulsed signals.
- A 0 is performed by a HIGH pulse of 0.35 us, followed by a LOW period of 0.9.
- A 1 is performed by a HIGH pulse of 0.9us and LOW 0.35 us.
- The “reset code” is sent as a 50us LOW signal.
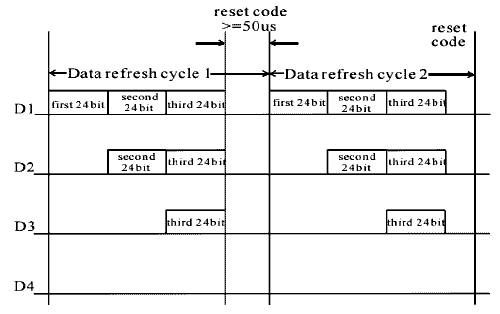
The operating frequency is greater than 400Hz/s. This allows for more than 1024 points to be animated at a refresh rate of 30fps.
For more information and details on its operation, we recommend consulting the WS2182B Datasheet.
Assembly diagram
The electrical diagram for connecting WS2812b LEDs is simple. Each LED powers the next one, so we only need to connect to the first element in the formation.
We have 3 pins, 2 for power (5V and GND) and a data input (Din) to receive data from Arduino.
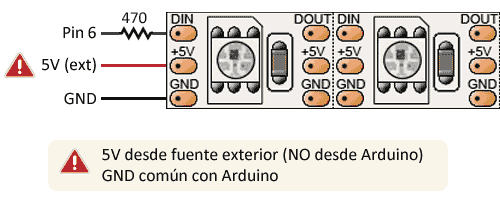
The LED strip must be powered from an external 5V power source, as Arduino does not have enough power. The GND reference will be common.
Each WS2182b LED consumes about 60mA (0.3W), giving intense white color (20mA for each color component) This represents a consumption of 9W for 30 LEDs, and 18W for 60 LEDs, which is a lot of power in a 5V power supply.
Fortunately, we will not always illuminate all the LEDs simultaneously with maximum intensity white. Depending on the program and effects we create, the required power will be much lower.
In cases of high consumption and a large number of LEDs, it may also be necessary to power more than one point at a time (for example, the head and tail of the strip). Otherwise, the voltage drop will cause the last LEDs to turn red.
You can use the 5V power supply to power the Arduino itself. What you cannot do is power the strip from the 5V output of Arduino.
Remember, the GND reference must always be common. You can damage a component if you don’t.
As for the signal pin, we can use any of the digital outputs of Arduino. It is necessary to use a 470 ohm resistor between the digital pin and the signal pin of the WS2818b, or you can damage the first LEDs.
It is also advisable to install a capacitor of at least 1000 uF between GND and 5V (although in the setups I have tried, I have never used it and it has worked correctly).
Code examples
We can send the signal directly by properly controlling the necessary timings. However, it is normal for us to use an existing library that takes care of this task for us. We have several libraries available to handle WS2812b from Arduino.
On the one hand, we have the Adafruit NeoPixel library which is easy to use but relatively slow, making it unsuitable for complex effects.
On the other hand, we have the FastLED library, a bit more difficult but in return allows much more complex patterns.
Download both libraries and try the examples that come included, so you can decide which types of effects you need and which library you are more comfortable with.
From here, it depends on your imagination and the effect you want to achieve. There are no limits, and the number of combinations is endless. Dare to program your own effects and animations.
Result
Here is a video showing the result of running some of the examples.
If you liked this post and want to read more about Arduino, you can check out the ARDUINO TUTORIALS section
Download the code
All the code from this post is available for download on Github. 
