We start with a new Arduino project, building a robotic arm controlled by a processor like Arduino.
A robotic arm is one of the ultimate projects for many makers. However, although at first it may not seem like it, it is simpler than it seems. And we can build it for about 60€.
In this post we will see different alternatives and commercial Kits for making a robotic arm with Arduino and the project budget. In the next posts of this series we will see the assembly, electrical connection, and programming.
Choosing a robotic arm
We have several options for making a robotic arm controlled by Arduino. On the one hand, we have several commercial Kits aimed at Makers. There are also people who build it with cardboard, wood, or plastic, or with recycled parts. Of course, we can also use a 3D printer to design it.
We are going to review some of the commercial kits to make a robotic arm. If you want to make the mechanical parts yourselves, it is always good to have these models as a reference.
When selecting a robotic arm, we must take various factors into account, such as weight and resistance, power consumption, type and size of motors, geometry, and especially the degrees of freedom (DOF) that the arm has. Let’s focus on two of them.
Type and size of motors (servos)
The robotic arms we are going to see use servos for their movement. Many robotic arms also use stepper motors, but in commercial Maker Kits it is more common to find those based on servos.
The size of the servos (or other motors) has a great influence on the weight the robot can lift, power consumption, and the size and weight of the robot itself. This, in turn, conditions the selection of the motor, the controllers, the geometry of the arm, its reach, precision, etc.
In short, it is one of the most important decisions to make at the beginning of the design. As almost always, there is not a better option, but it is a matter of making a correct balance of the elements, between size, weight, price, power, etc.
Geometry and degrees of freedom (DOF)
The DOF are one of the most important criteria for selecting a robotic arm. In this context, to make it more intuitive, you can say that the number of DOF is equivalent to the number of servos that the arm mounts.
In general, we will always have a DOF that corresponds to the Z axis, and that allows the entire arm to be oriented “horizontally” towards the target where we want to place the effector (the clamp, or whatever we have at the end).
On the other hand, we have the DOF corresponding to opening and closing the claw. In reality, it is practically not a DOF because it does not participate in the resolution of the arm’s position. But keep in mind that the kits count the opening of the claw as a DOF.
We are left with the DOF that remains with the X-Y plane of the arm. With 1 DOF in X-Y we can only rotate the claw so the positions are limited to a circle in the X-Y plane (counting the previous Z-axis in a hemisphere).
With 2 DOF in X-Y we have an articulated triangle, which can be positioned at any point within a certain area (determined by the lengths of the arm segments, and which we will call range or reach). We cannot choose the angle with which we reach the point. The resolution of the kinematics is simple and unique, for each feasible position of the effector.
With 3 DOF in X-Y we have an articulated quadrilateral, a very common mechanism when solving the inverse kinematics of an articulated robot. It allows positioning the end at any point in the reach area and the angle of attack of the effector. The resolution of the kinematics is simple and unique if we define the angle of attack as a parameter (if not, there are infinite solutions).
Many arms add more DOF along the arm. For example, it is normal to add one or two DOF at the end (equivalent to a “wrist”), allowing
Summary of DOF
Therefore, in summary, an arm with:
1 DOF is only the fixed position claw.
3 DOF (Z + X + claw) is the claw installed in a turret-type servo mechanism. It can rotate in Z and in X, but it cannot be considered a true “arm”.
4 DOF (Z + 2 in X-Y + claw). A limited mechanism, which we can hardly consider an “arm”. We can position the claw at any point (within reach), but we cannot choose the angle with which we grab the object.
5 DOF (Z + 3 in X-Y + claw) is the first mechanism that we can classify as an arm. We can choose the position and the angle of grip. The resolution of the inverse kinematics is not unique, if we do not define the angle.
6 DOF or more. They are configurations similar to the previous one, adding additional DOF. For example, the rotation of the claw. Therefore, there is more than one solution to pick up a piece, having to set (N-4) parameters to solve the inverse kinematics.
Commercial Robotic Arm Kit with Arduino
Let’s take a look at some of the commercial Kits that we can find on AliExpress or Ebay to build a robot arm controlled by Arduino. Normally these Kits do not include motors or electronics and, if they do, it is usually more economical to buy them separately.
Of course, they are just some of the possible configurations. And you don’t have to buy a Kit, you can always use them as inspiration or as a basis to build your own (with wooden parts, plastic, 3D printing, etc).
4 DOF robot arm (SG90)
If we start with the size of the servos, we have robotic arms based on 9g servos like SG90 or MG90S. In general, these arms will be cheaper, but they will have limitations in terms of the weight they can lift due to the small power of the servos.
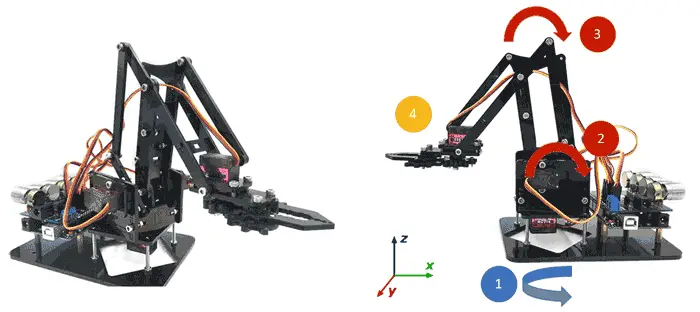
As for commercial kits with 9g motors, we have this 4 DOF kit (Z + 2 in X-Y + Claw). Since 4 DOF is insufficient for a complete arm (position + effector angle) this Kit uses a mechanism that makes the claw always move horizontally.
Therefore, we can grab a piece at any position within the reach area, but we will always grab it with the claw horizontally. As we say, it is a somewhat limited arm and cannot carry much weight.
But it has the advantage that, due to its light weight, it can be suitable for mounting on a robot or vehicle, due to its light weight. Another notable advantage is its price. We can buy it, including SG90 servos, for about 25-28€.
6 DOF arm (MG996R)
This is probably the most common Kit and it is the one we are going to assemble in this project. It is formed by 6 MG996R (or similar) servos that act as arm joints.
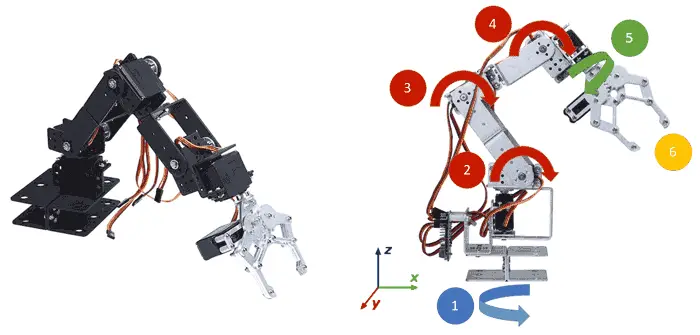
Therefore, they have 6 DOF (Z + 3 X-Y + Claw rotation + Claw). It is a configuration versatile enough to reach any position within the range, choosing the angle and rotation of the claw.
The mechanical parts of the body are made up of brackets, those standard black pieces that are used for robotics projects. We also have the servo horns, cylindrical pieces that are screwed onto the servo, and allow it to be screwed onto the brackets.
The distribution of the arm is not bad, but having the motors distributed along the arm the weight of the motors and brackets exert a great torque, especially those farther from the base. This means that it is subject to great stresses, especially in positions with the arm more extended.
For this reason, the behavior of the arm in this configuration depends a lot on the quality of the servos. With the cheap servos that we are going to mount, the robot moves acceptably, but we should not expect the smoothness of an industrial welding arm.
To be able to withstand in the most unfavorable positions, it is advisable to supply at high voltages (6-7V). With these voltages, the arm tends to overshoot a bit when it reaches the desired position. But well, it is not serious either.
Mixed 6DOF arm (4x MG996R + 2x SG90)
The last Kit we are going to see is made up of a mix of five MG996R servos in the arm and two SG90 servos at the end, not counting the claw.
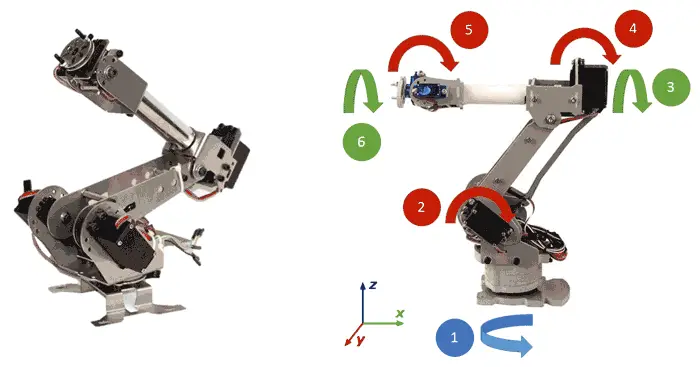
Therefore, we have an arm of at least 6 DOF (1 Z + 3 X-Y + 2 end). If we add the degree of the claw opening of the claw (as the others do) we have 7 DOF.
The configuration is very interesting. It allows reaching any point within the reach, and choosing two angles for the effector. This gives great versatility to the arm, although it also makes the resolution of the kinematics difficult.
Another advantage of this arrangement is that it uses a mechanism to transmit one of the joints, so 3 of the 4 large servos are located at the base. At the end we only have two small servos, so the effort in stretched positions is much less.
Of course, it also has its disadvantages. It is much more expensive than the previous ones. The Kit with the mechanical parts costs about 70€, not including motors or the end claw (with its motor). Therefore, this arm ends up costing 110-120€, twice as much as the previous model. In addition, you have to find a compatible claw and check how well those small servos at the end will behave to rotate the claw smoothly.
Honestly, it is an interesting configuration that I wouldn’t mind trying, but when I bought the arm this model was not sold (and with the price difference I don’t know if I would have bought it). If anyone wants to tell us about their experiences, we would be happy to hear.
Budget
The robotic arm that we are going to assemble is the 6DOF with MG996R type servos, which we have seen among the previous ones, which as we said is probably the most common among commercial Kits.

I have screwed mine to a wooden base, but there are also people who attach it to a table with clamps. It’s your choice. We will see it in detail in the next posts of the series.
We can find kits with all the mechanical parts that include the servo brackets and the servo horns (without servos) from international sellers on AliExpress or Ebay. It is important that you make sure that your Kit does not include (or does) the servos and servo horns, because it greatly affects the price.
So the budget, in broad terms, is composed of:
- Servo brackets + servo horns (kit), 25€
- 6 MG996R servos, another 25€
- Arduino Uno, 1.80€.
Other electrical materials (switch, cables, board, etc) let’s say at most 4€.
That is to say that the cost of building a robotic arm is about 55-60€, not including power supply (batteries, transformer, ATX power supply, etc). It is not exactly cheap, but it is not the most expensive project we can find either.
In the next posts of this series we will see the assembly, electrical diagram, and we will do the programming of both the direct and inverse kinematics.
Download the code
All the code in this post is available for download on Github. 
