
Today we are going to see how to do automated testing in Arduino, and for that, I’m sharing one of my “secret weapons”, the Arduino Simulator library.
Let’s suppose you have a machine that you want to put into production. This machine has a button panel, a user menu, an emergency stop button, an alarm speaker, sensors… and who knows what else.
Logically, you will want to test that it works correctly. Every time you make a change, you’re not going to upload the code to the real machine and start pressing buttons and checking that everything works, right? ¿!¿right?!?

No, what you would like is to have a series of automated tests that verify the code works correctly. That’s where Arduino Simulator comes into play.
Schedule
Let’s imagine your machine has to do certain things when a series of events occur. For example, if we press the emergency button, it has to stop and turn on the alarm.
We will call this a use case. With Arduino Simulator, we can create a use case using a Schedule, which contains the actions that will happen at each moment.
TEST_METHOD(MY_COOL_EXAMPLE_TEST)
{
   SIMULATION_STEP_US = 50;
   AT_MILLIS(2000, []() { digitalWrite(0, HIGH); });
   AT_MILLIS(5000, []() { digitalWrite(0, LOW); });
   AT_MILLIS(8000, []() { SIMULATE_INTERRUPT(0, HIGH); });
   AT_MILLIS(12000, []() { SAVE_STATE(); });

   EACH_MILLIS(1000, []() { digitalWrite(1, digitalRead(1) == LOW ? HIGH : LOW); });

   THEN([]() { analogWrite(0, 250); });

   for (size_t pwm = 250; pwm > 50; pwm -= 50)
   {
      THEN_AFTER_MILLIS(500, [pwm]() { ADC_Input[0] = pwm; });
   }

   simulate_seconds(50);

   Assert::IsTrue(Gpio_Status[0] == LOW);
   Assert::IsTrue(Gpio_Status[1] == LOW);
   Assert::IsTrue(Gpio_Status[2] == HIGH);
   Assert::IsTrue(PWM_Output[0] > 200);
   Assert::IsTrue(ADC_Input[0] <= 100);
}
For this we can use:
- AT_MILLIS, AT_MICROS
- THEN
- THEN_AFTER_MILLIS, THEN_AFTER_MICROS
- EACH_MILLIS, EACH_MICROS
Testing
You can use the Test environment of your IDE to generate several unit tests, or complete use cases.
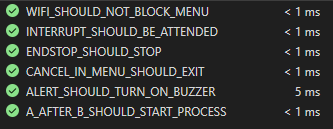
When you, or someone on the team, modifies the code, running all the Tests is as simple as clicking a button and verifying that the machine’s behavior is still correct.
Debug
Another advantage of simulating your machine is that you can use your IDE’s debugger to check the machine’s state.
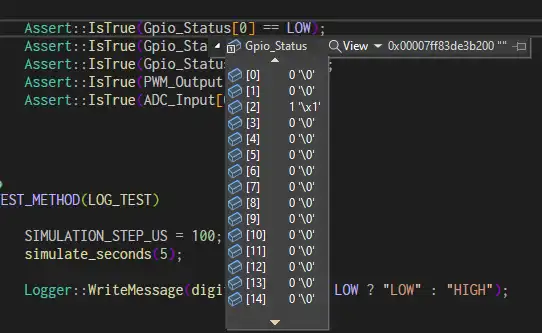
No more using Serial.println everywhere for debugging! Now you can find errors easily, add breakpoints, and debug properly.
Arduino Simulator
Arduino Simulator is a library that allows us to test Arduino C++ code from your favorite IDE, like Visual Studio or Visual Studio Code.
It is not, does not pretend to be, and never will be, a simulation of Arduino hardware. It is designed to simulate your code, not your hardware.
For this, the simulated “machine” has 16 GPIOs, 8 PWM outputs, 8 ADC inputs, and 2 interrupts. Although you can easily extend it by changing the code.
That is, if your machine starts writing registers and doing things like PORTy = 0x00, Arduino Simulator will tell you to get lost! And rightly so!
In short, to be able to test your code, it must be testable. If you don’t know how to make your code testable, check out the rest of the blog, as it’s a topic I like to talk about recurrently.
Using Arduino Simulator
Using Arduino Simulator is very simple:
- Clone the solution repo
- In the Sketch file, put your machine’s code
- Create one or more Schedules
- Run the simulation
You can create the Schedule in the main() function of the main.cpp file, although normally, if your IDE allows it, you would create several Tests, each with its own actions.
To run the simulation, you have the functions:
- simulate_seconds()
- simulate_milliseconds()
- simulate_microseconds()
By default, the simulation runs every microsecond. In many cases, this step is unnecessarily small. For example, if your code ‘does things’ every second, simulating it every microsecond is a waste of time.
For this, you can adjust the simulation step with the variable SIMULATION_STEP_US. For example, you can set it to 100 so the simulation runs every 100us.
You can access the simulated hardware variables with the collections:
- Gpio_Mode[] and Gpio_Status
- ADC_Input[]
- PWM_Output[]
- Interrupt[]
You can also simulate the occurrence of an interrupt with the function SIMULATE_INTERRUPT(numInterrupt, status). It will execute the code you defined in your Sketch with attachInterrupt(...).
Finally, you can also save machine states with the SAVE_STATE function, which creates a ‘snapshot’ of the machine’s state at a given moment.
Arduino Simulator is Open Source, and all the code and documentation are available in the repo https://github.com/luisllamasbinaburo/Arduino_Simulator
