A common need in automation and control is to perform a certain action when an input value crosses a reference value, which we will call a setpoint or threshold.
Control using a threshold is one of the simplest forms of regulation we can implement. It frequently appears when we have an on/off type actuator, so, lacking the option to modulate, no other more sophisticated type of controller is possible.
When the variable to be controlled is independent of the measured variable, we can use a single threshold as the activation and deactivation condition. For example, turning on a light or an alarm when a sensor reading is below (or above) a certain setpoint.
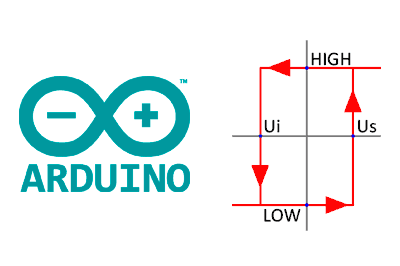
However, when the variable to be controlled has feedback on the measured variable, we will generally need to use a double threshold, i.e., use different setpoints for the activation and deactivation conditions.
For example, a thermostat that turns a heat emitter on or off based on the recorded temperature, or a pumping unit that activates if the level of a tank exceeds a certain level.
The purpose of the double threshold, or hysteresis, is to avoid multiple activations of the actuator, which would cause premature wear. In fact, in an ideal world where the performed action had an immediate effect and in the absence of noise, the moment the threshold was crossed, the actuator would activate, correcting the variable by a differential amount, sufficient to cause it to deactivate. That is, we would have infinite activations once the setpoint was reached, and the system would not be able to evolve to another state.
Of course, a real system has inertia, delays, inhomogeneities, etc. Therefore, we won’t have an infinite number of activations, although it could still cause a large number of activations.
This leads to the other reason for the double threshold: noise in the measured variable. If, for example, we take a temperature measurement, when the sensor reaches the threshold, the room temperature is not perfectly homogeneous. Any small variation (noise) in the signal will again cause multiple triggers around the threshold.
Noise in the measured variable makes the double threshold advisable even for independent variables. For example, if we want to turn on a light if the water in a tank exceeds a level, it may also be advisable that it does not turn off until it falls below a setpoint lower than the turn-on value. Otherwise, the waves and turbulence on the liquid surface itself could cause a flickering effect on the sensor as it crosses the threshold.
In this post, we will see two simple implementations for on/off control with single and double threshold in an automation controller or processor like Arduino.
Single Threshold in Arduino
Implementing a single threshold is really simple. We will use a function GetMeasure() that simulates obtaining a measurement from a sensor.
We store the previous state, and based on the previous state and the current state, we determine if the activation or deactivation action is necessary.
// Simulates the capture of a sensor or reading from a sensor
int values[] = { 7729, 7330, ... };
size_t valuesLength = sizeof(values) / sizeof(values[0]);
int getMeasure()
{
  size_t static index = 0;
  index++;
  return values[index - 1];
}

bool state;
int threshold = 15000;
void calculateThreshold(int value)
{
  if (state == false && value > threshold)
  {
    state = true;
    Rising();
  }
  else if (state == true && value < threshold)
  {
    state = false;
    Falling();
  }
}

void Rising()
{
  Serial.println("Rising");
}

void Falling()
{
  Serial.println("Falling");
}

void setup()
{
  Serial.begin(9600);

  state = true;
  for (size_t index = 0; index < valuesLength; index++)
  {
    // Get simulated measurement
    int rawMeasure = getMeasure();

    calculateThreshold(rawMeasure);
  }
}

void loop()
{
}
The system response is as follows. As we can see, the output switches every time the signal crosses the setpoint in either direction. We also see that noise can cause multiple triggers around the setpoint, as mentioned earlier.
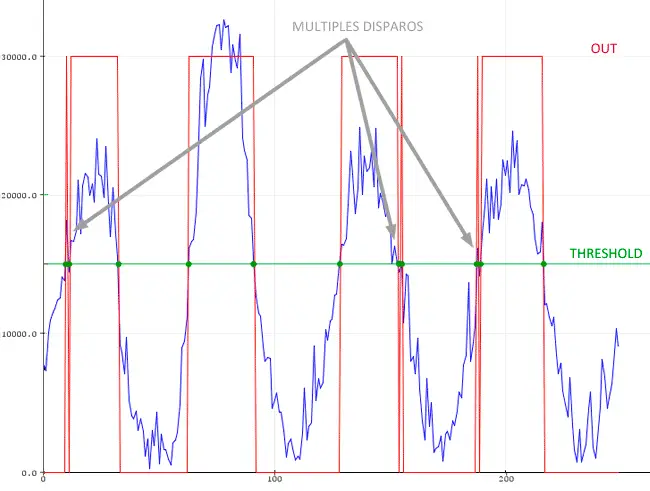
For this reason, except in very simple systems, we will generally always use a double threshold in our projects.
Double Threshold (Hysteresis) in Arduino
Implementing a double threshold is not much more difficult. This time we will have two different setpoints, and the state change will depend on the previous state, the signal value, and both setpoints.
// Simulates the capture of a sensor or reading from a sensor
int values[] = { 7729, 7330, ... };
size_t valuesLength = sizeof(values) / sizeof(values[0]);
int getMeasure()
{
  size_t static index = 0;
  index++;
  return values[index - 1];
}

bool state;
int riseThreshold = 20000;
int fallThreshold = 15000;
void calculateThreshold(int value)
{
  if (state == false && value > riseThreshold)
  {
    state = true;
    Rising();
  }
  else if (state == true && value < fallThreshold)
  {
    state = false;
    Falling();
  }
}

void Rising()
{
  Serial.println("Rising");
}

void Falling()
{
  Serial.println("Falling");
}

void setup()
{
  Serial.begin(9600);

  state = true;
  for (size_t index = 0; index < valuesLength; index++)
  {
    // Get simulated measurement
    int rawMeasure = getMeasure();

    calculateThreshold(rawMeasure);
  }
}

void loop()
{
}
The system response is as follows.
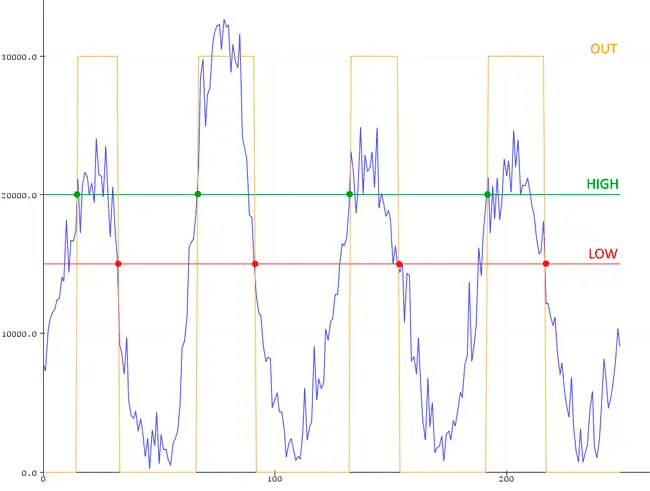
The system output activates when the input exceeds the rising threshold, but does not deactivate until it crosses the lower threshold. In this way, we eliminate the triggers that occurred due to noise in the single threshold case.
Single and Double Threshold in a Library
What if we clean up and improve the code, and put it in a library to make it more convenient to use? Of course, here is a Threshold library for Arduino. Enjoy!
Download the Code
All the code from this post is available for download on Github. 
