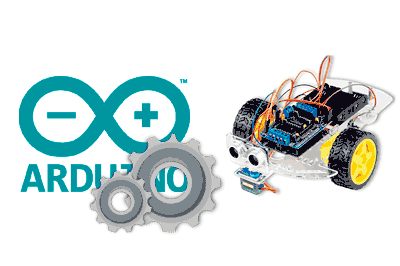
After many entries dedicated to electronics, programming, and Arduino, we have finally arrived at the most interesting projects. Let’s start with the first entry dedicated to building Robots!
If you are fans of electronics, the Geek world, and are introduced to the world of Arduino, surely one of your goals will be to build robots. However, the general impression is that building robots is a difficult and expensive hobby.
How much does a robot cost to get started in the world of robotics? We can find Starter Kits for 60-150 euros. But do we really need so much money to build an interesting robot?
Not at all! Although it may surprise you, we can get a fully functional robot for less than 20€. And don’t think that cheap means simple. We’re talking about a real robot that can serve as a base for many projects.
In fact, you will see configurations similar to the one we will see in this series of entries in all kinds of robots, some very “intelligent” and advanced. We can make a line follower, solve mazes, or follow pre-programmed routes. An endless number of functionalities with the same robot as a base, just by changing some module and changing its programming.
Also, now that Christmas is approaching, it is a great gift to give to the little ones in the house. With the help of an adult, a robot is a great teaching tool to introduce children to the world of science and technology.
Our first robot with Arduino
The base of the robot we are going to build looks like this. Basically, it is a platform with wheels that we are going to control with a processor like Arduino.
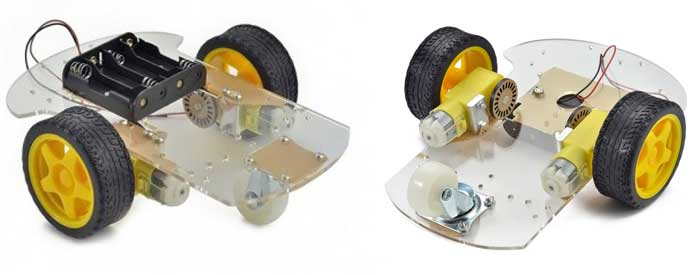
These types of robots are called by different names, RoboCar, Robot Car, Smart Car, Robot DC 2W, Robot Car with Arduino, etc. Basically, as each one likes. There are also robots with their own brand names, Open Source projects, or commercial ones, in which each one names their robot as they want.
Many types of similar robots that have as a difference the devices (sensors, electronics, batteries) that are on top, but in essence, they are all similar.
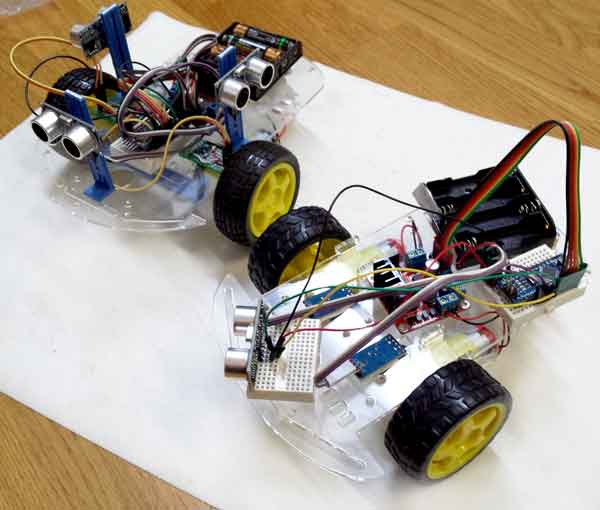
In fact, these are two of mine. The one with three sensors was my first robot (ooooh, nostalgia) and the second one to give to a relative’s son, and you will see that, although they are different, they have a common base with two wheels.
Number of wheels 2WD, 4WD, 6WD?
As we said, sometimes you will see this type of robots referred to as 2WD, 4WD, 6WD, etc. The acronym WD (Wheel drived) simply refers to the number of driven wheels, that is, with attached motors, that a vehicle has.
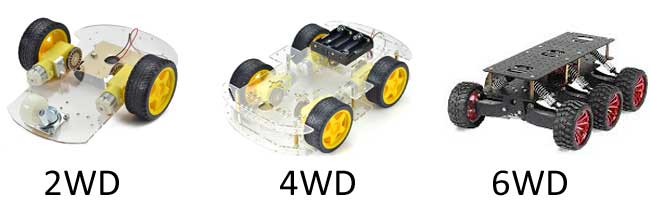
First of all, it must be said that many sellers use these terms incorrectly and, for example, call a 4WD robot any vehicle with 4 wheels, although sometimes they really have two with a motor and two without a motor (which would be a 2WD+2W).
The most common robots are the 2WD, which we have seen, which have two motors. For the robot to be stable statically, we need at least three support points, so they have one or more “crazy” wheels or spherical wheels that can roll in any direction.
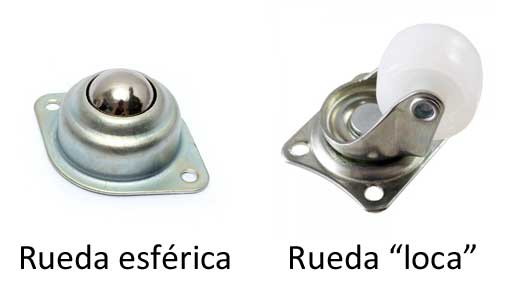
On the other hand, there are many chassis for 4WD and 6WD that are really very striking. On the other hand, they are more expensive, and they have the great disadvantage that a vehicle with 4 or 6 conventional fixed wheels, when turning, necessarily one or more wheels have to slide. This is a small horror when it comes to knowing the position and angle of the robot.
For this reason, the 2WD configuration is very suitable for making robots and is the one we will use in this post. However, the assembly, schematic, and programming for 4WD or 6WD would be practically the same.
Essential components
To assemble our basic platform, we will need at least the following elements.
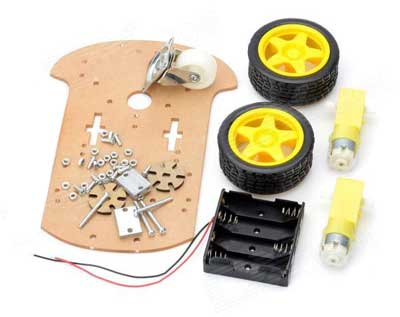
Robot chassis: Understood as the set of mechanical parts that serve as support and connect to all the others.
Wheels: The motorized ones transmit the motor torque to the ground and allow the vehicle to move. The non-motorized ones simply stabilize the robot and allow it to move by rolling.
Motors: Responsible for providing movement to the vehicle. Among the many available types, in this robot we will use DC motors with built-in reducer.
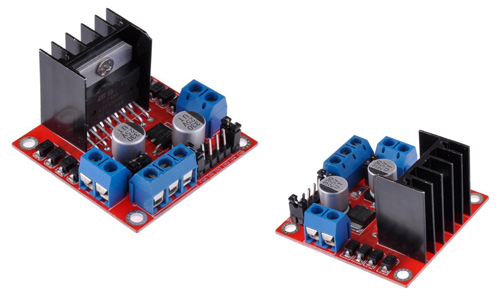
DC motor controller: To be able to electrically power the motors, control their speed easily, and, above all, to be able to reverse the direction of rotation, we will need a DC motor controller with an H-bridge like the L298N or the TB6612FNG.
Batteries: Provide energy to the robot so that it can move autonomously, without needing a cable connection. Among the many available alternatives, for this project we will use simple 4 AA batteries.
Switch: Very convenient to be able to turn off the robot comfortably without having to remove cables.
Electronics:. Including a processor like Arduino, cables to make the connections, and a breadboard to facilitate the assembly.
Budget
So, what is the budget to build a cheap autonomous platform controlled by Arduino?
Looking at international sellers such as Ebay or AliExpress, we will find very cheap robot kits for around 8-9€, which include the chassis (a black plastic or transparent methacrylate base), the wheels, the motors, and a battery holder.
To this, we must add the DC motor controller with H-bridge like the L298N (about 1.5€) and a processor like the Arduino Nano (2€). Of course, we need a mini breadboard (1€), cables (1.5€), and a switch (0.5€).
That is, for about 15€ we can have our basic robot assembled.
Possible improvements
With the motor we have assembled, we have a platform with wheels that we can move as we want, a basic and simple robot. We can make it move forward, turn, and try to follow a route controlling the speed and advance of the robot over time, and even carry a small load (of little weight!).
However, basically our robot is “blind”, it has no way of knowing its position or interacting with the environment. It only makes a movement for a certain time, which we know will soon cause the robot to have discrepancies.
To give it more dynamism and bring it closer to what we all “consider a robot” and not a toy car, we can add more sensors. Here are some of the most common improvements.
Add encoders
An almost essential improvement is to have a position control by adding optical encoders on the wheels. Encoders allow you to know the angle that each wheel has turned, so it is possible to have a good estimation of the angle turned and the distance traveled.
This improvement is necessary for almost any “serious” robot. With this, for example, it is already possible to say that you want the robot to advance 2 meters, and then turn 90º to the right.
The cost, 2x Photointerrupters (1x0.75€), about 1.5€.
Distance detectors
Another very common improvement is to add distance sensors in different numbers and positions. The most obvious is to put one in front, so that the robot stops when it is about to collide with an obstacle.
It is also interesting to have side sensors. This allows the robot to detect the side walls while moving, which is convenient both to avoid cars and to detect “gaps”. This is how, for example, robots that solve mazes work.
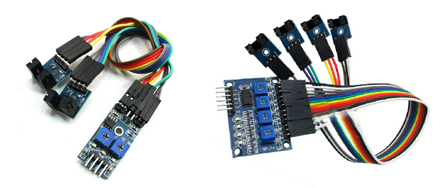
There are many distance sensors available. The most common in these simple robots is the HC-SR04 ultrasonic sensor, which, although it is not very precise, is very cheap. Also, although it is not a technical reason, they look like two little eyes and give a very funny look to the robots XD.
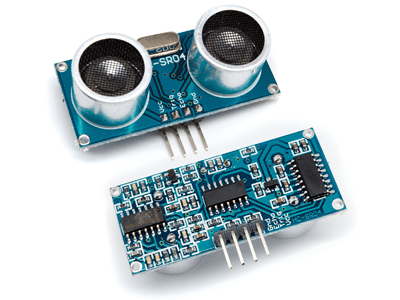
As for the cost, it will depend on the number of sensors we install. If we only put one in front, the cost is about 0.80€. With one sensor, when the robot reaches a wall, it will have to turn, measure, turn, measure, until it finds a gap through which to continue.
An alternative is to add a servo and mount the sensor on top. This allows you to measure in several directions without turning the entire robot. There are several types of supports for attaching a servo with an ultrasonic sensor, and the platforms we are seeing have holes to hold the servo. The cost, an ultrasonic sensor (about 0.80€), a sensor support (about 0.80€), and an SG-90 servo (1.4€). That is, about 2.80€.
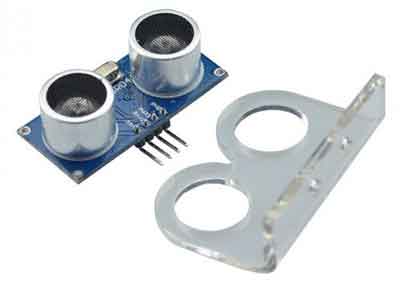
Adding a servo is an interesting option because it allows you to measure distances at any angle from -90 to 90º in front of the robot. Also, it has to be recognized that it is very cool to see the robot advancing by moving the tower from one side to the other, although it is not entirely practical.
The last option, which is what you saw in my first robot, is to add more ultrasonic sensors. Here you will see everything, people who put one behind and 3 in front at -45º, 0º, and 45º. Put 5 in front at -90º, -45º, 0º, 45º, and 90º. One in front and one behind.
For me, the combination of 3 sensors at -90º, 0º, and 90º is interesting because it allows me to move forward while detecting front obstacles and simultaneously tracking the side walls. The cost of this option is 3 ultrasonic sensors (3x 0.80 = 2.40€).
Line follower
Another very common improvement is to put reflective optical sensors on the bottom to make a robot able to follow a line. A very common, interesting, and fun project to get started in robotics.
These sensors simply detect the difference in reflection between a tape (white or black) that we stick on the ground and the ground around it. This way the robot can detect the line and correct its trajectory.
To make a line follower robot, the minimum number of sensors needed is 2, and the robot will try to keep the line between both sensors. The cost is 2 TCRT5000 reflective sensors (2x0.70€) about 1.40€.

With two sensors, the robot can only detect when one of them is on the line and assume that everything is fine the rest of the time. In this way, the behavior is not very good, and it has to make frequent sharp corrections. These are robots that seem to be “oscillating” all the time on the line.
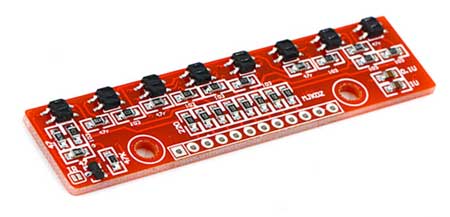
To improve the sensor, it is necessary to add more reflective sensors. This way, the robot will know if it is “slightly off” or “very off” from the sensor. It is normal to have 5-6 sensors. But for this, it is cheaper and simpler to buy a bar of infrared sensors designed for this, which cost about 3€, than to buy the sensors individually.
Other improvements
Of course, there are many other improvements and projects that we can do on our robot. We can replace the distance sensors with VL53l0X, which have much better precision. We can add an IMU like the MPU-6050 to know the orientation of the robot accurately.
We can also add actuators, such as a servo turret, a gripper, an electromagnet, a laser, a missile launcher… Anything we can think of.
In terms of controls, we can use any of the many we have seen on the blog, such as the PS2 controller, a Wiichuck, or a radio control transmitter.
In communications, it is common to add a bluetooth module to receive orders from the computer or mobile. We can also use WiFi with an ESP8266, or any other wireless form.
And in terms of electronics, we can use an STM32, an ESP8266, an ESP32, or even a mini computer like Raspberry Pi or Orange Pi. This would allow us, basically, to have a wheeled server to which we can even add a camera to see what the robot sees remotely.
Conclusion
With what we have seen, we have a basic platform controlled by Arduino for about 15€. On this common base, we can add as many devices as we want, or are interested in.
For example, if we add 2 encoders and an ultrasonic sensor we have a very interesting robot for about 18€. And if we want a complete configuration, with 3 ultrasonic sensors and an infrared bar to make a line follower, we can do it all for about 22€.
From there, all the projects and possibilities that occur to you. At that point, you will start assembling other robots, trying other chassis (larger, smaller), and you will see that in reality most of them are quite similar.
In the next entry in this series, we will see the assembly of the robot and the electrical diagram, and in the last entry in the series, we will see some programming examples.
Check out the rest of the articles in the Robot Car series.
Download the code
All the code in this post is available for download on Github.
![]()
