What is a servo?
A servo is a type of actuator widely used in electronics. Unlike other types of motors where we control the speed of rotation, in a servo we directly indicate the desired angle and the servo is responsible for positioning itself at this angle.
Typically, servos have a range of movement between 0 to 180º. That is, they are not able to complete a full rotation (in fact, they have internal stops that limit the range of movement).
Internally, a servo frequently consists of a reduction mechanism. Therefore, they provide high torque and a high degree of precision (even tenths of a degree). On the other hand, the rotation speeds are small compared to DC motors.
Servos accept a supply voltage between 4.8V to 7.2V, with the most suitable value being 6V. At lower voltages, the motor has less force and speed. With voltages higher than 6.5V, the servos start to oscillate too much, making them less useful.
Servos are convenient to use, as they themselves control the position, which with other types of motors must be done externally. For this reason, they are widely used in robotics projects, such as robotic arms, legged robots, controlling the rotation of turrets, or orienting sensors such as ultrasonic sensors or remote temperature sensors.
Price
There is a wide variety of servos, which vary in size, strength, speed, and precision. The servos we will use in our projects cost a few euros but, even within the field of hobbies, we can find servos for 100-150€, and thousands of euros in the industrial field.
For our home projects, we will mainly use two sizes of servo. Within the different models, we will highlight three for their quality/price. You can easily find them on international sellers such as eBay or AliExpress.
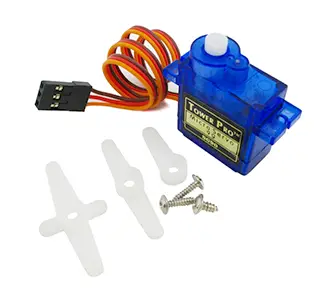
SG90
It is the “small” standard servo within electronic projects. It is a small, light, and cheap servo, which has plastic gears. Many devices, such as turrets and robot parts, are designed to install servos of this size.
- Torque: 1.4 kg·cm
- Speed: 0.1 sec/60º (4.8V) and 0.08 sec/60º (6V)
- Dimensions: 21.5 x 11.8 x 22.7mm
- Weight: 9g
- Price: 1.20€
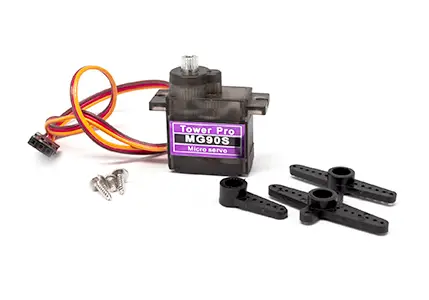
MG90S
The MG90S is similar to the SG90 but has metal gears and coupling. In exchange, it weighs a little more and is more expensive. It is physically compatible with SG90 accessories.
We will use this servo as a substitute for the SG90 when we have an application in which we really need to exert force, and the plastic parts could yield and become “rounded.”
- Torque: 1.8 Kg·cm
- Speed: 0.1 sec/60º (4.8V) and 0.08 sec/60º (6V)
- Dimensions: 22.8 x 12.2 x 28.5mm
- Weight: 13.4g
- Price: 2€
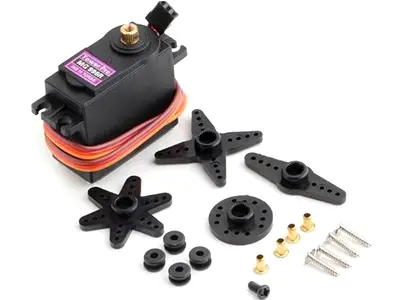
MG996R
This is the “large” servo we will frequently use. This type of servo is widely used in robotics projects. Just like with the SG90, many devices and kits such as robotic arms, hexapods, are designed to install this size of servo.
- Torque: 13kg·cm (4.8V) to 15kg·cm (6V)
- Speed: 0.17 sec/60º (4.8V) and 0.13 sec/60º (6V)
- Dimensions: 40 x 19 x 43mm
- Weight: 56g
- Price: 3.70€
It is worth clarifying that these servos, especially those purchased in China, stand out for their quality/price. But, logically, they are modest in their characteristics. You will see in comparisons that other more expensive models are also faster and more precise.
But when we do projects like hexapods or bipedal robots, which require between 18 to 24 servos, the difference between using servos from 1.2€-3.7€ to servos from 80-100€ means going from a cost of 40-60€ per project to 2000-2400€, which is a huge difference.
On the other hand, using cheap servos will bring us more problems in calibration, repeatability, testing, and additional work. But after all, building robots is easy, the hard part is making them cheap
How does a servo work?
Internally, a servo is made up of a DC motor, coupled to a reducer to reduce the rotation speed, along with the necessary electronics to control its position.
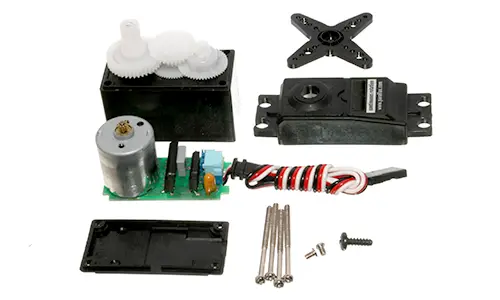
Frequently, there is simply a potentiometer attached to the servo’s shaft, which allows the servo to know the position of the shaft. This information is processed by an integrated controller that is responsible for acting on the motor to reach the desired position.
The communication of the desired position is done by transmitting a pulsed signal with a period of 20ms. The width of the pulse determines the servo’s position.
The relationship between the pulse width and the angle depends on the motor model. For example, some models respond with 0º to a pulse of 500 ms, and others to a pulse of 1000 ms.
In general, in all models:
- A pulse between 500-1000 us corresponds to 0º
- A pulse of 1500 ms corresponds to 90º (neutral point)
- A pulse between 2000-2500us corresponds to 180º
Therefore, by varying the signal in microseconds, we can have a theoretical precision of 0.18-0.36º, provided that the servo’s mechanics accompany it.
Assembly diagram
Connecting a servo to Arduino is simple. The servo has three cables, two for power (GND and Vcc) and one for signal (Sig).
The color of these cables usually has two combinations:
-
Brown (GND), Red (Vcc), and Orange (Sig)
-
Black (GND), Red (Vcc), and White (Sig)
On one hand, we power the servo through the GND (Brown / Black) and Vcc (Red) terminals.
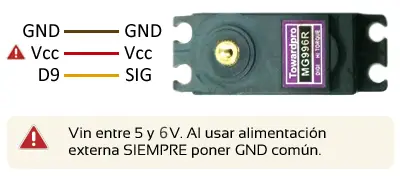
In general, the power to the servos will be supplied from an external voltage source (a battery or power supply) at a voltage of 5V-6.5V, with 6V being the ideal voltage.
Arduino can provide enough current to power a small servo (SG90), enough to do a few test projects.
However, it does not have enough current to actuate a large servo (MG996R). Even several small servos, or applying excessive force with them, may exceed the current capacity of Arduino, causing it to reset.
On the other hand, finally, for control, we connect the signal cable (orange / white) to any digital pin of Arduino.
When using several voltage sources, remember to always connect all the GNDs together. Otherwise, you could damage a component.
Code examples
Controlling servos in Arduino is very simple, as the Standard IDE provides the “servo.h” library, which allows you to simultaneously control up to 12 servos on Arduino Uno/Nano and up to 48 servos on Arduino Mega.
Among the typical examples to illustrate the operation of servos, we have the “Sweep” Sketch, which performs a continuous sweep with the servo.
To do this, it increases the angle from 0 to 180º at a rate of 1º every 15ms, then performs the opposite operation from 180º to 0º, and finally restarts the loop.
#include <Servo.h>

Servo myservo;  // creates the servo object

int pos = 0;    // servo position

void setup() {
  myservo.attach(9);  // attaches the servo to digital pin 9
}

void loop() {
  //varies the position from 0 to 180, with delays of 15ms
  for (pos = 0; pos <= 180; pos += 1)
  {
    myservo.write(pos);
    delay(15);
  }

  //varies the position from 180 to 0, with delays of 15ms
  for (pos = 180; pos >= 0; pos -= 1)
  {
    myservo.write(pos);
    delay(15);
  }
}Download the code
All the code in this post is available for download on Github.

