
We continue with our ESP8266 and ESP32 series by seeing how to receive data and execute actions through AJAX requests with information encoded in JSON.
We will refer to the ESP8266, but the same code is compatible with the ESP32, adjusting the library names. At the end, you have the code for both the ESP8266 and the ESP32.
In previous posts, we had already seen how to serve a REST API that receives and returns information in JSON. For this, we had used our example REST API, formulated as we saw in this post about NodeJs.
Now it’s time to “bring it down to earth” all this knowledge, and turn it into something more concrete and applicable to the ESP8266, allowing us to interact with it, reading information, or performing actions.
So, don’t worry! This post will be simpler than the previous one, so if you understood the REST API post, this one should be a piece of cake.
Suppose we wanted to activate or deactivate a digital input on the ESP8266. On the other hand, we also want to get information, for example about the state of a pin, a variable, or a sensor reading (or whatever).
How do we make a functional REST API that receives AJAX requests with information in JSON? Let’s get to work.
Our main program is quite simple, and identical to the one we saw in the REST API post.
#include <ESP8266WiFi.h>
#include <ESPAsyncWebServer.h>
#include <FS.h>
#include <ArduinoJson.h>

#include "config.h"  // Replace with your network data
#include "API.hpp"
#include "Server.hpp"
#include "ESP8266_Utils.hpp"

void setup(void)
{
  Serial.begin(115200);
  SPIFFS.begin();

  ConnectWiFi_STA();

  InitServer();
}

void loop(void)
{
}
On the other hand, our ‘Server.hpp’ file containing the server definition has changed. We have defined two endpoints to the URI ‘/LED’ for GET and POST requests respectively, and we have associated the corresponding callback functions.
AsyncWebServer server(80);

void InitServer()
{
    server.serveStatic("/", SPIFFS, "/").setDefaultFile("index.html");

    server.on("/LED", HTTP_GET, getData);
    server.on("/LED", HTTP_POST, [](AsyncWebServerRequest * request){}, NULL, setData);

    server.onNotFound([](AsyncWebServerRequest *request) {
        request->send(400, "text/plain", "Not found");
    });

    server.begin();
    Serial.println("HTTP server started");
}
The functions related to the API are defined in our ‘API.hpp’ file. As we can see, we only have two callback functions, ‘getData’ and ‘setData’.
In the ‘getData’ function, we return certain information in JSON with Id and Status. In the example, we use a random number, but in our real project, we would read the state of a pin, a sensor (or whatever).
On the other hand, the ‘setData’ function performs actions on the ESP8266. It also receives a JSON with Id and Status. In the example, we simply display it on the screen, but again, in a real example, we would act on a digital output, an actuator (or whatever we wanted).
#include "ESP8266_Utils_APIREST.hpp"

void getData(AsyncWebServerRequest *request)
{
   AsyncResponseStream *response = request->beginResponseStream("application/json");

   // we would get GPIO data, state...
   StaticJsonDocument<300> jsonDoc;
   jsonDoc["id"] = random(0,10);
   jsonDoc["status"] = random(0,2);
   serializeJson(jsonDoc, *response);

   request->send(response);
}

void setData(AsyncWebServerRequest * request, uint8_t *data, size_t len, size_t index, size_t total)
{
  String bodyContent = GetBodyContent(data, len);

  StaticJsonDocument<200> doc;
  DeserializationError error = deserializeJson(doc, bodyContent);
  if (error) { request->send(400); return;}

  int id = doc["id"];
  bool ledStatus = doc["status"];
  Serial.println(id);
  Serial.println(ledStatus);
  // perform actions with the received data

  request->send(200);
}
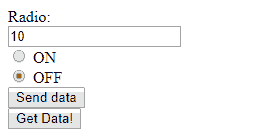
For its part, our web page is very simple for this example,
In our ‘index.html’ we only have a textbox to enter the pin number we want to act on (simulated), and a radio button to choose the ON/OFF state. On the other hand, a button to request information from the ESP8266, and a label for the received text.
<!DOCTYPE html>
<html class="no-js" lang="">
   <head>
      <meta charset="utf-8">
      <meta http-equiv="x-ua-compatible" content="ie=edge">
      <title>ESP8266 Json Ajax</title>
      <meta name="description" content="">
      <meta name="viewport" content="width=device-width, initial-scale=1">
   </head>

   <body>
     <div>
      Value:<br>
      <input type="text" id="ledNumber" name="ledNumber" value="10" checked><br>
      <input type="radio" id="ledOn" name="status" value="true" checked>
      <label for="ledOn">ON</label><br>
      <input type="radio" id="ledOff" name="status" value="false">
      <label for="ledOff">OFF</label><br>
      <button type="button" onclick="sendData()">Send data</button>
    </div>
    <div>
      <br>
      <button type="button" onclick="getData()">Get Data!</button>
      <label id="receivedText"/>
    </div>
  </body>

    <script type="text/javascript" src="./js/main.js"></script>
</html>
For everything to work, we need a small Javascript file ‘main.js’, where we use a bit of Vanilla Javascript (plain Javascript, without libraries) to send and receive information to/from the ESP8266.
function sendData()
{
  var xhttp = new XMLHttpRequest();

  let ledNumber = document.getElementById('ledNumber');
  let ledStatus = document.querySelector('input[name="status"]:checked');
  let ledData = {
    id: ledNumber.value,
    status: ledStatus.value
  }
  let data = JSON.stringify(ledData);

  xhttp.addEventListener('load', function(event) {
    console.log('OK', xhttp);
  });

  xhttp.addEventListener('error', function(event) {
    console.log('error', xhttp);
  });

  xhttp.open('POST', 'LED');
  xhttp.setRequestHeader('Content-Type', 'application/json');
  xhttp.send(data);
}

function getData()
{
    var xhttp = new XMLHttpRequest();

    xhttp.onreadystatechange = function() {
        if (xhttp.readyState == XMLHttpRequest.DONE) {
           if (xhttp.status == 200) {
        console.log((xhttp.responseText));
        let json = JSON.parse(xhttp.responseText);
              console.log();

        let receivedMsg = 'Received: GPIO ' + json.id + ' ' + (json.status == 1 ? "ON" : "OFF");
        document.getElementById('receivedText').textContent = receivedMsg;
           }
           else {
              console.log('error', xhttp);
           }
        }
    };

    xhttp.open("GET", "LED", true);
    xhttp.send();
}
Result
Now we upload everything to our ESP8266 and run it. If we access the ESP8266’s IP, we will see our simple web page.
When we press the buttons, we will see that, indeed, in the serial port the ESP8266 correctly parses the received information and displays the variables in the serial port.

On the other hand, if we press the button, we will see in the browser’s developer console that we receive and correctly parse the information, and that the appropriate label on the web page is updated.
![]()
This is the “correct” and clean way to turn on an LED via Web on the ESP8266. No dirty GET requests with parameters like /?LED=ON or things like that.
Complicated? Well, I hope if you’ve followed the series up to here, it hasn’t been that much. But we can still improve it! In the next post, we’ll see how to do something similar through websockets. See you soon!
Download the Code
All the code from this post is available for download on Github.

Version for ESP8266: https://github.com/luisllamasbinaburo/ESP8266-Examples
Version for ESP32: https://github.com/luisllamasbinaburo/ESP32-Examples
