We continue playing with our friend the ESP8266 and ESP32. This time we’ll see how to perform actions and receive information through JSON data over Websockets.
We will refer to the ESP8266, but the same code is compatible for the ESP32, adjusting the library names. At the end, you have the code for both the ESP8266 and the ESP32.
In the previous post we saw how to do the same thing through AJAX requests against a REST API. On the other hand, we have also seen the use of websockets on the ESP8266.
Now it’s time to modify the previous post, replacing AJAX requests with Websockets. Which, as we saw in the post about Websockets, has its advantages and disadvantages (don’t assume this way is “better”, it’s “better/worse” depending on the project).
And since at this point in the section we are already skilled ESP8266 programmers, we avoid unnecessarily long introductions and get straight “to the point”.
Our main program is basically the same as the previous posts. Only the AJAX ‘includes’ change to their Websocket equivalents.
#include <ESP8266WiFi.h>
#include <ESPAsyncWebServer.h>
#include <FS.h>
#include <WebSocketsServer.h>
#include <ArduinoJson.h>

#include "config.h"  // Replace with your network data
#include "API.hpp"
#include "WebSockets.hpp"
#include "Server.hpp"
#include "ESP8266_Utils.hpp"
#include "ESP8266_Utils_AWS.hpp"

void setup(void)
{
  Serial.begin(115200);
  SPIFFS.begin();

  ConnectWiFi_STA();

  InitServer();
  InitWebSockets();
}

void loop(void)
{
}
For its part, the ‘Server.hpp’ file is even simpler than before, since we don’t need endpoints
AsyncWebServer server(80);

void InitServer()
{
  server.serveStatic("/", SPIFFS, "/").setDefaultFile("index.html");

  server.onNotFound([](AsyncWebServerRequest *request) {
    request->send(400, "text/plain", "Not found");
  });

  server.begin();
  Serial.println("HTTP server started");
}
For its part, the ‘API.hpp’ file is identical to the one we had in the previous post, since we are going to have the same functions to receive and send data (simulated, in a real project we would activate a pin, read a sensor, whatever)
void setData(AsyncWebSocketClient * client, String request)
{
  StaticJsonDocument<200> doc;
  DeserializationError error = deserializeJson(doc, request);
  if (error) { return; }

  int id = doc["id"];
  bool ledStatus = doc["status"];
  Serial.println(id);
  Serial.println(ledStatus);
}

void getData(AsyncWebSocketClient * client, String request)
{
   String response;
   StaticJsonDocument<300> jsonDoc;
   jsonDoc["id"] = random(0,10);
   jsonDoc["status"] = random(0,2);
   serializeJson(jsonDoc, response);

   client->text(response);
}
And the highlight of our new code, the ‘WebSockets.hpp’ file, where we have defined an AsyncWebSocket that listens to client requests. These are “wrapped” inside a ‘command’ object, which contains the action type and the payload. Depending on the action type, we launch the appropriate API callback function.
AsyncWebSocket ws("/ws");

void ProcessRequest(AsyncWebSocketClient * client, String request)
{
  Serial.println(request);
  StaticJsonDocument<200> doc;
  DeserializationError error = deserializeJson(doc, request);
  if (error) { return; }

  String command = doc["command"];
  if(command == "Set")
  {
    setData(client, request);
  }
  if(command == "Get")
  {
    getData(client, request);
  }
}
What changes is the Javascript file ‘main.js’, where we have replaced the code to make and receive AJAX requests with the necessary code for Websockets.
var connection = new WebSocket('ws://' + location.hostname + '/ws', ['arduino']);

connection.onopen = function () {
  console.log('Connected: ');
};

connection.onerror = function (error) {
  console.log('WebSocket Error ', error);
};

connection.onmessage = function (e) {
  console.log('Server: ', e.data);
  processData(e.data);
};

connection.onclose = function () {
  console.log('WebSocket connection closed');
};

function sendData()
{
  let ledNumber = document.getElementById('ledNumber');
  let ledStatus = document.querySelector('input[name="status"]:checked');

  let data = {
    command : "Set",
    id: ledNumber.value,
    status: ledStatus.value
  }
  let json = JSON.stringify(data);

  connection.send(json);
}

function getData()
{
  let data = {
    command : "Get"
  }
  let json = JSON.stringify(data);

  connection.send(json);
}

function processData(data)
{
  let json = JSON.parse(data);
  console.log(json);
  let receivedMsg = 'Received: GPIO ' + json.id + ' ' + (json.status == 1 ? "ON" : "OFF");
  document.getElementById('receivedText').textContent = receivedMsg;
}
On the client side
The HTML file ‘index.html’ is identical to the previous example
<!DOCTYPE html>
<html class="no-js" lang="">
   <head>
      <meta charset="utf-8">
      <meta http-equiv="x-ua-compatible" content="ie=edge">
      <title>ESP8266 Json Websocket</title>
      <meta name="description" content="">
      <meta name="viewport" content="width=device-width, initial-scale=1">
   </head>

   <body>
     <div>
      Radio:<br>
      <input type="text" id="ledNumber" name="ledNumber" value="10" checked><br>
      <input type="radio" id="ledOn" name="status" value="true" checked>
      <label for="ledOn">ON</label><br>
      <input type="radio" id="ledOff" name="status" value="false">
      <label for="ledOff">OFF</label><br>
      <button type="button" onclick="sendData()">Send data</button>
    </div>
    <div>
      <br>
      <button type="button" onclick="getData()">Get Data!</button>
      <label id="receivedText"/>
    </div>
  </body>

    <script type="text/javascript" src="./js/main.js"></script>
</html>
Result
We load all this onto the ESP8266 and, as expected, we will have behavior similar to what we had in the AJAX case. 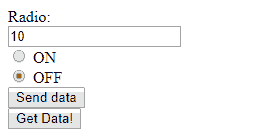
That is, when pressing the “Send data” button we verify in the serial port that the ESP8266 has correctly received the request.
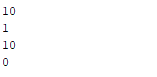
While when pressing the “Get data” button we check in the browser’s developer console that, indeed, we receive the request, and we see how the page label updates accordingly.
![]()
Pretty fun, right? Although, surely, you are a bit tired of “simulated” examples and our ugly example pages. By the way, hadn’t we seen how to make them prettier with Material Design?
Patience. Now we have all (almost all) the basic building blocks, and in the next example we will combine them by seeing how to make a complete Web interface in Material Design for our ESP8266.
Download the code
All the code from this post is available for download on Github.

Version for ESP8266: https://github.com/luisllamasbinaburo/ESP8266-Examples
Version for ESP32: https://github.com/luisllamasbinaburo/ESP32-Examples
