ML.NET is an open-source library developed by Microsoft that allows .NET developers to integrate Machine Learning (ML) capabilities into their applications.
ML.NET provides a robust platform for building, training, and deploying machine learning models without requiring deep ML knowledge, and it integrates seamlessly with the .NET ecosystem.
Furthermore, Microsoft provides ML.NET Model Builder, a graphical tool that allows .NET developers to create, train, and consume machine learning models directly from Visual Studio, without needing in-depth knowledge in the field of machine learning.
Model Builder uses a scenario-based approach and guides you step-by-step through the process of creating models for common tasks like classification, regression, and anomaly detection.
Some of the features of ML.NET are,
- Pre-trained Model Support: Use pre-trained models from TensorFlow and ONNX, allowing you to leverage existing models without training from scratch.
- Interoperability with Data Environments: Supports data in common formats like CSV, SQL, and others, facilitating integration with various systems.
- Ease of Use: Provides an intuitive and easy-to-use API for .NET developers, enabling the creation of ML models with minimal configuration.
- Supervised and Unsupervised Learning Capabilities: Includes support for regression, classification, clustering, and anomaly detection.
- Training and Evaluation: Facilitates model training, performance evaluation, and hyperparameter tuning.
For more information, documentation, and additional examples, visit the official ML.NET repository on GitHub and the official ML.NET page. Here you will find additional resources to get started and make the most of this little marvel.
Installing ML.NET
To start using ML.NET in your C# project, you need to add the corresponding package to your solution. You can do this via the NuGet package manager. Open the terminal or the Visual Studio Package Manager Console and run the following command:
Install-Package Microsoft.ML
Alternatively, you can search for Microsoft.ML in the NuGet interface in Visual Studio and install it from there.
Installing ML.NET Builder
Although it’s possible to start using ML.Net directly, the easiest way is to use ML.NET Model Builder, which is installed as an extension in Visual Studio. To do this,

- Open Visual Studio.
- Navigate to
Extensions > Manage Extensions. - Search for “ML.NET Model Builder” in the search box.
- Click
Downloadand install the extension.
In this case, there’s no need to add the NuGet directly as we saw in the previous step. Model Builder configures the dependencies for us.
How to Use ML.NET
Once you have the extension installed, you can start creating and training machine learning models.
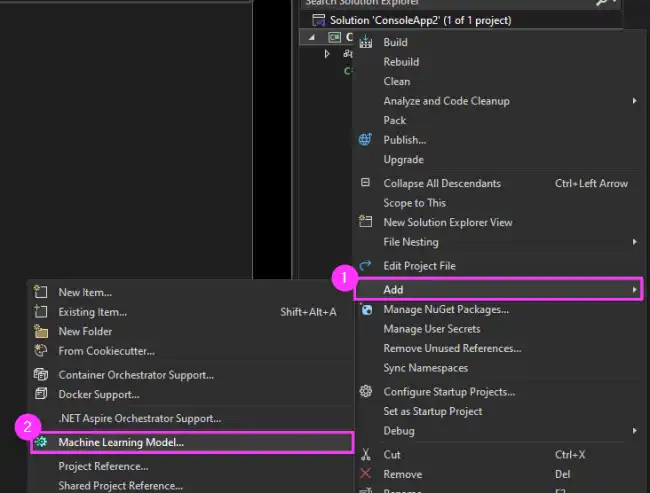
In your Visual Studio project, right-click on the project in Solution Explorer. Select Add > Machine Learning.
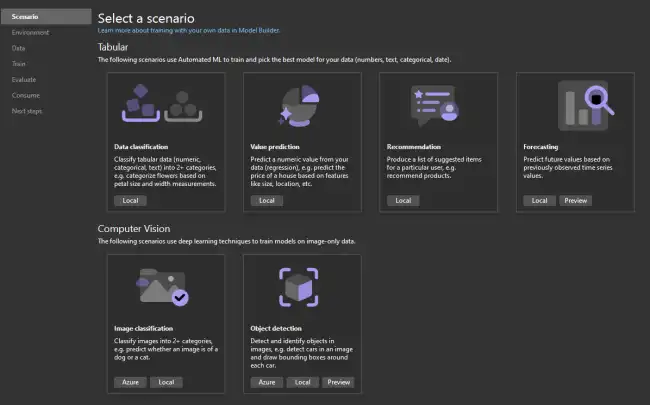
Model Builder will guide you through a wizard where you can select the type of problem you want to solve, such as classification, regression, or anomaly detection.
Depending on the model you have chosen, Model Builder will ask you to load the dataset you will use to train the model. You can load data from a CSV file, a SQL Server database, among others.
Select the data source, load and configure the data, and proceed to train the model. Model Builder will automatically select the best algorithm and tune the hyperparameters.
Once training is complete, Model Builder will show you the model’s performance metrics, such as accuracy and mean squared error, depending on the selected problem type.
Example of Generated Code
Model Builder will generate the necessary code to integrate and consume the model in your application.
The generated code will include two main parts: model configuration and prediction of new data.
Below is an example of what the generated code for a classification task might look like.
// Model configuration
public static ITransformer TrainModel(MLContext mlContext, string dataPath)
{
    IDataView dataView = mlContext.Data.LoadFromTextFile<ModelInput>(dataPath, hasHeader: true, separatorChar: ',');

    var pipeline = mlContext.Transforms.Conversion.MapValueToKey("Label")
                    .Append(mlContext.Transforms.Concatenate("Features", "Feature1", "Feature2"))
                    .Append(mlContext.MulticlassClassification.Trainers.SdcaMaximumEntropy("Label", "Features"))
                    .Append(mlContext.Transforms.Conversion.MapKeyToValue("PredictedLabel"));

    var model = pipeline.Fit(dataView);
    return model;
}

// Prediction of new data
public static void UseModel(MLContext mlContext, ITransformer model)
{
    var predictionEngine = mlContext.Model.CreatePredictionEngine<ModelInput, ModelOutput>(model);

    var input = new ModelInput { Feature1 = 1.5f, Feature2 = 2.3f };
    var result = predictionEngine.Predict(input);

    Console.WriteLine($"Predicted Label: {result.PredictedLabel}");
}
Additionally, it will give us the code needed to use it easily from our project. For example,
//Load sample data
var sampleData = new MLModel1.ModelInput()
{
    Input = 2F,
};

//Load model and predict output
var result = MLModel1.Predict(sampleData);
It’s that simple. From there, you can make modifications to the codes generated by ML.NET Model Builder, or consume them directly in your application. It really couldn’t be more convenient and practical.