What is an APDS-9960?
The APDS-9960 is a gesture sensor, proximity sensor, color sensor, and ambient light sensor that can be used with a processor such as Arduino.
This little technological gem was a component of the now retired Samsung Galaxy S5. The large production of this mobile phone has allowed this sensor to be manufactured in large quantities, which allows for its great quality/price ratio.
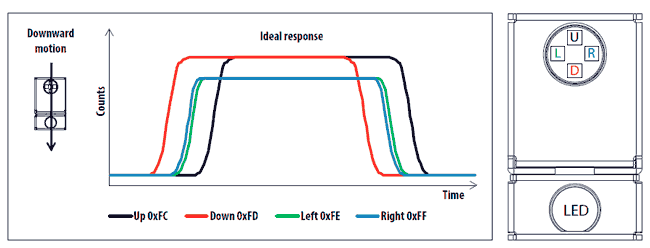
The APDS-9960 can measure color, measure ambient light, and detect gestures. Contactless gesture detection allows the sensor to detect an object moving at 5-20cm, detecting gestures of left, right, up, down, near, and far.
It incorporates IR and UV filters. It has gain and software-controlled integration time. Its high sensitivity allows it to work even behind dark glass.
Communication is done through I2C, so it is very simple to read with a processor like Arduino. Additionally, it has an interrupt pin with configurable thresholds, avoiding the need to constantly check the sensor’s state.
Price
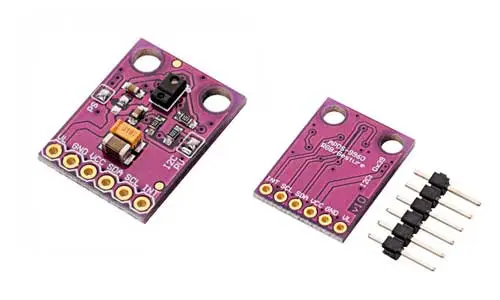
The APDS-9960 is a very cheap sensor for the many functions it performs. We can find a module with APDS-9960 for 1.70€ from international sellers on eBay and AliExpress.
How does an APDS-9960 work?
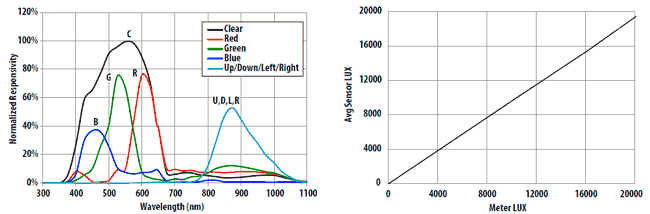
The APDS-9960 integrates an infrared emitter, four directional photodiodes, and four photodiodes for color measurement. In addition, it incorporates the necessary electronics for measurement, with ambient light rejection and offset compensation.
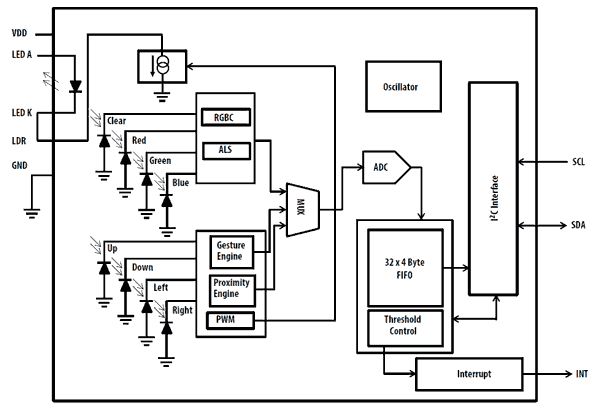
For motion detection, the APDS-9960 compares the variations in light recorded in each of the photodiodes, allowing it to estimate movement in front of the sensor at a distance of 5-20cm.
For proximity detection, the APDS-9960 measures the total amount of infrared light recorded, allowing it to estimate the distance of an object in front of the sensor.
Additionally, the device’s RGB sensors allow the APDS-9960 to act as a colorimeter and as a light meter.
Assembly diagram
The connection of the modules that integrate the APDS-9960 is simple, as communication is done through I2C. However, the supply voltage of the APDS-9960 is 3.3V.
If you connect the APDS-9960 to 5V, you will immediately and permanently damage it.
Therefore, to power the module, we will connect the GND and Vin module pins, respectively, and GND and 3.3V on Arduino.
On the other hand, for communication via I2C, we must connect the SCK and SDA pins to the corresponding pins of our Arduino model. The communication pins should also work at 3.3V.
If our Arduino model is 5V, we must use a level shifter to make the I2C bus connection. However, in experiments with 5V communication, the APDS-9960 worked correctly, but we risk damaging the module or reducing its lifespan.
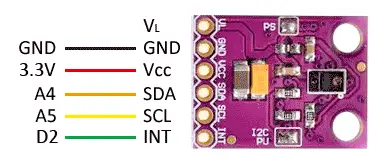
The connection, seen from Arduino, would be as follows.
Not using a level shifter on the SDA and SCK communication pins can shorten the device’s lifespan, or even damage it.
Code Examples
To read the sensor, we will use the library developed by Adafruit, available at [this link].(https://github.com/adafruit/Adafruit_APDS9960) The library includes several usage examples that should be reviewed.
Next, we will see some usage examples of the APDS-9960 sensor.
Display on serial port
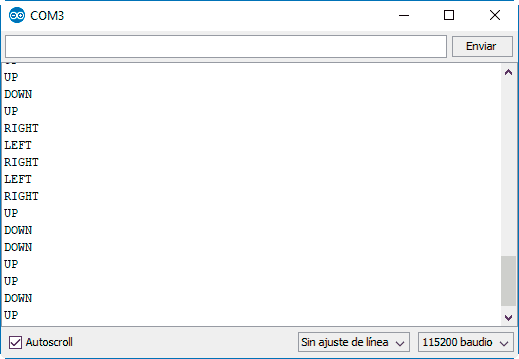
In this first example, we read the gestures and display the result on the serial port. To test it, pass your hand over the sensor at a distance of about 4-20cm.
#include "Adafruit_APDS9960.h"
Adafruit_APDS9960 apds;

void setup() {
  Serial.begin(115200);

  if(!apds.begin()) Serial.println("failed to initialize device! Please check your wiring.");
  apds.enableProximity(true);
  apds.enableGesture(true);
}

void loop() {
    uint8_t gesture = apds.readGesture();
    if(gesture == APDS9960_DOWN) Serial.println("DOWN");
    if(gesture == APDS9960_UP) Serial.println("UP");
    if(gesture == APDS9960_LEFT) Serial.println("LEFT");
    if(gesture == APDS9960_RIGHT) Serial.println("RIGHT");
}This is the result of running this example
Display on Integrated LED
In this example, we blink the LED integrated on the board a number of times, depending on the detected gesture. This allows us to check the correct operation of the sensor without needing a computer to visualize the output.
#include "Adafruit_APDS9960.h"
Adafruit_APDS9960 apds;

void setup()
{
  Serial.begin(115200);

  pinMode(LED_BUILTIN, OUTPUT);

  if(!apds.begin()) Serial.println("failed to initialize device! Please check your wiring.");
  apds.enableProximity(true);
  apds.enableGesture(true);
}

void loop()
{
    uint8_t gesture = apds.readGesture();
    if(gesture == APDS9960_DOWN) blink(1);
    if(gesture == APDS9960_UP) blink(2);
    if(gesture == APDS9960_LEFT) blink(3);
    if(gesture == APDS9960_RIGHT) blink(4);
}

void blink(int count)
{
  for(int i = 0; i < count; i++)
  {
    digitalWrite(LED_BUILTIN, HIGH);
  delay(100);
  digitalWrite(LED_BUILTIN, LOW);
  delay(100);
  }
}Here is a video with the result.
Download the code
All the code from this post is available for download on Github.

