What is a microphone?
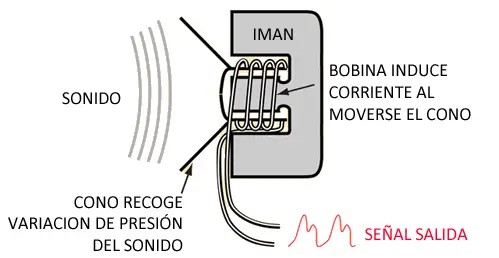
A microphone is a transducer that converts sound waves into electrical signals. We can connect a microphone to a processor like Arduino to detect sounds.
The output produced by a microphone is an analog electrical signal that represents the received sound. However, in general, this signal is too low to be measured and needs to be amplified.
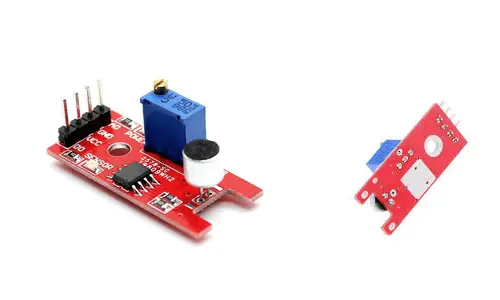
There are boards like the KY-038 that incorporate a microphone along with an LM393 comparator, which allows obtaining the reading both as an analog value and in digital form.
The usual use of this type of non-amplified sensors is to use the digital output to detect the sound when it exceeds a certain threshold, regulated through a potentiometer located on the board.
The analog output allows obtaining an estimate of the recorded volume. However, as we have mentioned, these types of microphone modules are not suitable for measuring sound in an analog way since they lack amplification.
If we only want to detect the sound, and not measure it, these types of sensors are more appropriate as they only require the reading of a digital signal, without needing to perform further calculations.
These types of sensors can be useful, for example, to turn on a device when sound is detected, turn on a lamp with a clap, or even orient a robot or a tower with servos using sound.
If we want to measure the sound, it is better to use an amplified module, such as the modules with the MAX9812 amplifier.
Price
These types of sensors are very cheap. We can find microphone modules like the KY-038 for around €0.80, by searching on international sellers on eBay or AliExpress.
Depending on the model, the microphone can be installed pointing towards the front or upwards, but the electronics are the same. We will choose one or the other depending on what is most convenient for our project.
The price of these types of sensors is very low, but we must take into account that for a similar price, we can find amplified sensors such as the MAX9812.
Choosing between one or the other, as we have mentioned, depends on whether we only want to detect sound or if we want to measure it, in which case we would opt for an amplified module. When in doubt, amplified modules are more versatile and interesting.
Assembly diagram
The electrical diagram is simple. We power the module by connecting GND and 5V to the corresponding pins of the Arduino.
Now, if we want to use the digital reading, we connect the DO output to one of the digital inputs of the Arduino.
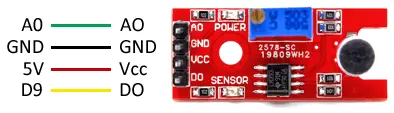
We will have to calibrate the triggering threshold of the digital output with the potentiometer installed on the module for the desired sound level.
While the connection seen from Arduino would be like this,
If we wanted to use the analog value, we would simply connect the AO output of the sensor to an analog input of the Arduino. Although, as we have said, in this case it would be better to opt for an amplified model.
Code examples
In the first code example, we use the digital signal of the sensor to turn on the integrated LED on the Arduino if sound is detected, and turn it off otherwise.
const int pinLED = 13;
const int pinMicrophone = 9;

void setup ()
{
  pinMode (pinLED, OUTPUT);
  pinMode (pinMicrophone, INPUT);
}

void loop ()
{
  bool soundDetected = digitalRead(pinMicrophone);
  if (soundDetected)
  {
    digitalWrite (pinLED, HIGH);
    delay(1000);
  }
  else
  {
    digitalWrite (pinLED, LOW);
    delay(10);
  }
}
In the next example, we store a state (ON/OFF) and make it change each time a sound is detected. In the example, we use the state to turn on or off the integrated LED, but in a real case, we would take the appropriate actions such as activating a relay.
const int pinLED = 13;
const int pinMicrophone = 9;
bool state;

void setup()
{
  pinMode(pinLED, OUTPUT);
  pinMode(pinMicrophone, INPUT_PULLUP);
}

void loop()
{
  bool soundDetected = digitalRead(pinMicrophone);
  if (soundDetected == true)
  {
    state = ! state;
    digitalWrite(pinLED , state);
    delay (1000);
  }
  delay(10);
}
Download the code
All the code in this post is available for download on Github. 
