We continue to delve deeper into the ESP8266 SoC from Espressif. In this post, we are going to see the pinout diagram of the ESP8266 and the ESP12E.
One of the first difficulties when using development boards based on the ESP8266 is obtaining their pinout diagram. Even more so because manufacturers do not maintain the same criteria when assigning their board’s pins to those of the ESP8266. This can lead to more than one headache.
That’s why it’s important to spend some time understanding the pins and hardware of the ESP8266. Because, although the names may change on development boards, they will always have the characteristics of the ESP8266 in common, so that just by knowing the equivalence between the pins, we can use any development board.
On the other hand, the ESP12E is the module with the ESP8266 SoC most used in development boards. Understanding its Pinout is closely related to understanding the ESP8266, discarding pins that don’t add much value (internal ones).
Finally, understanding the pinout and hardware of the ESP8266 and ESP12E will allow us to use them independently, without a development board. Although we will have to include our own electronics (resistors, dividers, voltage regulators).
So let’s start delving into the hardware of the ESP8266 and the ESP12E module, looking at their pinout diagrams and then we will see some details of their hardware.
Pinout of the ESP8266
Here is the pinout diagram of the ESP8266.
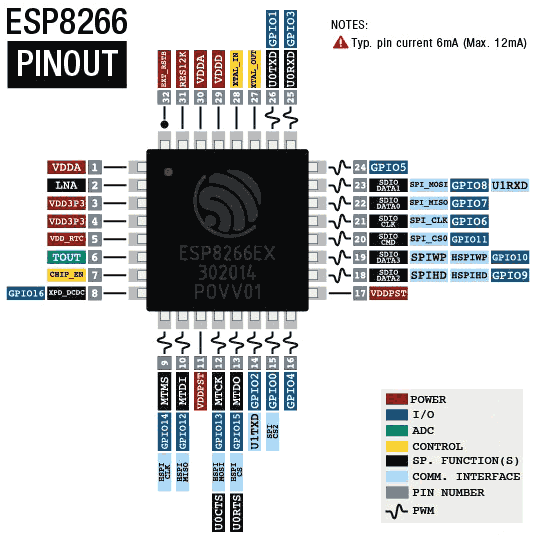
The ESP8266 has 32 available pins, of which 17 are GPIO, 1 is an ADC, and the rest are essentially related to power supply and control of the ESP8266.
Pinout of the ESP12E
On the other hand, here is the pinout diagram of the ESP12E.
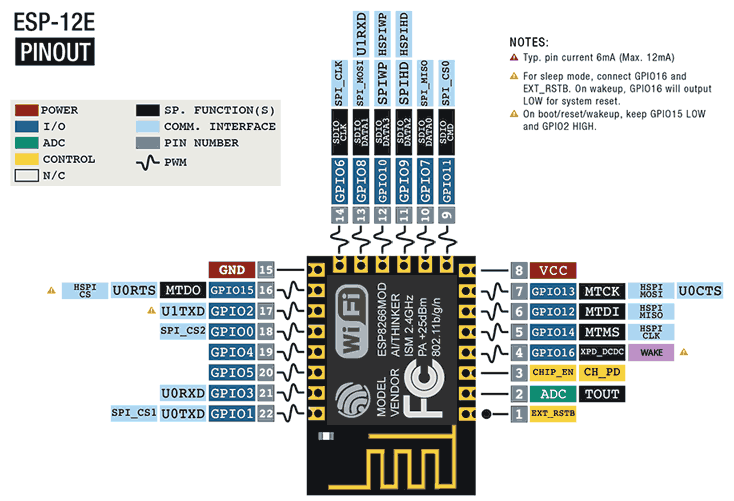
As we can see, the ESP12E has 22 pins. It retains the 17 GPIO pins, the ADC pin, but reduces the power pins to 2 (Vcc and GND) and the control pins to CHIP_EN (to turn the ESP12E on/off) and EXT_RSTB (to reset).
That is, in the ESP12E we have most of the “important” pins of the SoC available, while the module takes care of electrically connecting most of the power and control pins. This is one of the reasons for the success and high implementation of the ESP12E, as it offers us all the functions of the ESP8266. Other modules, for example like the ESP01 or even the ESP12S, omit some GPIOs to have a smaller number of pins or a smaller size.
In the next post of the series on ESP8266 and ESP32 we will go into detail about the hardware of the ESP8266 and see the main differences with the common Arduino models. that integrate the ESP8266 and we will start its programming.
