We continue advancing with the ESP8266 SoC tutorials. In this post, we are going to see our first ESP8266-based development board, among the many available. As it could not be otherwise, we are going to start with the well-known NodeMCU.
NodeMCU is a development board based on the ESP12E, which is probably the most popular module integrating the ESP8266 SoC. However, despite the popularity of NodeMCU boards, there is also a lot of confusion regarding the terminology (Lua, Lolin, versions) and sometimes they are mixed up or even used as synonyms.
Keep in mind that, unlike Arduino where there is a company that imposes some order on the designs and models available, development boards based on the ESP8266 have evolved somewhat in leaps and bounds and by the hand of different manufacturers.
It gets even more complicated if we read the descriptions from some sellers, who mix concepts and contribute to generating even more confusion.
So let’s try to delve deeper and bring some order around NodeMCU, one of the most popular ESP8266-based development boards and one of the fundamental pillars on which the ESP8266 ecosystem has been based during its evolution.
What is NodeMCU?
NodeMCU is a name that encompasses both an Open Source firmware and a development board based on the ESP8266.
Initially, the name NodeMCU mainly referred to the firmware. Currently, this has reversed and when we talk about NodeMCU we normally refer to the development board.
The NodeMCU firmware was created shortly after the ESP8266 appeared, on December 30, 2013. A few months later, in October 2014, the first version of the NodeMCU firmware was published on Github. Two months later, the first NodeMCU development board, called devkit v0.9, was published, also being Open Hardware.
Recall that in those early moments of the ESP8266 there was hardly any information and the little there was was confusing. Most of the community’s interest was limited to the ESP01, which was considered more of a cheap Wifi module for processors like Arduino than an independent development board.
The NodeMCU firmware could be flashed onto an ESP8266, after which we could program it with the Lua scripting language. Programming in Lua allowed connecting and programming the ESP8266 in a much simpler way than the official tools provided by Espressif.

Lua is an imperative and structured programming language, created in 1993 by Roberto Ierusalimschy, Luiz Henrique de Figueiredo and Waldemar Celes. It is based on C and Perl, and is designed to be very lightweight. It has been implemented in a wide variety of embedded devices, from video game consoles to industrial robots. The official website is https://www.lua.org/.
Over time and with the appearance of other alternatives for programming the ESP8266, such as (especially) C++ with the Arduino environment and others like MicroPython, interest in Lua has decreased considerably.
Although programming in Lua had interesting aspects, it is not as widespread a language as C++ and Python. Furthermore, they never managed to make it fully stable on the ESP8266. On the other hand, being an interpreted language (rather than compiled) performance and resource utilization is inferior.
In 2015, the original development team stopped maintaining the NodeMCU firmware. Although it is still maintained by a community of developers, interest in the firmware has almost completely waned. For this reason, we currently refer to NodeMCU more as the development board than the firmware.
However, although the firmware has now fallen somewhat into oblivion, we must not forget the contribution that the NodeMCU project, both firmware and development board, has made to the proliferation and adoption of the ESP8266.
NodeMCU Development Board
Now that we’ve seen a bit of history and the origin of NodeMCU both as firmware and development board, it’s time to get down to business and see what interests us currently, which is NodeMCU as a development board.
Basically, the NodeMCU development board is based on the ESP12E and exposes its functionalities and capabilities. But, in addition, it adds the following advantages typical of development boards:
- Micro USB port and Serial-USB converter
- Easy programming via Micro-USB
- Power via USB
- Terminals (pins) to facilitate connection
- Integrated LED and reset button
We are not going to go into the hardware details of the ESP12E because we covered them intensively in its own post and they are common to all development boards based on the ESP12E (and it also doesn’t make sense to repeat it in each development board we see).
If you want, you can check the hardware details of the ESP12E (GPIO pins, analog outputs and inputs, communication), which are directly shared with those of the NodeMCU, you can check the post about the ESP12E.
Here we will focus on the aspects specific to the NodeMCU board beyond those “inherited” by mounting an ESP12E. As we said in the introduction, everything related to NodeMCU can become confusing because there is more than one manufacturer and each has its own criteria.
To make matters worse, Chinese sellers on AliExpress or eBay write the descriptions of their items as if they were paid by the word, mixing everything up and making it unnecessarily complicated.
To summarize, we have three main manufacturers of NodeMCU, Amica, Lolin/Wemos and DOIT/SmartArduino. The boards are very similar (or even identical), although they may have some differences in pin designation.
On the other hand, we have three versions of the NodeMCU board, which we will see below. The version designations don’t make it worse even if they try also contribute to generating confusion. But, although it seems a bit complicated, it’s actually simple if you follow the evolution from the beginning.
First Generation v0.9
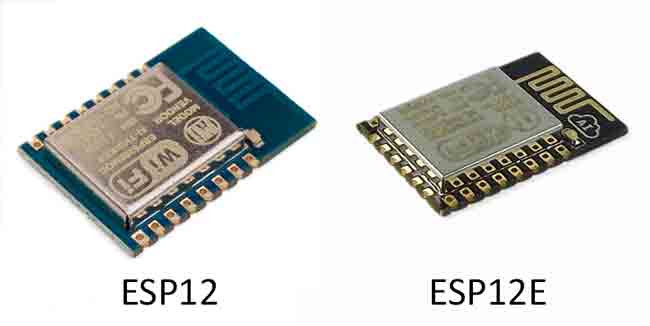
The original version of NodeMCU was called devkit v0.9, and it mounted an ESP12 along with 4MB of flash (remember that memory on the ESP8266 is external and connected via SPI). The ESP12 is similar to the ESP12E, but lacks a row of pins so it has fewer GPIOs.
The 0.9 version was ugly (well, to each their own), yellow-orange and very wide. With dimensions of 47x21mm it occupied 10 pin rows on a breadboard, covering it completely. This made it very impractical to use because it leaves no free pins on the breadboard to make connections.
We won’t spend more time on this board because it is an obsolete version and we won’t even be able to buy it. But know that it was the original NodeMCU and that everything starts here.
Second Generation v1.0 / V2
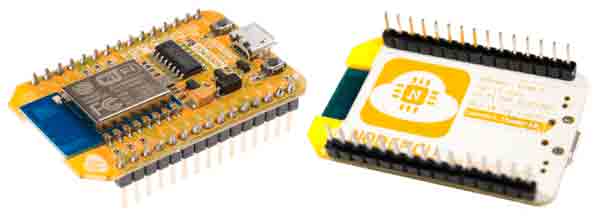
The next version of NodeMCU is the v1.0 V2. In summary, Amica, a company created by German Gerwin Janssen, manufactured its own improved version of the v0.9. The original NodeMCU team liked it and declared it the “official” version of NodeMCU.
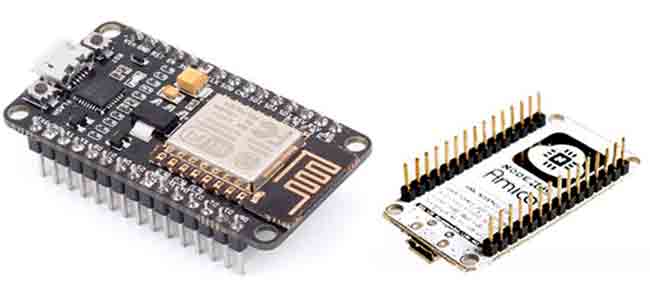
The main difference of the v1.0 v2 version is that it mounts an ESP12E instead of an ESP12, so it has more pins available than the original model. Furthermore, it is narrower than the 0.9 version, covering only 8 rows of a breadboard. This leaves an additional row on each side to make connections.
The three manufacturers, Amica, Lolin/Wemos and DOIT/SmartArduino manufacture, or have manufactured at some point, this v1.0 V2 version.
Since the NodeMCU team designated Amica’s version as “official”, it is sometimes said that Amica is the official distributor of NodeMCU. This is not the case as it is Open Hardware, and any manufacturer is as valid as the others.
Third Generation v1.0 / V3
We come to what is sometimes called the “third generation”, the version 1.0 V3. Basically, the manufacturer Lolin/Wemos decided to create its own “improved” design with a few minor changes.

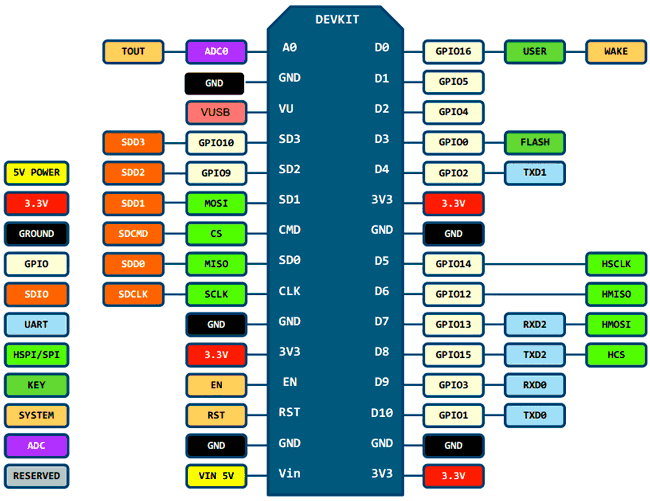
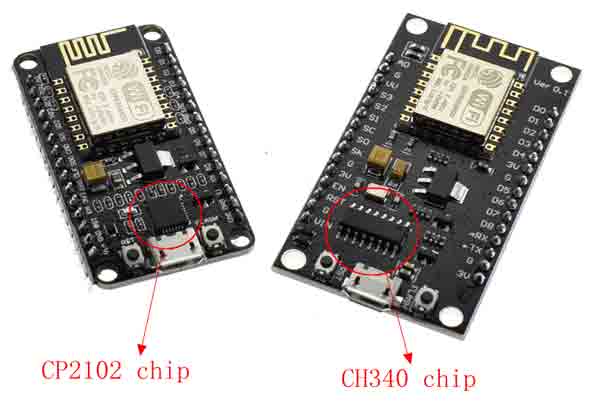
The main change is that the V3 mounts a CH340G serial converter instead of the CP2102. The manufacturer claims this makes the USB port more robust. On the other hand, they reused the two reserved pins from the V2 to bring out a GND and a VUSB.
Otherwise, the specifications are the same. On the downside, the v1.0 V3 model is again wide and covers the entire breadboard, which is a real problem when making breadboard assemblies.
Even so, the 1.0 V3 is probably the best-selling model right now. Although many people look for the V2 because they are practically the same in functionality, but being narrow it is more comfortable to use on a breadboard.
Since the V3 version is a version created by Lolin/Wemos, it has sometimes been labeled as “unofficial” (by NodeMCU itself). But considering it is open hardware, the very concept of “unofficial” doesn’t make much sense.
Version Summary
Summarizing what we’ve seen,
| Generation | Version | Module | Width | Comment | |
|---|---|---|---|---|---|
| First | 0.9 | ESP12 | 10 pins | The original, not for sale | |
| Second | 1.0 | V2 | ESP12E | 8 pins | ”Official” version |
| Third | 1.0 | V3 | ESP12E | 10 pins | Wemos/Lolin version. CH340G converter |
That’s the theory. Now comes reality, which is a bit more “fun”. eBay and AliExpress (and others) sellers mix everything up! For example, they might write “NodeMCU Lua Lolin V2” or “NodeMCU Amica devkit v3”. Just like that, all mixed up. But the funniest part is that I’ve seen versions marked as V3 that are actually narrow. Versions sold as V2 that are wide.
The best way to tell the difference between V2 and V3 at a glance is to look at the serial converter it mounts. The CP2102 which is square, or the CH340G which is more elongated.
Otherwise, it’s not worth spending more time than necessary on the version issue. They are practically similar, and whichever one you have will work fine.
Price
Let’s talk about the price of these little development boards which are currently really cheap. In both cases, both for the v1.0 V2 version and the V1.0 V3, we can find them for the (incredible) price of 2-2.5€, searching in international sellers on AliExpress or eBay.
The V3 version is generally a bit cheaper (around 2€, compared to 2.5€ for the V2), probably because it mounts the CH340G or due to higher production. If you want a NodeMCU for a project without a breadboard, maybe the V3 suits you for being slightly cheaper.
However, in assemblies that require using a breadboard, the preferred option is usually the V2 despite its slightly higher price, because its narrower width facilitates connections.
In any case, both NodeMCU board models are similar and have a truly unbeatable price for a development board with this power and Wifi connectivity, being the main reason for its success and high popularity.
NodeMCU Pinout
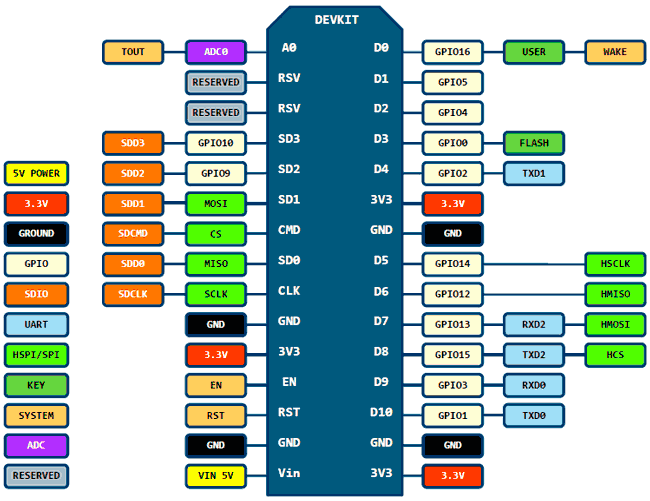
We cannot finish the post without seeing our always beloved and consulted pinout diagram.
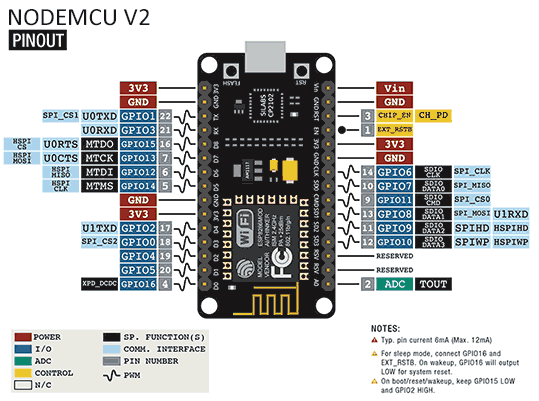
And here is a summary table with the pins, their functions, and some of their peculiarities.
| Pin | GPIO | Input | Output | Comments |
|---|---|---|---|---|
| D0 | GPIO16 | No interrupts | No PWM No I2C | HIGH during boot Pull-Down Resistor Connect to RST for Wake-Up |
| D1 | GPIO5 | OK | OK | SCL (I2C) (frequently) |
| D2 | GPIO4 | OK | OK | SDA (I2c) (frequently) |
| D3 | GPIO0 | Pulled Up | OK | Boot fails if pulled LOW Connected to FLASH button |
| D4 | GPIO2 | Pulled Up | OK | HIGH during boot Boot fails if pulled LOW Built-in LED TX1 |
| D5 | GPIO14 | OK | OK | SLCK (SPI) |
| D6 | GPIO12 | OK | OK | MISO (SPI) |
| D7 | GPIO13 | OK | OK | MOSI (SPI) |
| D8 | GPIO15 | Pulled GND | OK | CS (SPI) LOW during boot Boot fails if pulled HIGH No Pull-Up |
| RX | GPIO3 | OK | RX | HIGH during boot Not usable if UART is used |
| TX | GPIO1 | TX | OK | HIGH during boot Boot fails if pulled LOW Debug output at boot Not usable if UART is used |
| A0 | ADC0 | Analog Input | NO |
However, as we have seen, there is a great variety of small variations and manufacturers who call their development boards the same (and sometimes mistakenly). So there may be small differences in the development board you have.
Precisely for that reason, in case of doubt, refer to the post about the ESP12E, because what all these boards have in common is that they mount the same module and, therefore, have the same functions.
What can change is the name labeled on each pin or that the integrated LED is on another pin or, in rarer cases, that they have connected the pins differently to the ESP12E. But by looking at the ESP12E pinout you will be able to deal with any NodeMCU board even if they have small variations.
