
Second post dedicated to the ESP8266 and ESP32 as a server. This time we will delve deeper into handling different types of requests and obtaining parameters.
We will refer to the ESP8266, but the same code is compatible with the ESP32, adjusting the library names. At the end, you have the code for both the ESP8266 and the ESP32.
In the previous post, we saw how to set up a server with the ESP8266, mentioning that it would occupy several posts. Previously, we had seen how to use the ESP8266 as an HTTP client.
When we looked at the web server in the previous post, we only used GET type methods (requests). And many internet tutorials would stop there. But we like to go a bit deeper, don’t we?
To do this, we are going to see the different types of requests and their parameters. As we had seen, an HTTP request can be of different types (GET, POST, PATH, DELETE…).
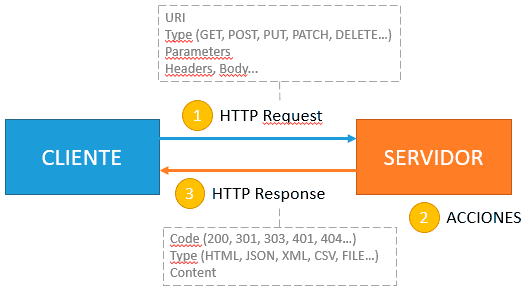
A long time ago, when the internet “was young”, there was a lot of confusion about the purpose of the different types of functions. But in this era of REST APIs and M2M interfaces, the reason for the existence of different types of requests should be very clear. Typically, each type corresponds to ‘actions’ you want to perform on the server.
So it’s logical that the HTTP request that tells you if an LED is on is a GET type. But the one that turns it on and off should correctly use a PATCH (at most, a POST could be used).
To understand the requests and what action they want us to perform, it’s not enough to route a URI to a callback action; we must also be able to launch different actions based on the type of request we receive.
Similarly, we have parameters. Remember that in an HTTP request we can send parameters, either in the URL (in GET requests) or encoded in one of the various ways in the request body.
Differentiating Request Type
To differentiate the request type, the ESP8266WebServer library provides an overload of the ‘on(…)’ method, which allows us to specify the method we need.
void on(const String &uri, HTTPMethod method, THandlerFunction fn);
- URI, resource address.
- method, the method we want to associate (HTTP_ANY, HTTP_GET, HTTP_POST, HTTP_PUT, HTTP_PATCH, HTTP_DELETE, HTTP_OPTIONS)
- fn, the callback function to execute.
Obtaining Parameters
On the other hand, to obtain parameters, the ESP8266WebServer library provides the following methods.
const String& arg(String name) const;    // get request argument value by name
const String& arg(int i) const;          // get request argument value by number
const String& argName(int i) const;      // get request argument name by number
int args() const;                        // get arguments count
bool hasArg(const String& name) const;   // check if argument exists
Let’s See an Example
As always, the best way is to see it in a simple example. Let’s suppose we have an ESP8266 with a series of LEDs, which we identify by their ID. On one hand, we want to be able to query the status of each LED and, in addition, we want to be able to turn the LED on or off.
First, let’s see how NOT to do it. What you don’t do is use a GET request to both turn the LED on and off, nor do you do “weird things” with the String class to create a request to a URI with the following form.
/led?Id=10&Status=ON
No, that’s not done. The correct way is to create two routes. One of type GET to the URI ‘/led’ that receives the ID of the LED we want to query, and one of type POST that receives the ID of the LED and its new status.
We could do this in the following way, where we simply create two routes and associate a function that, in this example, simply displays the received parameters.
The main program hasn’t changed from the previous post, which we recall was,
#include <ESP8266WiFi.h>
#include <ESP8266WebServer.h>

ESP8266WebServer server(80);

#include "config.h"  // Replace with your network data
#include "ESP8266_Utils.hpp"
#include "Server.hpp"

void setup(void)
{
   Serial.begin(115200);

   ConnectWiFi_STA();

   InitServer();
}

void loop()
{
   server.handleClient();
}
We modify the ‘Server.hpp’ file we created in the previous post with the following content.
// Function when receiving a GET request
void getLED()
{
// return response
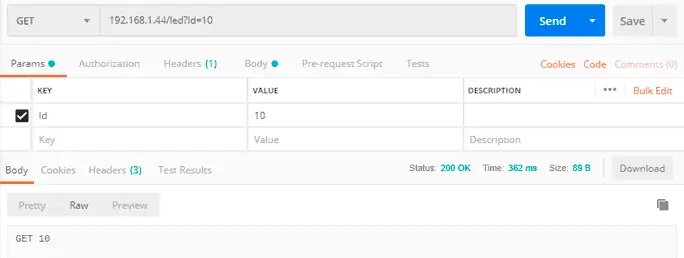
server.send(200, "text/plain", String("GET ") + server.arg(String("Id")));
}
// Function when receiving a POST request
void setLED()
{
// show on serial port
Serial.println(server.argName(0));
// return response
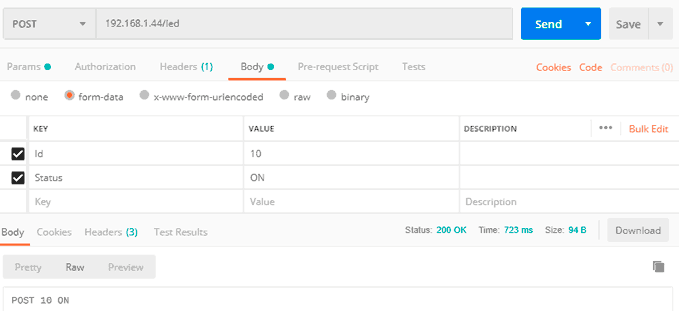
server.send(200, "text/plain", String("POST ") + server.arg(String("Id")) + " " + server.arg(String("Status")));
}
// Function to be executed in the URI '/'
void handleRoot()
{
server.send(200, "text/plain", "Hello world!");
}
void handleNotFound()
{
server.send(404, "text/plain", "Not found");
}
void InitServer()
{
// Routing for '/'
server.on("/", handleRoot);
// We define two routings
server.on("/led", HTTP_GET, getLED);
server.on("/led", HTTP_POST, setLED);
server.onNotFound(handleNotFound);
server.begin();
Serial.println("HTTP server started");
}
Result
Now, if we use a Postman to send requests to the ESP8266 and check that we are correctly reading the type and parameters of the request.
For the GET request we would do,
And for the POST request we would have,
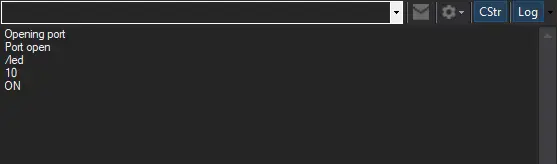
In this example, we would also see the request on the serial port. In a real case, we would perform the appropriate actions (in this case, probably turning the LED on or off).
That’s all for today. We have learned to read the type and parameters of an HTTP request from an ESP8266 when it acts as a server. Although for now, we only return simple responses.
In the next post, we will expand our server, starting to serve more complex content, typically a web page. See you soon!
Download the Code
All the code from this post is available for download on Github.

Version for ESP8266: https://github.com/luisllamasbinaburo/ESP8266-Examples
Version for ESP32: https://github.com/luisllamasbinaburo/ESP32-Examples
