File and folder permissions are the rules that indicate who can read, write, or execute each item in the system.
In Raspberry Pi OS, as in any Linux system, understanding permissions is basic for working with files, services, users, and devices without ending up fighting with “permission denied” messages.
Getting used to the file and folder permission system is another of those things we will have to deal with sooner or later in Linux, because it is one of the main features of this operating system.
As we know, one of Linux’s strengths is its security. An important part of it relies on its simple but robust permission system. So it’s important to understand and handle them fluently.
Show Permissions in Linux
Each file and folder in Linux has an owner, an owner group, and a series of permissions associated with each of these roles. We can check the permissions simply by listing the files with this command
#Show permissions ls -lh
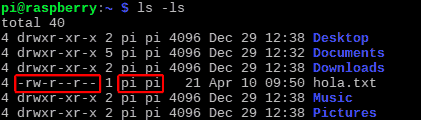
For example, the file ‘hola.txt’ we see has:
-rw-r—r— pi pi
This means that the file owner is the user ‘pi’, and the user group is ‘pi’
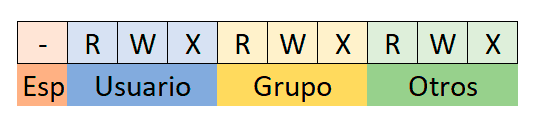
On the other hand, the beginning of the line represents the permissions that the different user roles have over the file or folder.
- The first character is reserved for special permissions
- Next three, permissions of the owner user (u)
- Next three, permissions of the owner group (g)
- Last three, permissions of other users (o)
Furthermore, the characters for each role represent a permission, being,
r: readw: writex: execute
Therefore, in the example, the permissions mean,
-: No special permissionsrw-: Owner user can read and writer--: Owner group can readr--: Other users can read
Playground
Change Owner
To change the owner user of a file or folder we use the ‘chown’ command (change owner)
#change file user chown user file
We can change the permissions of all folders and subfolders of a directory recursively with the ‘-R’ parameter
#change user for all files in a directory chown -R user directory
We can also change the owner group of a file with the ‘chgrp’ command (change group)
#change file group chgrp group file
Finally, we can change the user and group simultaneously with the following command.
#change file user and group. chown user
Change Permissions
To change the permissions of a file we use the ‘chmod’ command. This command receives the different parameters
- Role, u (user) / g (group) /o (others)
- Action, + (add permissions) / - (remove permissions)
- Permission, r (read) / w (write) / x (execute)
Thus, for example, to give full permissions to all roles we would use
give full permissions to all roles
chmod ugo+rwx file/directory
If we want to apply the permissions to all files in a directory and subdirectory, we use the ‘-R’ parameter.
For example, if we wanted to remove write and execute permissions from other users recursively, we would do,
remove write and execute permissions from other users
chmod -R o-wx directory
Octal Representation of Permissions
Finally, it is also very common to work with the octal representation of permissions. This shows the same information but grouped into 4 octal digits, where each octal groups the 3 permissions (r,w,x) of each user role.
- First octal, special permissions
- Second octal, owner user permissions
- Third octal, owner group permissions
- Fourth octal, other users permissions
The equivalence between the octal and the r-w-x equivalent is as follows.
| OCTAL | R | W | X |
|---|---|---|---|
| 0 | 0 | 0 | 0 |
| 1 | 0 | 0 | 1 |
| 2 | 0 | 1 | 0 |
| 3 | 0 | 1 | 1 |
| 4 | 1 | 0 | 0 |
| 5 | 1 | 0 | 1 |
| 6 | 1 | 1 | 0 |
| 7 | 1 | 1 | 1 |
With the octal representation, the ‘chmod’ command directly receives the desired permission, instead of adding them with ’+’ or ’-’.
For example, to give full permissions to the owner, and no permissions to the other roles we would do
#assign permissions 0700 chmod 700 file/directory
For example, if we want to give full permissions to the owner user, read permission to the owner group, and none to the rest of the users, we would do
#assign permissions 0740 to file chmod 740 directory
That’s all for the topic of permission management. At first it may seem cumbersome, but it’s actually a very robust and simple system.
With a little practice, you’ll get the hang of it quickly. See you in the next post! See you soon!
