In this post, we are going to see how to model a finite state machine on a processor like Arduino.
A finite state machine is a computational abstraction commonly used. It is a systematic way to approach the programming of an automaton. For this reason, they are widely used in the development of small and medium-sized projects.
Examples that can be implemented with a state machine include, for instance, vending machines, elevators, parking barriers, industrial stations, and even small robots, among many others.
What is a State Machine?
A state machine models the behavior of an automatic machine. It consists of states, transitions, inputs, and outputs.
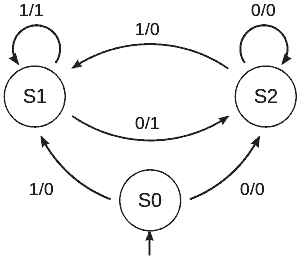
State machines are frequently represented with diagrams, where each state corresponds to a circle, and transitions correspond to arrows connecting them. Sometimes, the inputs and outputs of the system are added according to different conventions.
States describe the possible combinations of the automaton’s internal variables at a given instant. An automaton starts from an initial state and, as events occur, changes to the different states that describe its possible behavior.
Changes from one state to another are determined by transitions, which have an associated condition. The conditions associated with state change transitions can depend on both external (inputs) and internal variables.
Finally, a state machine must perform actions (or outputs). These can be associated with states (Moore machine) or with transitions (Mealy machine), both approaches being similar in their formulation.
State Machine Example
We are going to implement a simple state machine on a processor like Arduino. The machine we will implement as an example corresponds to the following diagram.
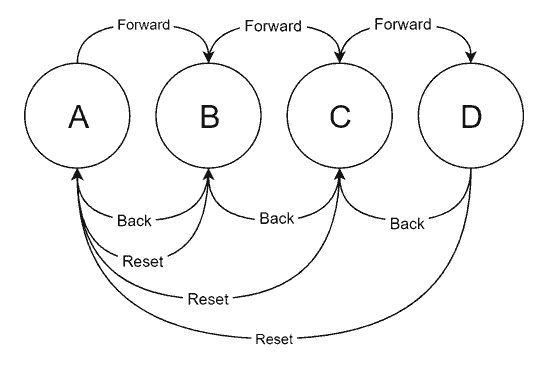
As we can see, it is a very simple machine with 4 states A, B, C, and D. We have three possible inputs: Forward, Backward, and Reset.
With Forward and Backward, the machine moves to the next and previous state. On the other hand, the Reset input returns to state A from any other state.
It has been decided that the states are not cyclic. That is, Forward does not move from D to A, nor does Backward move from A to D. Although we could have done that just as easily.
State Machine in Arduino
A possible implementation of the state machine could be the following.
enum State
{
  PosicionA,
  PosicionB,
  PosicionC,
  PosicionD
};

enum Input
{
  Unknown,
  Reset,
  Forward,
  Backward
};

// Global variables
State currentState;
Input currentInput;

// State actions and transition conditions
void stateA()
{
  if (currentInput == Input::Forward)
    changeState(State::PosicionB);
}

void stateB()
{
  if (currentInput == Input::Backward)
    changeState(State::PosicionA);
  if (currentInput == Input::Forward)
    changeState(State::PosicionC);
  if (currentInput == Input::Reset)
    changeState(State::PosicionA);
}

void stateC()
{
  if (currentInput == Input::Backward)
    changeState(State::PosicionB);
  if (currentInput == Input::Forward)
    changeState(State::PosicionD);
  if (currentInput == Input::Reset)
    changeState(State::PosicionA);
}

void stateD()
{
  if (currentInput == Input::Backward)
    changeState(State::PosicionC);
  if (currentInput == Input::Reset)
    changeState(State::PosicionA);
}

// Outputs associated with transitions
void outputA()
{
  Serial.println("A   B   C   D");
  Serial.println("X            ");
  Serial.println();
}

void outputB()
{
  Serial.println("A   B   C   D");
  Serial.println("    X        ");
  Serial.println();
}

void outputC()
{
  Serial.println("A   B   C   D");
  Serial.println("        X    ");
  Serial.println();
}

void outputD()
{
  Serial.println("A   B   C   D");
  Serial.println("            X");
  Serial.println();
}

void setup()
{
  Serial.begin(9600);
  currentState = PosicionA;
  outputA();
}

void loop()
{
  readInput();
  updateStateMachine();
}

// Updates the state of the machine
void updateStateMachine()
{
  switch (currentState)
  {
    case PosicionA: stateA(); break;
    case PosicionB: stateB(); break;
    case PosicionC: stateC(); break;
    case PosicionD: stateD(); break;
  }
}

// Reads the input from the serial port
void readInput()
{
  currentInput = Input::Unknown;
  if (Serial.available())
  {
    char incomingChar = Serial.read();

    switch (incomingChar)
    {
    case 'R': currentInput = Input::Reset;  break;
    case 'A': currentInput = Input::Backward; break;
    case 'D': currentInput = Input::Forward; break;
    default: break;
    }
  }
}

// Function that changes the state and triggers the transitions
void changeState(int newState)
{
  currentState = newState;

  switch (currentState)
  {
    case State::PosicionA: outputA();   break;
    case State::PosicionB: outputB();   break;
    case State::PosicionC: outputC();   break;
    case State::PosicionD: outputD();   break;
    default: break;
  }
}
As we can see, first, we have defined two enumerations that correspond to the possible states and inputs. This is good practice to simplify code readability, maintainability, and scalability.
On the other hand, we have 2 global variables currentState and currentInput, which store the current state of the state machine and the last received input.
Next, we have a function (state) for each of the states. These actions contain the logic associated with the transitions, that is, they perform the change to another state based on a condition. In this case, the only conditions we have are input variables, but they could be timings, or any other.
On the other hand, we have the output functions for each state, which are triggered upon entering a node. In this example, we only show a serial port representation of the machine’s state. In a real machine, we would perform the necessary actions.
To change between states we use the function changeState(int newState), which checks the current state with the new state. Here we launch the entry functions for each state.
If we wanted to associate a function with a particular transition, instead of upon entering a state, we could, for example, launch them in the state functions when performing the state change.
Finally, the machine is constantly updated through the Update() function. This function only launches the state function corresponding to the current state, and thus updates the state of the machine.
In the example, we also have the readInput() function, which receives a character from the serial port. A, D, and R correspond, respectively, to the Backward, Forward, and Reset inputs. This function is not strictly part of the state machine; we simply use it in the example to check its operation.
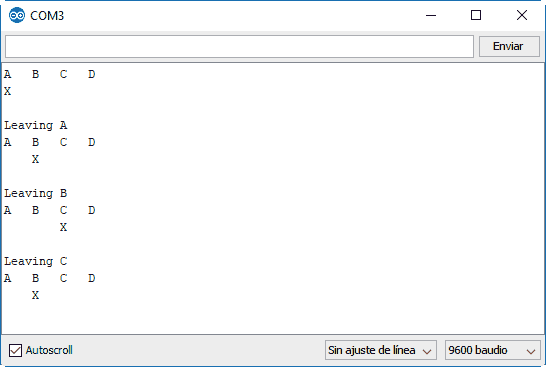
Results
If we run the previous code, we can see the result on the serial port. We can change the state by pressing the keys ‘A’, ‘D’, and ‘R’.
Tabular State Machine in Arduino
Next, we are going to see a variation of the previous code, a tabular implementation of a state machine.
The main differences are that in this case, the transitions between states are collected in a state transition matrix, instead of in the previous functions for each state. The new state is obtained by the combined index of the current state and input.
Similarly, the actions associated with the transitions are collected in a function vector, so we access each one directly by the index of the current state.
enum State
{
  PosicionA,
  PosicionB,
  PosicionC,
  PosicionD
};

enum Input
{
  Unknown,
  Reset,
  Forward,
  Backward
};

const void outputA()
{
  Serial.println("A   B   C   D");
  Serial.println("X            ");
  Serial.println();
}

const void outputB()
{
  Serial.println("A   B   C   D");
  Serial.println("    X        ");
  Serial.println();
}

const void outputC()
{
  Serial.println("A   B   C   D");
  Serial.println("        X    ");
  Serial.println();
}

const void outputD()
{
  Serial.println("A   B   C   D");
  Serial.println("            X");
  Serial.println();
}

typedef void (*const StateFunc)();
State currentState;
Input currentInput;

const StateFunc transitionOutput[] PROGMEM = { outputA, outputB, outputC, outputD};

const byte stateChange[4][4] PROGMEM =
{
  { PosicionA, PosicionA, PosicionB, PosicionA },
  { PosicionB, PosicionA, PosicionC, PosicionA },
  { PosicionC, PosicionA, PosicionD, PosicionB },
  { PosicionD, PosicionA, PosicionD, PosicionC },
};

void setup()
{
  Serial.begin(9600);
  currentState = PosicionA;
  outputA();
}

void loop()
{
  readInput();
  updateStateMachine();
}

void updateStateMachine()
{
  State newState = (State)pgm_read_byte(&stateChange[currentState][currentInput]);
  if (currentState == newState) return;

  currentState = newState;

  StateFunc pStateFunc = (StateFunc)pgm_read_ptr(&transitionOutput[currentState]);
  pStateFunc();
}

void readInput()
{
  currentInput = Input::Unknown;
  if (Serial.available())
  {
    char incomingChar = Serial.read();

    switch (incomingChar)
    {
      case 'R': currentInput = Input::Reset;  break;
      case 'A': currentInput = Input::Backward; break;
      case 'D': currentInput = Input::Forward; break;
      default: break;
    }
  }
}
The tabular implementation has advantages in certain situations. Code execution is slightly more efficient, since, instead of computing conditionals for state transitions and associated actions, we access directly through the matrix indices.
Furthermore, in certain cases, it can be slightly more efficient in memory usage, since transitions can be mapped directly into program memory (ROM), instead of dynamic memory (RAM).
Finally, it is easier to change the behavior of the network, simply by altering the transition matrix. This change can, for example, be updated from an SD card, or received via a communication medium (UART, Bluetooth, Wifi…).
However, it is considerably more restrictive. Any input to the machine has to be mapped to an input, which makes it counterproductive in the (very frequent) case of having transitions with combined conditions (for example, in the case of condition A&B, we would have to create a new input), timings, etc…
In any case, it was not possible to make a post about finite state machines without presenting a tabular approach to the problem. So here it is as an alternative, with its respective advantages and disadvantages.
State Machine in a Library
Finally, the most useful and convenient option is to encapsulate the finite state machine in an object. Here we have the StateMachine library that allows implementing state machines on a processor like Arduino.
With this library, the code for this example would look like this.
#include "StateMachineLib.h"

enum State
{
  PosicionA = 0,
  PosicionB = 1,
  PosicionC = 2,
  PosicionD = 3
};

enum Input
{
  Reset = 0,
  Forward = 1,
  Backward = 2,
  Unknown = 3,
};

StateMachine stateMachine(4, 9);
Input input;

void setupStateMachine()
{
  stateMachine.AddTransition(PosicionA, PosicionB, []() { return input == Forward; });

  stateMachine.AddTransition(PosicionB, PosicionA, []() { return input == Backward; });
  stateMachine.AddTransition(PosicionB, PosicionC, []() { return input == Forward; });
  stateMachine.AddTransition(PosicionB, PosicionA, []() { return input == Reset; });

  stateMachine.AddTransition(PosicionC, PosicionB, []() { return input == Backward; });
  stateMachine.AddTransition(PosicionC, PosicionD, []() { return input == Forward; });
  stateMachine.AddTransition(PosicionC, PosicionA, []() { return input == Reset; });

  stateMachine.AddTransition(PosicionD, PosicionC, []() { return input == Backward; });
  stateMachine.AddTransition(PosicionD, PosicionA, []() { return input == Reset; });

  stateMachine.SetOnEntering(PosicionA, outputA);
  stateMachine.SetOnEntering(PosicionB, outputB);
  stateMachine.SetOnEntering(PosicionC, outputC);
  stateMachine.SetOnEntering(PosicionD, outputD);

  stateMachine.SetOnLeaving(PosicionA, []() {Serial.println("Leaving A"); });
  stateMachine.SetOnLeaving(PosicionB, []() {Serial.println("Leaving B"); });
  stateMachine.SetOnLeaving(PosicionC, []() {Serial.println("Leaving C"); });
  stateMachine.SetOnLeaving(PosicionD, []() {Serial.println("Leaving D"); });
}

void setup()
{
  Serial.begin(9600);

  Serial.println("Starting State Machine...");
  setupStateMachine();
  Serial.println("Start Machine Started");

  stateMachine.SetState(PosicionA, false, true);
}

void loop()
{
  input = static_cast<Input>(readInput());

  stateMachine.Update();
}

int readInput()
{
  Input currentInput = Input::Unknown;
  if (Serial.available())
  {
    char incomingChar = Serial.read();

    switch (incomingChar)
    {
      case 'R': currentInput = Input::Reset;   break;
      case 'A': currentInput = Input::Backward; break;
      case 'D': currentInput = Input::Forward; break;
      default: break;
    }
  }

  return currentInput;
}

void outputA()
{
  Serial.println("A   B   C   D");
  Serial.println("X            ");
  Serial.println();
}

void outputB()
{
  Serial.println("A   B   C   D");
  Serial.println("    X        ");
  Serial.println();
}

void outputC()
{
  Serial.println("A   B   C   D");
  Serial.println("        X    ");
  Serial.println();
}

void outputD()
{
  Serial.println("A   B   C   D");
  Serial.println("            X");
  Serial.println();
}
The advantage of having the logic in a class is that it is much more convenient to use, the code is cleaner and more compact, and it is easier to maintain and scale.
The disadvantage is that we will have a slight performance penalty. In most cases, this will be of no importance and is perfectly acceptable, compared to the advantage of convenience and code.
Download the Code
All the code from this post is available for download on Github. 
