What is an infrared flame sensor?
An optical flame sensor is a device that allows the detection of combustion by the light emitted by it. This light can be detected by an optical sensor and captured by the digital inputs and analog inputs of Arduino.
A flame is a light emission phenomenon associated with combustion processes. Combustion is a process that releases large amounts of energy in the form of heat. During the reaction, intermediate compounds are generated that release part of their energy through the emission of light.
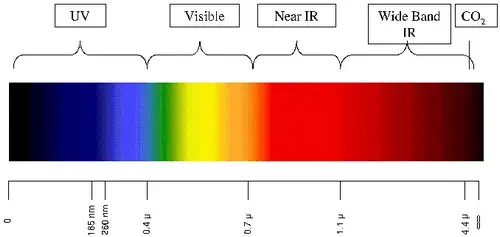
The flame emission spectrum depends on the elements involved in the reaction. In the case of the combustion of carbon products in the presence of oxygen, we have two characteristic peaks in ultraviolet at wavelengths of 185nm-260nm and in infrared at wavelengths of 4400-4600nm.
Flame sensors are widely used in the industry. Many machines carry out processes that are susceptible to generating flames, such as machining or electroerosion processes. These are often carried out in the presence of flammable elements such as oil or shavings.
For this reason, flame sensors are incorporated as a safety device, allowing the process to be stopped in case of detecting any sign of combustion. These devices are adjusted to the characteristic wavelengths of the appearance of the flame and normally combine the ultraviolet and infrared signals.
In the field of hobbies, we can find cheap flame sensors. These sensors often consist of only an infrared sensor adjusted to 760-1100 nm. The detection angle is 60º, and the detection distance is between 0.40 m and 0.80 m.
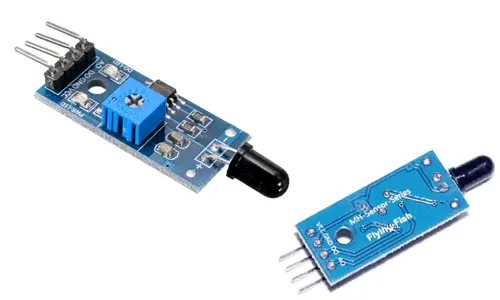
These types of infrared flame sensors usually incorporate a standard measurement board with the LM393 comparator, which allows obtaining the reading both as an analog value and in digital form when a certain threshold is exceeded, which is regulated through a potentiometer located on the board.
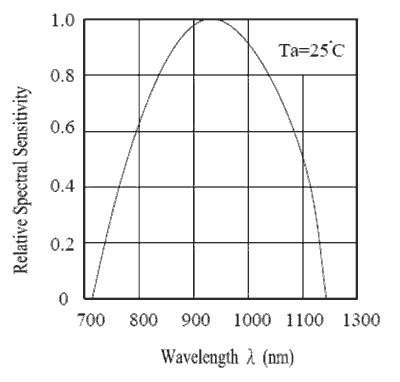
As we can see, the wavelengths of these cheap sensors have little to do with the characteristic emissions of flames and industrial sensors. In fact, they are even affected by indoor lighting, leading to numerous false positives.
Therefore, the sensitivity and reliability of these cheap detectors are not sufficient to consider them a true safety device, although they can be interesting in small electronics projects and for educational purposes, such as sounding an alarm or activating an LED when a lighter flame is detected.
Do not use sensors without the appropriate certifications in setups on which the safety of people or equipment depends.
Price
Home infrared flame sensors are cheap devices. They can be found, including the measurement board, for €0.65 from international sellers on Ebay and Aliexpress.
Assembly diagram
The electrical diagram is simple. We power the module by connecting GND and 5V to the corresponding pins of Arduino.
Now, if we want to use the digital reading, we connect the DO output to one of the digital inputs of Arduino.
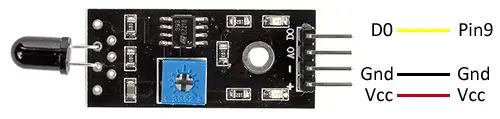
While the connection from Arduino’s perspective would look like this,
If we wanted to use the analog value, we would simply connect the sensor’s AO output to an analog input of Arduino.
Code examples
The necessary code is equally simple. If we are using the digital signal, we use a digital input to read the state. In the example, we show a message on the screen, but in a real case, we would carry out the appropriate actions.
const int sensorPin = 9;

void setup()
{
   Serial.begin(9600);
   pinMode(sensorPin, INPUT);
}

void loop()
{
   int humidity = digitalRead(sensorPin);

   //send message to serial port depending on the read value
   if (humidity == HIGH)
   {
      Serial.println("Detection");
      //actions would be executed here
   }
   delay(1000);
}
If we are using the analog signal AO, we read the value through the analog input, and use the serial port to display the value on the screen. In a real case, this value would be used to carry out actions, instead of displaying the value.
const int sensorPin = A0;

void setup() {
   Serial.begin(9600);
}

void loop()
{
   int measure = analogRead(sensorPin);
   Serial.println(measure);

   if(measure < 500)
   {
      Serial.println("Detection");
      //carry out necessary actions
   }
   delay(1000);
}
Download the code
All the code from this post is available for download on Github. 
