
I continue to tell the story of my garage controlled by Arduino. We remember that in the previous entry we saw that a plastic piece had broken, which should cost a maximum of €5? and after four weeks of waiting, I had received a quote of €1100.
I made a replacement and sort of started the machine on the ceiling when testing it. I call the installation company, tell them that I made a replacement, but that something is wrong with that machine. That they come, adjust it, regulate it, or whatever they have to do.
Another week waiting for a response and, in all this, we have already passed Christmas. I call them again. They tell me they are very busy and do not know when they could come. I spare my opinion on their service and simply outline that, if it weren’t for my neighbor working there, I would have sent them… where they deserve to go a long time ago.
I call another company, where a much kinder lady takes my message and tells me they will call me next week (must be a constant in garage door companies). Of course, they don’t call me either.
I call again. Super kind, she tells me that they are very busy and that they will call me the following week. They still don’t call me. I call again, and they tell me that they are very busy… that… they don’t know when they will be able to come. I tell them, “So, should I look for others?” And they say yes, that it’s probably for the best (literally).
I can’t believe it! What kind of loobie are the garage door installers, who, apart from charging you €40 for reprogramming a remote because they have the codes, are so busy that they say no to a customer. Of course, repairs for an individual are not good for them, they make more money by building developments in new construction sites.
I call the third company. A super kind gentleman says he will come the next day. Finally! And he does! I cry with excitement. He comes and I explain that the gear has broken but that I have replaced it with a replacement (I don’t even tell him that it’s 3D printed). It goes up and down, but there is something wrong with it because (etc etc).
He tells me that he will give me a quote in two days, and he does. Finally a professional!… I look at the quote, replacement of motor + chain + guide +… €1100 + VAT. VERY PROFESSIONAL! Come on, he wants to change everything except the car.
Let’s see, let’s see, let’s see. A machine like this, new, costs €200 at most. But remember the problem that I wanted to keep the wireless remote so I wouldn’t have to carry two, and that the ceiling of my basement is made of white cork.
Keep calm, let’s analyze the situation
By now I had found and read the installer’s manual for the garage door opener, which by the way, was not easy to find.
Well, no wonder I didn’t understand what was happening with the buttons on the electronic board. One is for opening and closing, which is the one that doesn’t work. The other is for Setup, and it’s for learning the travel.
It turns out that this model has about 6 Setup modes, and depending on whether you press the button and do not press it within 5 seconds, it does one thing. If you press it and within less than 5 seconds you press the other, it does another… etc, etc. Well, as if anyone could have guessed that without the manual.
With this now known, I do the learning cycle. Indeed, the door opens and closes, and the light flashes, indicating that the process has been correct. But when I press the “normal” open button, the door tries to move, but stops.
The instruction manual states that during the Setup cycle, the overcurrent and anti-entrapment protections are deactivated. Mmmmm… This is starting to make sense.
And what if it wasn’t the gear that broke? What if it was the electronics, and when it closed and the protections failed, that’s what broke the gear? That’s why the Setup cycle works, but the normal one doesn’t, because the electronics have something wrong.
But well, the motor works… the gear works… it’s an electronics problem! It’s just controlling a motor. A big motor, attached to something heavy, and that can rip my ceiling apart.
But the control is nowhere near as complicated as one of my robots. Well, I remove their electronics and install mine. Bye-bye!
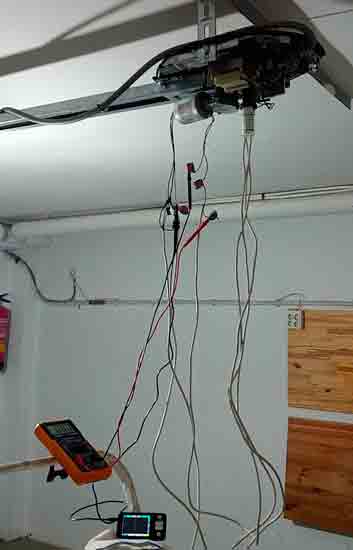
Oscilloscope and multimeter galore
I start measuring their electronics, which, by the way, is the typical old PCB from years ago. There is a 24V transformer (which actually gives them 29V), a rectifier bridge, and 3 relays. One is for the courtesy light, and the others to power the motor and reverse the direction of rotation.
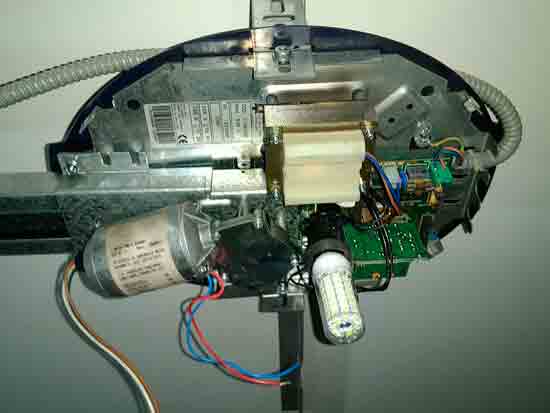
In other words, all or nothing control by relay. Full up, full down. Look, I refuse to be charged more than €1000 for this.
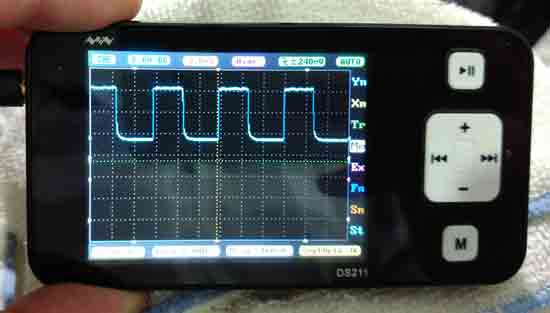
On the other hand, the motor has 2 power cables, and 3 others of… unknown. Could it be an encoder? It looks like it. A little playing around with the oscilloscope… There it is! A perfect square wave of 15ms when the motor moves. This motor is a delight!
Finally, we have the radio frequency receiver linked to the remote controls, which has a rotating code. In other words, I can’t emulate it. But these modules are interchangeable, they work for several motor models.
Mmm… this module has to communicate with the electronics. It sends a digital signal somewhere fixed. I see that the module has 6 pins, but it only communicates with three on the board… Two power and one signal? Mmm… I see a beautiful transistor here. Is it a simple transistor output?
Multimeter here and there, and finally, I end up finding which pins are for power, and there it is! A beautiful digital output at 24V for about 300ms when I press the remote control button.
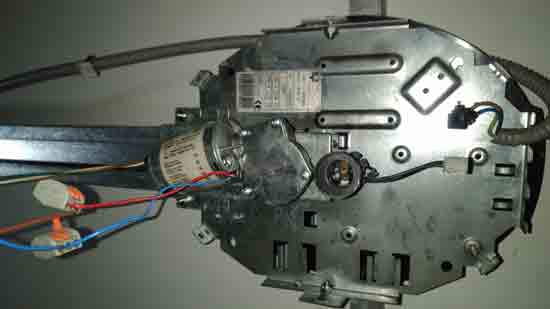
Well, I have everything I need to assemble my own electronics in the purest Maker style. And, by the way, let’s modernize it a bit and it will still cost me next to nothing. I remove all their electronics and leave the motor “naked”.
Designing the electronics
All the components have to fit in the available space, and not exceed the height so that it can close its cover. The new electronics will be based, as it couldn’t be otherwise, on my ever-faithful Arduino Nano. I am going to need a very big motor controller, up to 36V and 40A.
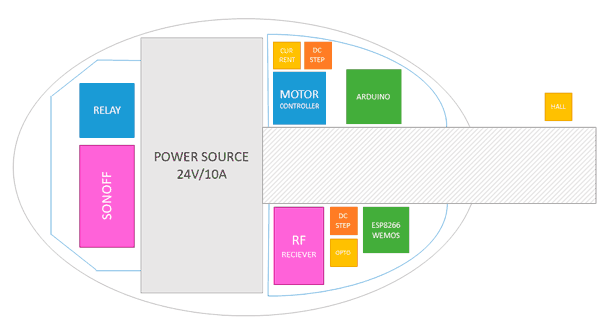
I can read the encoder directly without any problems. Along with the MOSFET motor controller, I will have speed control, and not just their lousy all-or-nothing control. In addition, I will need a current sensor as a safety measure. I choose an ACS712 of up to 20A.
The original machine has no limit switches, neither at the bottom nor at the top. All the movement is controlled by the motor’s encoder. It doesn’t seem like the best solution… so I decide to add a Hall magnetic limit switch to detect the open position of the door.
On the other hand, I will need an optocoupler to read the RF receiver. Moreover, I will put a Wemos ESP8266 because, since I’m at it, I’m going to make everything WiFi.
I will also need a relay module to turn on the courtesy light, that is, the light that the motor itself has that turns on for a while when you open or close the door.
In fact, I’d better put a two-channel one, in case in the future I feel like turning on the light for the entire garage from there. And I’m going to leave space to put a Sonoff relay… just in case.
To power everything, I will need a 24V, 10A power supply. And two voltage Step-Down/regulators, one for the Arduino at 5V and the other for the ESP8266 at 3.3V.
Well, most of the components I have. But the 24V power supply, and the 40A motor controller, I don’t have. So I place the orders, and wait for things to arrive. To be continued in the next entry