
I continue with the story of the repair of my garage door. You will remember that by this point, the gear has broken again, I have the ceiling full of holes, and I have put in a lot of hours.
It seems that the most sensible thing to do at this point is to give up. Assume that Maker tools have their limits, go buy a mechanism for 200€ and then I will worry about how to skip the 20cm of Porexpan and fix it to the flooring. After all, it’s just one more hole in the ceiling!
And I was just about to buy it but (and I know this is going to sound super geeky) I found this image of Ironman lost in space, using his helmet to leave a message to Pepper. And I know it’s silly, but I said to myself “man, he wouldn’t leave it like that.”
 So, just out of sheer stubbornness and Maker pride… we are back to the hardware phase! Which, in this case, means dealing with the 3D printer again.
Back to hardware mode
I start printing a new gear. But this time I increase the temperature “to the max.” In addition, I increase the overlap between lines to 10%. And “as a bonus,” I increase the flow by 5%.

The printer head was moving like when you spread Nutella on bread, leaving a trail. There was plastic everywhere, it was a mess.
I also remove the striations and, in their place, I heat the shaft and press it in (and I would say that the technical term is “bundling,” but I don’t know if I would dare to be so precise with something that involved several hammer blows).
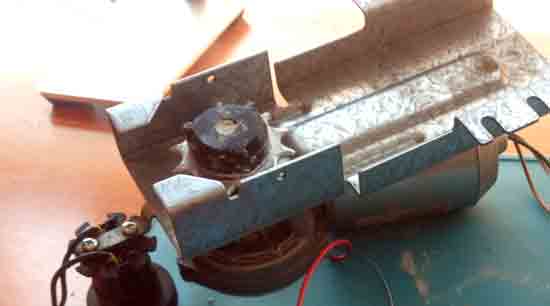
On the other hand, I temper the piece to eliminate residual stresses. So, I take the whole reducer and put it in the oven for 30 minutes. I have read a lot about it, and I have not found any conclusive studies on the effect. But hey, it won’t hurt.
This is as far as I can go with my resources. The next step would be to look for a lathe, print it in polyamide, or… look, the next step is to buy the darn 200€ mechanism.
As a consequence, before the gear used to slide in, so you inserted the gear into the chain and then coupled the motor. But now the gear is attached to the motor, so I have to disassemble the rail by loosening the tensioner on the other side.
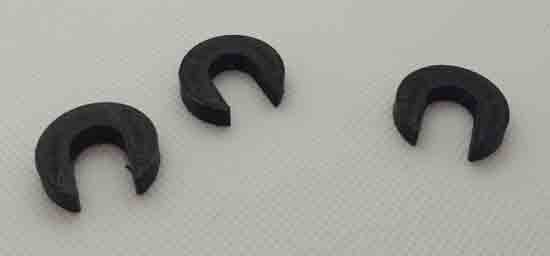
I’m going to assemble everything and, in the process, the nut of the tensioner has gone too far and no longer tightens, so the chain is loose and I can’t tighten it. But it can’t get any worse.
What the heck, I make some 3D printed pieces, of different thicknesses, that I insert into the tensioner screw as a shim. I play with the different thicknesses until the chain has the tension that, by eye, I think it should have.
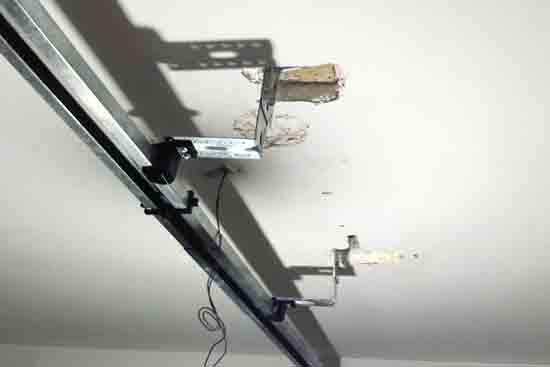
On the other hand, I still want my ceiling supports. So I look for the beams, and I remove (and swallow) a lot of Porexpan in order to be able to attach the metal brackets.
Of course, that means that I have to redesign and print the pieces that hold the rail. In addition, now I need two brackets instead of one for each support, so I make some plastic pieces to act as braces and give rigidity.
So, with more work and more weekends dedicated, I am ready to perform the tests again. It seems to work! I don’t know how long the new gear will last, but for now, we’re there.
Moving on to programming
The programming, version 1, involves creating a state machine diagram. In general, we have 2 work cycles.
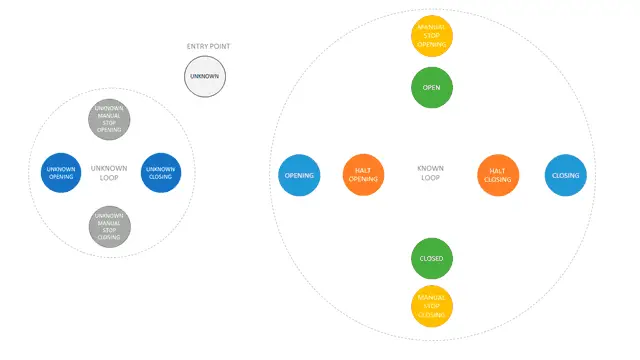
When the machine starts, we don’t know in what position we are, so as a precaution, we limit the speed of the door to the slowest speed.
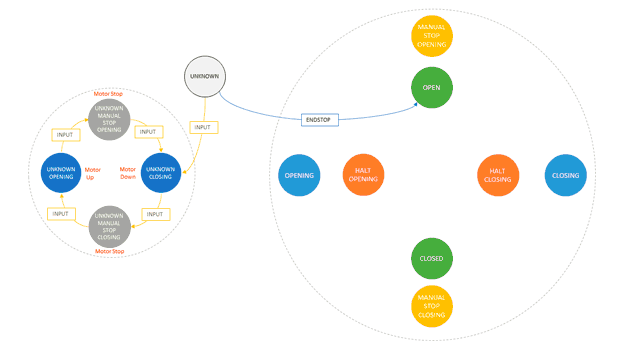
When detecting the closing or the upper limit, we switch to the normal work cycle.
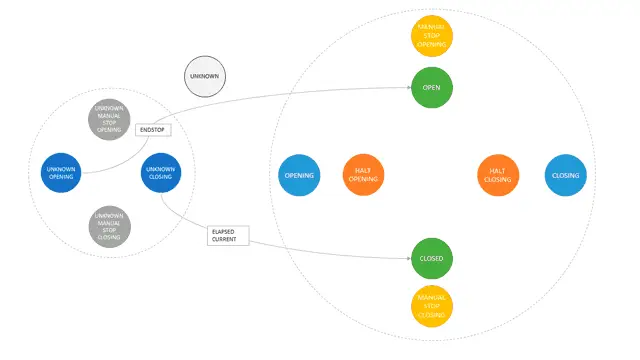
In the normal work cycle, we know the position of the door through the encoder. On the other hand, we monitor manual inputs (the remote control, a push button, etc.), the current, and the time of the encoder.
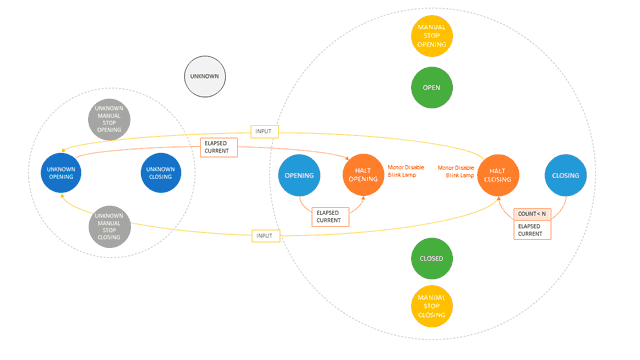
Depending on the different inputs, the state machine switches to one state or another, according to the scheme.
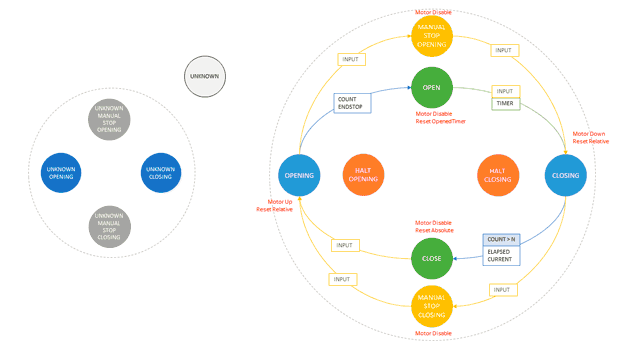
In addition, we have speed control. On the one hand, we have an acceleration curve, which occurs whenever the door starts moving. On the other hand, we have deceleration zones that depend on the absolute position of the door.
We also have current control and encoder control as a collision prevention measure.
Finally, we have control of the light relay, and timers for turning it off, and for the automatic closing of the door when it is up.
Result
And the result… here it is. I don’t know if it’s a success of the Maker philosophy, or an exercise in stubbornness. I also don’t know if the replacement gear will last a week, or a lifetime.
The speed control and the anchors make the movement much smoother than before. In addition, they represent a much lower starting peak for the motor, which has gone from 9A with all or nothing control, to 3.5A.
The current measurement and encoder control make the door stop in less than 50ms, either if a collision occurs, or when it closes. Which seems quite safe, probably more than the original.
All this, in addition to making the movement smoother and quieter, favors that the gear withstands less stress, and extends its life.
Finally, now it’s WiFi. For now, I can only open and close, but over time (and with desire), I will make a page that allows you to see the status of the door, and debug information, etc.
In the future, I can think of many more things to add. Replace the courtesy light with a NeoPixel ring, control the lights of the entire garage, add an ultrasonic sensor to know if there is a car parked or not, or add an indicator to help you park. But, for now, I have dedicated a lot of time to the garage door, so it will be for the future.
Well, that’s the end of my garage story. I will soon upload all the code to Github, and I will put a link in this same entry.
