Throughout the course, we have basically used the terminal. We did it this way to avoid complicating the explanation and to be able to explain the concepts well.
But I said in the introduction that we weren’t only going to talk about the terminal. There are graphical interface programs (GUIs) and IDE integrations that help us work with Git more easily.
Most of us use a hybrid work strategy:
- Graphical Interface (GUI): For daily work (add, commit, diff)
- Terminal: For complex operations or fixing disasters
As for GUIs, they are all more or less similar. We will base ourselves on Visual Studio Code, because it is the most used (but any other you find will be very similar).
Knowing that, in general terms, they all share a similar approach, in this article we will take the usual manager of Visual Studio Code as a basis.
VS Code Git Simulator
So you don’t have to install anything, and we can follow the explanation right here, I’ve set up an Interactive Simulator for you to try the real workflow without fear of breaking anything.
At the bottom, in the emulated terminal, I show you the real Git command being executed behind each click.
What can you try to do?
Initialize: Click the blue button to do git init.
Create content: Use the “Simulate Edit” button to generate changes in your project’s three files app.js, style.css, and index.html (in the tabs)
Try the classic flow: Click the + on a file to stage it, and then click Commit.
Try the Smart flow: Modify a file and click Commit directly without staging it.
Practice with Branches (advanced): Click on the branch name (main, top right) to create a new branch (feature) and switch to it.
Keep reading the rest of the article, and you can come back here to try and understand the concepts
The Control Panel
Let’s continue with the “real” VS Code. In the left sidebar of VS Code, you’ll see an icon that looks like a branch graph (three connected circles). That’s the Source Control panel.
When you enter there, VS Code groups your files into several sections.
- STAGED CHANGES: Files you have already prepared with
git add. - CHANGES: Modified files that you have not yet prepared.
If you hover over a file in “Changes” and click the + button, VS Code executes git add for you. If you click the - button in “Staged”, it executes git restore --staged.
The “Smart Commit”
This is the most useful functionality, but the one that differs the most from what we’ve seen in the terminal.
In the terminal, the flow is always:
git add .(Stage)git commit -m "..."(Commit)
But in GUIs like VS Code, we can do a Commit simply by writing the message, without having done git add before.
How is this possible? Sacrilege! Because VS Code has a feature called Smart Commit.
If you have nothing in the Staging Area, VS Code assumes you meant add everything I’ve changed and commit.
This functionality is terribly convenient 💜. But you need to know what it’s doing to avoid uploading junk files (and to understand how it works).
Even with Smart Commit, staging can be useful:
- If you’re in the middle of a change and want to make a kind of “save point,” but without committing yet.
- If you’ve modified several files and want to make separate commits.
Key Differences with the Terminal
Besides Smart Commit, there are other differences that VS Code makes to make your life easier (and you can notice in the simulator)
You don’t need to write git status like crazy. VS Code watches your files.
- If a file turns Green (U), it’s new.
- If it turns Yellow (M), it’s modified.
Forget about git checkout. In the bottom left of VS Code, you’ll always see your current branch name (e.g., main).
If you click, a menu opens to create branches or jump to others.
Be careful when switching branches If you have “dirty” changes (uncommitted) and try to switch branches, VS Code (and our simulator) will warn you. The terminal would leave you hanging or force you to do a manual stash. VS Code usually offers you options to take them with you or save them automatically.
Although the simulator doesn’t go that far, when you have a merge conflict (Merge Conflict), VS Code will color-code the text and place buttons above it:
- Accept Current Change
- Accept Incoming Change
Furthermore, it will allow you to decide on each change individually.
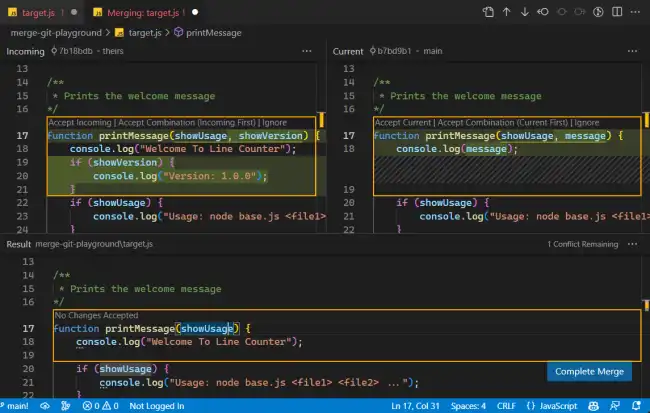
It’s infinitely easier than looking for the <<<<<<< HEAD symbols in Notepad.
Plus many, many functions with the right-click button. Basically, you can do almost everything, although for complicated things, I recommend using the terminal.
Git Extensions for VScode
Although VS Code comes with the basics out of the box, there are two extensions that turn the editor into a complete Git tool.
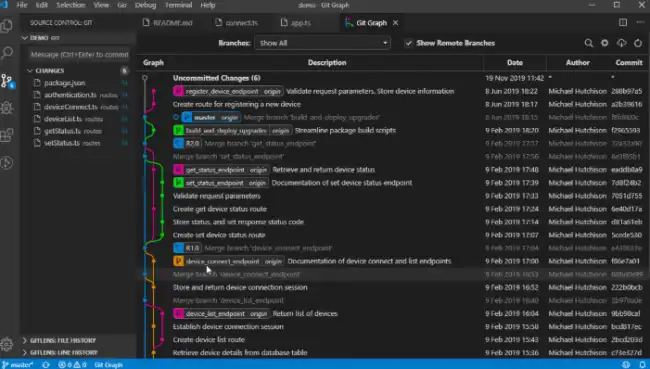
- Git Graph: VS Code doesn’t come with a history tree visualizer by default. This extension draws that famous “subway map” with your branches and commits. It’s essential for visually understanding where you are and what has happened in the project.
- GitLens: It’s the most powerful extension out there. Its star feature is the inline “Blame”: when you click on any line of code, it tells you in faint gray who modified it, when, and in which commit.
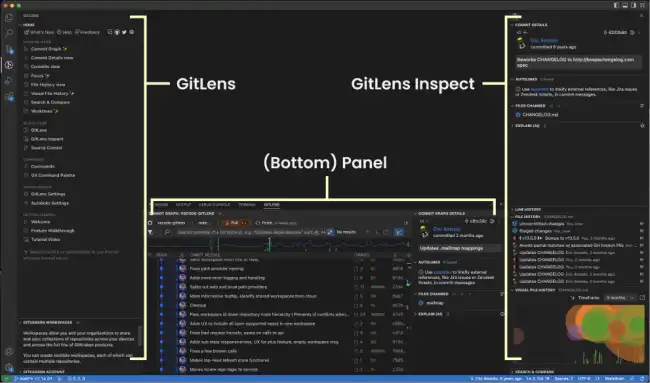
I don’t recommend installing GitLens at the beginning. It adds a ton of functions, 98% of which you’ll never use. It might confuse you more than anything else.
