
VueJS, Vuetify, and WebSockets let us create a GPIO panel to control an ESP32 from the browser.
This is a special post because it will be a recap and consolidation of everything we have seen so far. To put it in context, remember that to get here we have seen Ajax communication, Asynchronous Websockets, Vue, Vuetify.
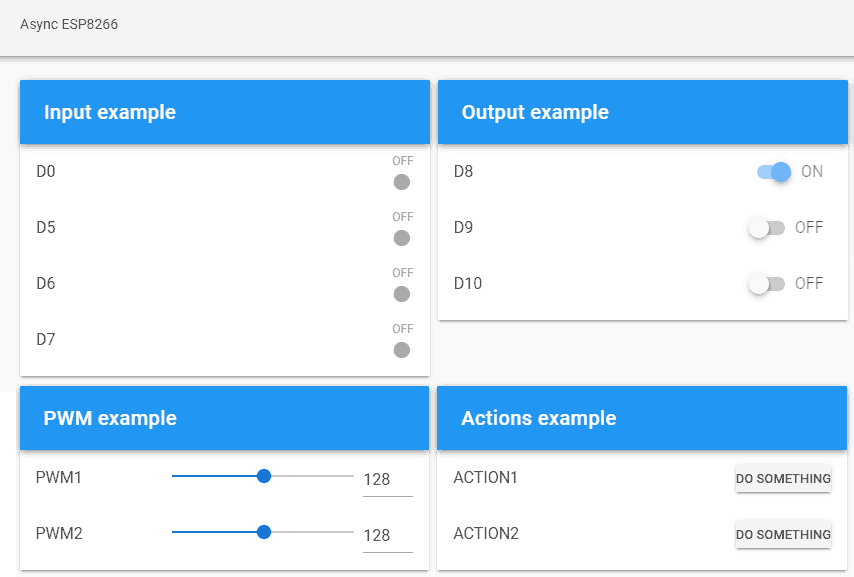
Already in the previous post we put all the components together to make a Web interface. Now we just need to add Vuetify to the equation to have a good demo of how to make a web interface for your project.
 The good news is that this post won’t be very difficult! In fact, the entire backend part is identical to the previous post. So we avoid repeating the code and refer you to it.
The part that will change is the frontend, which must be adapted to integrate Vuetify.
So our ‘index.html’ file looks like this. Nothing particularly striking, we have simply adapted the code to make use of the components provided by the framework.
<!doctype html>
<html lang="">

<head>
  <title>ESP8266 VueJS</title>
  <meta charset="utf-8">
  <meta http-equiv="x-ua-compatible" content="ie=edge">
  <title></title>
  <meta name="description" content="">
  <meta name="viewport" content="width=device-width, initial-scale=1">
</head>

<body>
  <link rel="stylesheet" href="css/main.css">
  <link href="./vendor/google-fonts.css" rel="stylesheet">
  <link href="./vendor/vuetify.min.css" rel="stylesheet">

  <v-app id="app">
    <v-toolbar app>Async ESP8266</v-toolbar>
    <v-content>
      <v-container fluid grid-list-md text-xs-center>

        <v-layout row wrap>
          <v-flex xs3>
            <v-card>
              <v-toolbar color="blue" dark>
                <v-toolbar-title class="text-xs-center">Input example</v-toolbar-title>
              </v-toolbar>
              <v-list subheader>
                  <gpio-input v-for="item in gpio_input_list" :gpio="item" :key="item.id" />
              </v-list>
            </v-card>
          </v-flex>

          <v-flex xs3>
              <v-card>
                <v-toolbar color="blue" dark>
                  <v-toolbar-title class="text-xs-center">Output example</v-toolbar-title>
                </v-toolbar>
                <v-list subheader>
                    <gpio-output v-for="item in gpio_output_list" v-bind:gpio="item" v-bind:key="item.id" />
                </v-list>
              </v-card>
            </v-flex>

            <v-flex xs3>
                <v-card>
                  <v-toolbar color="blue" dark>
                    <v-toolbar-title class="text-xs-center">PWM example</v-toolbar-title>
                  </v-toolbar>
                  <v-list subheader>
                      <pwm v-for="item in pwm_list" :gpio="item" :key="item.id" />
                  </v-list>
                </v-card>
              </v-flex>

              <v-flex xs3>
                  <v-card>
                    <v-toolbar color="blue" dark>
                      <v-toolbar-title class="text-xs-center">Actions example</v-toolbar-title>
                    </v-toolbar>
                    <v-list subheader>
                        <action v-for="item in action_list" :action="item" :key="item.id" />
                    </v-list>
                  </v-card>
                </v-flex>
        </v-layout>
      </v-container>
    </v-content>
  </v-app>

  <!-- From CDN -->
  <!--<script src="https://cdn.jsdelivr.net/npm/[email protected]/dist/vue.min.js"></script>-->
  <script type="text/javascript" src="./vendor/vue.min.js"></script>
  <script type="text/javascript" src="./vendor/vuetify.min.js"></script>
  <script type="text/javascript" src="./vendor/nativeWs.min.js"></script>

  <!-- Load the file containing our Vue.JS App -->
  <script type="text/javascript" src="./js/app.js"></script>
</body>
</html>
Our JavaScript file will also change, but only in the part of the templates for the components we had defined for GPIO Input, GPIO Output, PWM and callback action.
Vue.use(VueNativeSock.default, 'ws://' + location.hostname + '/ws', { format: 'json' })

Vue.component('gpio-input', {
  props: ['gpio'],
  template: `
    <v-list-tile avatar>
      <v-list-tile-content>
        <v-list-tile-title>{{gpio.text}}</v-list-tile-title>
      </v-list-tile-content>
    <v-list-tile-action>
      <v-list-tile-action-text>{{ gpio.status ? "ON " : "OFF "}}</v-list-tile-action-text>
      <v-icon :color="gpio.status ? 'teal' : 'grey'">fiber_manual_record</v-icon>
    </v-list-tile-action>
    </v-list-tile>
    `
})

Vue.component('gpio-output', {
  props: ['gpio'],
  template: `
    <v-list-tile avatar>
      <v-list-tile-content>
        <v-list-tile-title>{{gpio.text}}</v-list-tile-title>
      </v-list-tile-content>
      <v-list-tile-action>
        <v-switch v-model="gpio.status" class="ma-2" :label="gpio.status ? 'ON' : 'OFF'" @change="sendGPIO"></v-switch>
      </v-list-tile-action>
    </v-list-tile>
`,
  methods: {
    sendGPIO: function (evt) {
      console.log(this.gpio.text + ': ' + this.gpio.status);

      let data = {
        command: "setGPIO",
        id: this.gpio.text,
        status: this.gpio.status
      }

      let json = JSON.stringify(data);
      this.$socket.send(json);
    }
  }
})

Vue.component('pwm', {
  props: ['gpio'],
  template: `
      <v-list-tile avatar>
        <v-list-tile-content>
          <v-list-tile-title>{{gpio.text}}</v-list-tile-title>
        </v-list-tile-content>
        <v-list-tile-action>
        <v-slider thumb-label v-model="gpio.value" min="0" max="255" @change="sendPWM">
            <template v-slot:append>
              <v-text-field class="mt-0 pt-0" hide-details single-line  type="number" style="width: 50px"
                    v-model="gpio.value" @change="sendPWM"></v-text-field>
              </template>
              </v-slider>
        </v-list-tile-action>
      </v-list-tile>`,

  methods: {
    sendPWM: function (evt) {
      console.log(this.gpio.text + ': ' + this.gpio.value);

      let data = {
        command: "setPWM",
        id: this.gpio.text,
        pwm: this.gpio.value
      }

      let json = JSON.stringify(data);
      this.$socket.send(json);
    }
  }
})

Vue.component('action', {
  props: ['action'],
  template: `
        <v-list-tile avatar>
        <v-list-tile-content>
          <v-list-tile-title>{{action.text}}</v-list-tile-title>
        </v-list-tile-content>
      <v-list-tile-action>
      <v-btn text small color="flat" @click="doAction">Do something</v-btn>
      </v-list-tile-action>
      </v-list-tile>
`,

  methods: {
    doAction: function (evt) {
      console.log(this.action.text + ': ' + this.action.id);
      let data = {
        command: "doAction",
        id: this.action.id,
      }

      let json = JSON.stringify(data);
      this.$socket.send(json);

      this.action.callback();
    }
  }
})

var app = new Vue({
  el: '#app',
  data: function () {
    return {
      gpio_input_list: [
        { id: 0, text: 'D0', status: 0 },
        { id: 1, text: 'D5', status: 0 },
        { id: 2, text: 'D6', status: 0 },
        { id: 3, text: 'D7', status: 0 },
      ],
      gpio_output_list: [
        { id: 0, text: 'D8', status: 1 },
        { id: 1, text: 'D9', status: 0 },
        { id: 2, text: 'D10', status: 0 },
      ],
      pwm_list: [
        { id: 0, text: 'PWM1', value: 128 },
        { id: 1, text: 'PWM2', value: 128 },
      ],
      action_list: [
        { id: 0, text: 'ACTION1', callback: () => console.log("action1") },
        { id: 1, text: 'ACTION2', callback: () => console.log("action2") },
      ]
    }
  },
  mounted() {
    this.$socket.onmessage = (dr) => {
      console.log(dr);
      let json = JSON.parse(dr.data);
      let gpio = this.$data.gpio_input_list.find(gpio => gpio.text == json.id);
      gpio.status = json.status;
    }
  }
})
Result
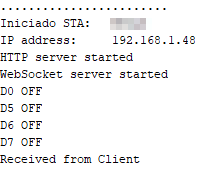
Alright, let’s upload all this to our ESP8266/ESP32 and load the page in a browser. Just like in the previous example, we can modify the state of a pin on the ESP8266/ESP32, and we see that the changes are notified through ReactiveArduino to the client.
On the other hand, if we interact with the web page, we see that the actions performed are displayed correctly both in the browser console and in the serial port of the ESP8266/ESP32.
If you’ve made it this far. Congratulations! You have a fully functional example of how to use a VueJS + Vuetify application, served from an ESP8266/ESP32, and communicated via asynchronous Websockets. That’s something!
As we always say, it’s just a demo. It’s up to you to adapt it to the needs of your project and the details of your device. But it’s a good foundation.
As always, this is only a demo. It is up to you to adapt it to the needs of your project and the details of your device. But it is a good base for web control and monitoring panels.
Download the code
All the code for this post is available for download on Github.

Version for ESP8266: https://github.com/luisllamasbinaburo/ESP8266-Examples
Version for ESP32: https://github.com/luisllamasbinaburo/ESP32-Examples
