
A web page served from an ESP32 can communicate over MQTT using WebSockets and a JavaScript library like PAHO.
MQTT usually appears as communication between devices or backend services. In this case we want to bring those messages to the frontend, so that a web page can receive data published on the broker.
This will not always be the simplest option, because an ESP32 acting as a backend can communicate with the frontend through Ajax calls, its own WebSockets, or other techniques. But if the system already uses MQTT, it can be useful to use the same channel to inform the web page.
So, in short, we want to make a web client for the MQTT protocol and serve this client from the ESP32 itself.
This is where we encounter the first problem: how can we communicate a webpage, which lives in its “web world” of HTTP calls, with communication via MQTT.
Communicating a Webpage via MQTT
A webpage communicates via HTTP, which is a protocol that operates on the Application layer (layer 7 of the OSI model). This, in turn, operates over TCP which acts on the transport layer (layer 4). That is, with few exceptions or future changes (HTTP 3?), a webpage can only communicate via HTTP requests, websockets, or WebRTC.
And how does MQTT fit into this? MQTT is also an Application layer protocol (layer 7) that generally operates over TCP/IP. In summary, MQTT goes directly against a socket and will not enter an HTTP request.
So can’t we connect them? Well, here come Websockets to the rescue. We can configure MQTT to work over Websockets, which as we said, we can manipulate from a webpage.
But first we need to configure our broker to accept Websockets. Whether this is possible, or how to configure it, will depend on the broker we are using. In the rest of the post, we will see it as if we had a local installation of Mosquitto as we saw in this post.
And, on the other hand, we will need a JavaScript library that allows us to read this MQTT communication via Websockets from the served webpage.
Configuring Mosquitto to Use Websockets
If we are using Mosquitto as an MQTT broker, communication via Websockets is disabled by default. So we must activate it in the configuration to be able to communicate from a webpage.
To do this, edit the ‘mosquitto.conf’ file, which you will have in the folder where you installed Mosquitto. Here, look for the “Extra listeners” section and uncomment the Websockets lines by removing the ’#’ symbol from the beginning of the line.
=================================================================
Extra listeners
=================================================================
… listener 9001 protocol websockets …
This way we have added an extra listener for Mosquitto, via Websockets acting on port 9001.
Paho JavaScript Client Library
The other component we need for our communication is a JavaScript library for MQTT. Several libraries exist, but the most commonly used is the Paho JavaScript Client library from Eclipse.
It is a library available in several languages, including Java, JavaScript, Python, C/C++, Rust, and Golang. More information on the project page https://www.eclipse.org/paho
![]()
Code Example
Now that we have configured our broker to accept communication via Websockets, and with our Paho JS Client library, it’s time to put it all together to see an example.
The program we will upload to the ESP32 keeps the same MQTT communication base we already used in other examples. Here we will focus on the parts needed to serve the web page and connect it to the broker.
The code of the main loop of the program looks like the following. The difference is that we have added a call to ‘InitServer()’ to be able to serve the webpage from the ESP32. Also, we have added the necessary includes.
#include <WiFi.h>
#include <SPIFFS.h>
#include <ESPAsyncWebServer.h>
#include <AsyncMqttClient.h>
#include <ArduinoJson.h>

#include "config.h"  // Replace with your network data
#include "Server.hpp"
#include "MQTT.hpp"
#include "ESP32_Utils.hpp"
#include "ESP32_Utils_MQTT_Async.hpp"

void setup(void)
{
  Serial.begin(115200);
  SPIFFS.begin();

  delay(500);

  WiFi.onEvent(WiFiEvent);
  InitMqtt();

  ConnectWiFi_STA();
  InitServer();
}

void loop()
{
  PublishMqtt();

  delay(1000);
}
The other difference is the ‘Server.hpp’ file, where we have put in the logic associated with serving the web page. We are simply serving a web page from SPIFFS, something we have already seen in the rest of the entries in the series.
AsyncWebServer server(80);

void InitServer()
{
  server.serveStatic("/", SPIFFS, "/").setDefaultFile("index.html");

  server.onNotFound([](AsyncWebServerRequest *request) {
    request->send(400, "text/plain", "Not found");
  });

  server.begin();
  Serial.println("HTTP server started");
}
Now we go to what’s really new, which is the page we are serving, and which must act as a MQTT communication client.
In the ‘index.html’ file, it would look like this.
<!doctype html>
<html lang="">

<head>
  <title>ESP32 MQTT</title>
  <meta charset="utf-8">
  <meta http-equiv="x-ua-compatible" content="ie=edge">
  <title></title>
  <meta name="description" content="">
  <meta name="viewport" content="width=device-width, initial-scale=1">
</head>

<body>
  <div id="app">
  </div>

  <script type="text/javascript" src="./vendor/nativeWs.min.js"></script>
  <script type="text/javascript" src="./vendor/mqttws31.min.js" ></script>

  <script type="text/javascript" src="./js/API.js"></script>
  <script type="text/javascript" src="./js/app.js"></script>
</body>

</html>
In the ‘API.js’ file, we have encapsulated the functions associated with the workflow of our application. It is worth noting that in the onConnect() method we subscribe to the ‘hello/world’ topic.
On the other hand, the onMessageArrived method receives text formatted as JSON, parses it, and uses a little Vanilla JavaScript to add the message content to the web page. The rest of the functions in this example only display the data for debugging in the console.
function onConnect() {

  var options = {
    qos: 0,
    onSuccess: onSubSuccess,
    onFailure: onSubFailure
  };
  client.subscribe('hello/world', options);
}

function onFailure(message) {
  console.log(message)
}

function onConnectionLost(responseObject) {
  if (responseObject.errorCode !== 0) {
    console.log("onConnectionLost:" + responseObject.errorMessage);
  }
}

function onMessageArrived(message) {
  console.log(message)
  var topic = message.destinationName;
  var payload = message.payloadString;

  let json = JSON.parse(payload);

  var element = document.getElementById('app');
  var newElement = document.createElement('div');
  newElement.appendChild(document.createTextNode(json.data));
  element.appendChild(newElement);
}

function onSubFailure(message) {
  console.log(message)
}

function onSubSuccess(message) {
  console.log(message)
}
Finally, the logic of our page is in the ‘app.js’ file. We define an MQTT client with the Paho library, where we specify the address of our broker, the listening port for Websockets, and a unique identifier for the client.
For the identifier, we have used a function that generates a random GUID, although we could have used any other, as long as we don’t repeat the client identifier. Finally, we have associated each of the client’s events to our functions in the ‘API.js’ file.
function createGuid() {
  return 'xxxxxxxx-xxxx-4xxx-yxxx-xxxxxxxxxxxx'.replace(/[xy]/g, function (c) {
    var r = Math.random() * 16 | 0,
      v = c === 'x' ? r : (r & 0x3 | 0x8);
    return v.toString(16);
  });
}

client = new Paho.MQTT.Client("192.168.1.150", 9001, createGuid())

var options = {
  onSuccess: onConnect,
  onFailure: onFailure
};

client.onConnectionLost = onConnectionLost;
client.onMessageArrived = onMessageArrived;

client.connect(options);
Result
With this, we upload both the program and the web to the ESP32, run everything, and access the web page served from the ESP32. If everything has gone well, we will see the received messages appear as they are added to the served web page.
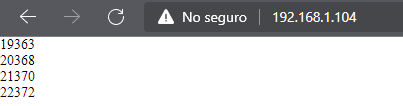
In this example the message simply contains the value of millis(). In a real project, the JSON-formatted data would contain more information: states, measurements, alarms, or commands. The same idea can later be taken to a more complete interface with VueJS or any other frontend framework.
Download the code
All the code from this post is available for download on Github.

Version for the ESP8266: https://github.com/luisllamasbinaburo/ESP8266-Examples
Version for the ESP32: https://github.com/luisllamasbinaburo/ESP32-Examples
