We continue with the series of posts dedicated to communication with the ESP8266 / ESP32, seeing how to communicate an application in Vue through MQTT.
We remember that in the previous post we saw how to communicate an ESP8266 or ESP32 with a web page served from it through MQTT thanks to the PAHO library.
In this tutorial we use vanilla JavaScript to read the Json format and add the received value to the page. But, knowing ourselves, we knew that the next step would be to integrate it into a VueJs App.
While we’re at it, let’s modify the example so that, instead of simply sending the value of millis(), it sends more interesting information. Such as, for example, the state of a GPIO, simulating the reception of an alarm.
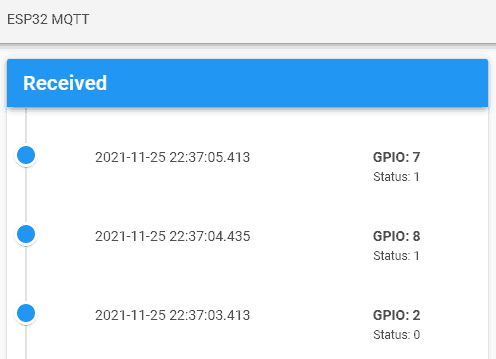
In short, we are going to do something like this.

However, in this example the GPIO state is going to be simulated, because we are only interested in illustrating the communication. It depends on you to adapt it to the hardware and needs of your project.
So, let’s get to work.
The main loop of the program has not been modified with respect to the previous example. We remember that it was the following.
#include <WiFi.h>
#include <SPIFFS.h>
#include <ESPAsyncWebServer.h>
#include <AsyncMqttClient.h>
#include <ArduinoJson.h>

#include "config.h"  // Replace with data from your network
#include "Server.hpp"
#include "MQTT.hpp"
#include "ESP32_Utils.hpp"
#include "ESP32_Utils_MQTT_Async.hpp"

void setup(void)
{
  Serial.begin(115200);
  SPIFFS.begin();

  delay(500);

  WiFi.onEvent(WiFiEvent);
  InitMqtt();

  ConnectWiFi_STA();
  InitServer();
}

void loop()
{
  PublishMqtt();

  delay(1000);
}What has changed is the ‘MQTT.hpp’ file, in which we have separated the logic associated with MQTT communication from our program. There are no major modifications either.
We have only changed the Json that we send to contain the GPIO Id and state. Which, for the example, we are simply filling in with random values.
#pragma once

const IPAddress MQTT_HOST(192, 168, 1, 150);
const int MQTT_PORT = 1883;

AsyncMqttClient mqttClient;

String GetPayloadContent(char* data, size_t len)
{
  String content = "";
  for(size_t i = 0; i < len; i++)
  {
    content.concat(data[i]);
  }
  return content;
}

void SuscribeMqtt()
{
  uint16_t packetIdSub = mqttClient.subscribe("hello/world", 0);
  Serial.print("Subscribing at QoS 2, packetId: ");
  Serial.println(packetIdSub);
}

void PublishMqtt()
{
  String payload = "";

  // We would get GPIO data, status...
  StaticJsonDocument<300> jsonDoc;
  jsonDoc["id"] = random(0, 10);
  jsonDoc["status"] = random(0, 2);
  serializeJson(jsonDoc, payload);

  mqttClient.publish("hello/world", 0, true, (char*)payload.c_str());
}

void OnMqttReceived(char* topic, char* payload, AsyncMqttClientMessageProperties properties, size_t len, size_t index, size_t total)
{
  Serial.print("Received on ");
  Serial.print(topic);
  Serial.print(": ");

  String content = GetPayloadContent(payload, len);

  StaticJsonDocument<200> doc;
  DeserializationError error = deserializeJson(doc, content);
  if(error) return;

  int id = doc["id"];
  bool ledStatus = doc["status"];

  Serial.print(" Id:");
  Serial.print(id);
  Serial.print(" Status:");
  Serial.println(ledStatus);
}
The frontend that we serve to the client, as we said, will become a VueJs App.
The ‘index.html’ file becomes the following.
<!doctype html>
<html lang="">

<head>
  <title>ESP32 MQTT</title>
  <meta charset="utf-8">
  <meta http-equiv="x-ua-compatible" content="ie=edge">
  <title></title>
  <meta name="description" content="">
  <meta name="viewport" content="width=device-width, initial-scale=1">
</head>

<body>
  <link rel="stylesheet" href="css/main.css">
  <link href="./vendor/google-fonts.css" rel="stylesheet">
  <link href="./vendor/vuetify.min.css" rel="stylesheet">

  <v-app id="app">
    <v-toolbar app>ESP32 MQTT</v-toolbar>
    <v-content>
      <v-container fluid grid-list-md text-xs-center>

        <v-layout row wrap>
          <v-flex>
            <v-card>
              <v-toolbar color="blue" dark>
                <v-toolbar-title class="text-xs-center">Received</v-toolbar-title>
              </v-toolbar>

              <v-timeline
              align-top
              dense
            >
            <mqtt-message v-for="item in mqtt_message_list" :mqtt_message="item" />
            </v-timeline>
            </v-card>
          </v-flex>

        </v-layout>
      </v-container>
    </v-content>
  </v-app>

  <!-- From CDN -->
  <script type="text/javascript" src="./vendor/vue.min.js"></script>
  <script type="text/javascript" src="./vendor/vuetify.min.js"></script>
  <script type="text/javascript" src="./vendor/nativeWs.min.js"></script>
  <script src="https://cdnjs.cloudflare.com/ajax/libs/paho-mqtt/1.0.1/mqttws31.min.js" type="text/javascript"></script>

  <!-- Load the file containing our Vue.JS App -->
  <script type="text/javascript" src="./js/API.js"></script>
  <script type="text/javascript" src="./js/app.js"></script>
</body>

</html>On the other hand, we have the ‘API.js’ file that contains the front-end logic associated with MQTT communication.
function onConnect() {

    var options = {
      qos: 0,
      onSuccess: onSubSuccess,
      onFailure: onSubFailure
    };
    client.subscribe('hello/world', options);
  }

  function onFailure(message) {
    console.log(message)
  }

  function onConnectionLost(responseObject) {
    if (responseObject.errorCode !== 0) {
      console.log("onConnectionLost:" + responseObject.errorMessage);
    }
  }

  function onMessageArrived(message) {
    console.log(message)
    var topic = message.destinationName;
    var payload = message.payloadString;

    let json = JSON.parse(payload);

    var mqtt_message = new Object();
    mqtt_message.id = json.id;
    mqtt_message.status = json.status;
    mqtt_message.date = new Date().toISOString().replace("T", " ").replace("Z", " ");
    app.mqtt_message_list.unshift(mqtt_message);
  }

  function onSubFailure(message) {
    console.log(message)
  }

  function onSubSuccess(message) {
    console.log(message)
  }

  function createGuid() {
    return 'xxxxxxxx-xxxx-4xxx-yxxx-xxxxxxxxxxxx'.replace(/[xy]/g, function (c) {
      var r = Math.random() * 16 | 0,
        v = c === 'x' ? r : (r & 0x3 | 0x8);
      return v.toString(16);
    });
}Finally, the ‘App.js’ file contains the Vue application, and it looks like this.
  Vue.component('mqtt-message', {
    props: ['mqtt_message'],
    template: `
        <v-timeline-item
        color="blue"
        small
        >
        <v-layout pt-3>
            <v-flex xs3>
            {{mqtt_message.date}}
            </v-flex>
            <v-flex>
            <strong>GPIO: {{mqtt_message.id}}</strong>
            <div class="caption">Status: {{mqtt_message.status}}</div>
            </v-flex>
        </v-layout>
        </v-timeline-item>
    `
})

var app = new Vue({
    el: '#app',
    data: function () {
        return {
            mqtt_message_list: [

            ]
        }
    },
    mounted() {
        client = new Paho.MQTT.Client("192.168.1.150", 9001, createGuid())

        var options = {
            onSuccess: onConnect,
            onFailure: onFailure
        };

        client.onConnectionLost = onConnectionLost;
        client.onMessageArrived = onMessageArrived;

        client.connect(options);
    },
})
Result
We upload all this to our ESP8266/ESP32, and we will see that the simulated messages are received every second, and are added to the list of alerts.

Similarly, in the serial port of the ESP32 we also see the received messages. Which, in this case, are sent by the device itself, to avoid having to use several. But, if we had several devices, they would all receive simultaneously.

So far today’s post, and the penultimate of this communication series. In the next and final post, we will see how to expand this project to create a complete web interface through MQTT. See you in the next one.
Download the code
All the code from this post is available for download on Github.
Version for the ESP8266: https://github.com/luisllamasbinaburo/ESP8266-Examples
Version for the ESP32: https://github.com/luisllamasbinaburo/ESP32-Examples

