A headless setup means preparing a Raspberry Pi without connecting a monitor, keyboard, or mouse.
It is very useful when we want to dedicate the device to tasks such as a web server, home automation, robotics, or any setup where the Raspberry Pi will end up hidden in a box, a cabinet, or behind a screen.
The most convenient solution today is to prepare the network, user, and SSH from Raspberry Pi Imager. This way we can perform a fully headless setup from the first boot, without plugging in peripherals or doing the ritual of looking for a spare keyboard around the house.
In general, in a headless setup we aim to create the user, enable SSH, and configure connectivity. With this we will be able to access the Raspberry Pi through SSH and perform the rest of the adjustments.
The recommended method nowadays is to use the customization options in Raspberry Pi Imager. The ssh and wpa_supplicant.conf files were the classic method for years and still appear in many tutorials, but in modern versions you need to keep in mind the changes in Raspberry Pi OS and NetworkManager.
Install Raspberry Pi OS
The installation process is the usual one. We prepare the card with Raspberry Pi Imager and, before writing the image, open the customization options to configure user, password, hostname, WiFi, and SSH.
Enable SSH
As a security measure, SSH is disabled by default if we did not enable it during installation. In Raspberry Pi Imager we can enable it directly, choosing whether we want password or public key authentication.
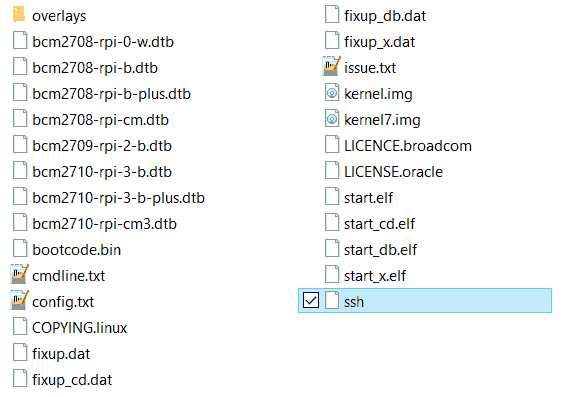
On older installations it could also be enabled simply by creating a file called ssh, without an extension, inside the boot partition of the SD card.
Configure WiFi
If we are going to connect the Raspberry Pi via WiFi, the easiest way is to configure it from Raspberry Pi Imager. We enter the WiFi SSID, password, and country, and the system will apply it on the first boot.
On older installations, similarly to SSH, we could add the WiFi configuration by creating the wpa_supplicant.conf file on the SD card. On boot, Raspbian would take the WiFi configuration file from the card.
Remember that the format of ‘wpa_supplicant.conf’ is as follows:
ctrl_interface=DIR=/var/run/wpa_supplicant GROUP=netdev update_config=1 country=ES
network={ ssid=“your-wifi-name” psk=“your-wifi-password” key_mgmt=WPA-PSK }
Find the Raspberry Pi Address
We come to the part that could give us some trouble. At this point, when we turn on the Raspberry Pi, it will be connected to the local network, and SSH will be enabled. But to connect, we need to know the Raspberry Pi’s address on our network.
If we have not configured a fixed IP or a convenient hostname, we will have to find the dynamic IP address that has been assigned to the Raspberry Pi on our network.
For that, we have different options:
- Try to connect using ‘raspberrypi.local’ as the address.
- Use an IP scanner program on the network, such as Nirsoft Wireless Network Watcher (Windows) or Fing (Android).
- Find the device’s IP by accessing the Router’s configuration.
In most cases, any of these options will work for us. But depending on the network (size, security, etc.), some (or all) may not be usable.
If we have access to a computer with Linux or Mac, another option is to mount the SD card and directly configure a static IP as we saw in this post.
If none of the above works, you can try putting your device in ‘WiFi Sharing’ mode and connecting the Raspberry Pi to it. Configure a static IP and finally connect it to the definitive network.
Configure the Rest of the Options
Once we have SSH access to the Raspberry Pi, we can configure the rest of the options in the usual way using raspi-config or the Raspberry Pi OS tools. For example, you can enable VNC, Raspberry Pi Connect, or whatever service you need.
As you can see, a headless setup is a simple process that takes only a few minutes, and saves us the headache of connecting a monitor and keyboard just for a first boot.
