
In this post, we will see how to configure the standard Arduino IDE to be able to program the ESP32 and boards based on this popular SoC.
The process is quite simple, thanks to the work Espressif has done in creating a Core compatible with the Arduino environment.
All the code is Open Source and available in the project repo on GitHub - espressif/arduino-esp32: Arduino core for the ESP32
This process is only valid for the ESP32. If you are looking for the same tutorial for the ESP8266, you can find it in this post Cómo programar ESP8266 con el IDE de Arduino
I assume you have the Arduino IDE installed and updated to the latest version. If not, logically, go to the official Arduino page and install it on your computer.
Install ESP32 in Arduino IDE
The ESP32 is not included in the Arduino IDE by default, but we can easily add it using the “Board Manager”.
Open the Arduino IDE and go to File > Preferences. In the “Additional Boards Manager URLs” field, add the following URL:
espressif.github.io/arduino-esp32/package_esp32_index.json
If you want the development branch, add this URL instead.
raw.githubusercontent.com/espressif/arduino-esp32/gh-pages/package_esp32_dev_index.json
Then, go to Tools > Board > Boards Manager.
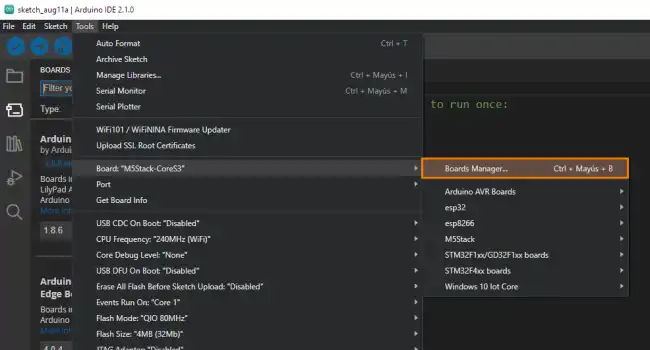
In the panel that appears, search for “ESP32” in the search bar, and click “Install” on the package that appears.
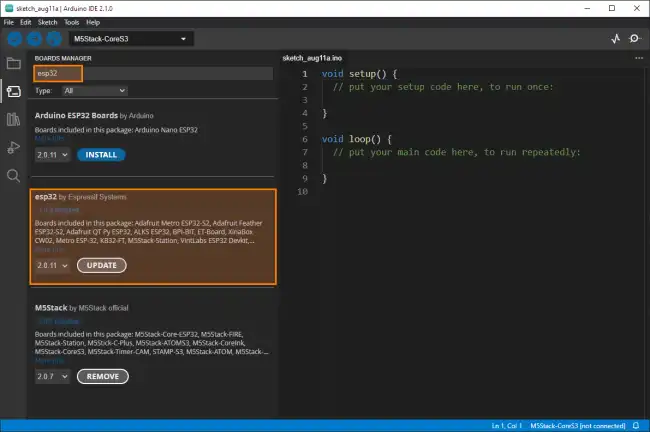
Once the installation is complete, you will be able to choose the ESP32 models from the dropdown, and you will be ready to program the ESP32.
Testing the ESP32 in Arduino IDE
Let’s test that everything works correctly. Connect the ESP32 to your computer using a USB cable.
In the Arduino IDE, select the board you are using. Go to Tools > Board and select “ESP32 Dev Module” as the board you are using.
Then select the COM port to which the ESP32 is connected in Tools > Port
If you are not sure which port it is, you can disconnect the ESP32 and return to this section to see which port disappears and reappears when you connect the device.
Hello World on the ESP32
Now that you have your development environment set up, let’s test it with a simple ‘Blink’, where we will simply make the built-in LED on the ESP32 blink every second.
Copy this code into the Arduino IDE
void setup()
{
  pinMode(LED_BUILTIN, OUTPUT); // Set the built-in LED pin as output
}

void loop()
{
  digitalWrite(LED_BUILTIN, HIGH); // Turn on the LED
  delay(1000); // Wait for one second
  digitalWrite(LED_BUILTIN, LOW); // Turn off the LED
  delay(1000); // Wait for one second
}
Press Verify to make sure there are no syntax errors. If everything is fine, press the Upload button to load the program onto the ESP32.
After a few seconds, you should see the built-in LED blinking at one-second intervals.
As we can see, it is very easy to program an ESP32 with the Arduino environment, thanks to the work Espressif has done to create a compatible Core.
In the following tutorials, we will see how to use the different features of the ESP32, and its differences from a “normal” Arduino.
