Byobu is a terminal management tool that acts as an additional layer on top of tmux or screen, offering a more user-friendly and functional interface.
It is especially useful in environments where you need to work with multiple terminal sessions simultaneously or maintain active sessions across multiple disconnections.
Some of its most relevant features are,
- Terminal Multiplexing: Allows splitting the terminal into multiple windows and panels.
- Session Persistence: Sessions can continue in the background even if the connection is lost.
- Enhanced Interface: Offers a more intuitive and easier-to-use interface compared to
tmuxorscreenalone. - Notifications and Shortcuts: Includes activity notifications and configurable keyboard shortcuts.
Installing Byobu on Raspberry Pi
To install Byobu on our Raspberry Pi, we must first ensure the system is up to date. We update our Raspberry Pi’s packages with the following commands:
sudo apt update sudo apt upgrade
Then, we install Byobu, which is available in the official Debian and Raspbian repositories. We use the following command for installation:
sudo apt install byobu
This command will install Byobu along with its dependencies, such as tmux or screen, depending on our preference.
Once installed, we start Byobu simply by running:
byobu
This will open a new terminal session managed by Byobu.
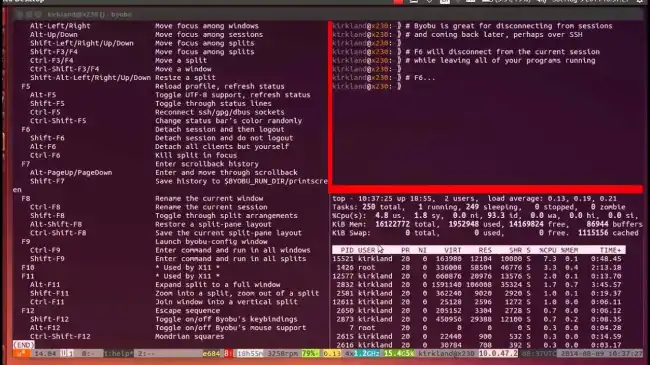
Using Byobu
Now that you have Byobu installed, let’s explore how to use it to enhance your terminal experience. Byobu allows you to manage multiple windows and panels in a single terminal session. Here are some of the basic commands:
- Shift + F2: Creates a new window.
- Ctrl + F3: Switches to the previous window.
- Ctrl + F4: Switches to the next window.
- exit: Closes the current window.
- F9: Shows the Byobu configuration menu.
- F10: Exits the Byobu session (keeping the session active in
tmuxorscreen).
For more detailed information on advanced configuration and customization of Byobu, consult the official documentation.
