Ligatures are a relatively new feature in programming environments. They are alternative symbols that represent common character combinations in code.
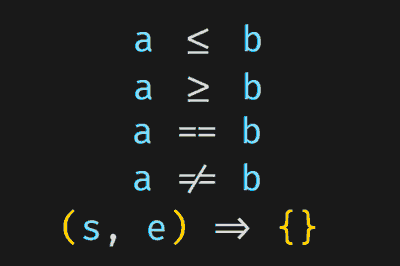
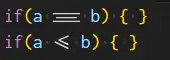
For example, instead of seeing >= or ==, with ligatures you will see special symbols like ≤, ≠ or ≡ that combine these characters into a single visual representation.
Ligatures add functionality, but above all, an aesthetic improvement to your development environment. We could debate whether they improve code readability (in theory, yes) but, in any case, they are “cool” and can enhance your programming experience.
These ligatures are not only pleasing to the eye but also facilitate reading and improve error detection in your code.
So let’s see how to enable ligatures in the Visual Studio Code development environment.
How to Use Ligatures in Visual Studio Code
To activate ligatures in Visual Studio Code, you first need a compatible font. Nerd Fonts are popular for this purpose, as they include specific glyphs for ligatures.
You can download these fonts from Nerd Fonts.
Everyone will have their preferred font. Personally, I really like Inconsolata NF. Other popular ones are Fira or VictorMono. The best thing is to check out the different fonts and choose the one you prefer.
Configuration in Visual Studio Code
Once you have downloaded and installed a Nerd Font, follow these steps to configure ligatures in Visual Studio Code:
- Open Visual Studio Code
- Go to the settings menu by clicking on “File” and selecting “Preferences”, then “Settings”.
- In the search bar, type “font family” to search for the font family setting.
- In the “Editor: Font Family” setting, type the name of your font. For example, for Inconsolata NF it would look like this:
Inconsolata NF, Consolas, 'Courier New', monospace
In theory, it should work for you now. But, in general, I prefer to edit the options Json file directly.
In VSCode, there is a button in the options window itself that allows us to open the settings.json file easily.
In this file, verify that you have these lines:
“editor.fontFamily”: “Inconsolata NF, Consolas, ‘Courier New’, monospace”, “editor.fontLigatures”: true
If you also want to use this font in the integrated terminal, add these lines.
“terminal.integrated.fontFamily”: “Inconsolata NF”, “terminal.integrated.defaultProfile.windows”: “Command Prompt”, “terminal.integrated.inheritEnv”: false,
Save the settings.json file. and that’s it! Now, Visual Studio Code will use the Nerd Font with ligatures in your development environment.
Font Variations and the editor.ligatures Parameter
Some Nerd Fonts support ligature variations. These are options that allow us to adjust some of the visual parameters of the fonts. For example, the Fira font stands out for having a large number of options to customize its appearance.

If you want to customize your ligatures, you can use the editor.ligatures parameter in Visual Studio Code. This parameter allows you to enable or disable ligatures according to your preferences.
To configure this parameter, in the configuration file, we add the font options.
“editor.fontLigatures”: “‘ss01’, ‘ss02’, ‘ss03’, ‘ss04’, ‘ss05’, ‘ss06’, ‘zero’, ‘cv02’, ‘cv29’, ‘ss08’”,
Font variations and the ability to enable or disable ligatures provide a high degree of customization so you can adapt Visual Studio Code to your specific needs.