
MQTT is a lightweight messaging protocol based on publish and subscribe, very suitable for IoT applications with ESP32 or ESP8266.
In very short form, MQTT allows devices to publish messages to topics and for other clients to subscribe to those topics to receive them. It is a very convenient pattern when we have sensors, actuators, dashboards, or services talking to each other without connecting directly to one another.
On the other hand, in the Arduino ecosystem the PubSubClient library is one of the most popular options for implementing MQTT on microcontrollers. On the ESP32 we can also use it to build simple publish and subscribe examples.
We are going to start with a simple example, to get over the fear. Do not be scared by the acronyms and terms. The truth is that communication via MQTT is simple and robust (that is precisely where a good part of its success and popularity lies).
Just as we did with Ajax and Websockets in their time, we are going to start with a simple application that receives a numeric value. In this first example, receiving the value of millis() is enough to test the communication.
To follow this tutorial you will need to have an MQTT broker installed, or access to one of the many cloud services. Here is a post on how to install Mosquitto on your computer.
And, as in the rest of the examples in the course, we are going to divide the code into different files, grouped by functions, and trying to make some of them reusable between projects without any modification.
Our main sketch remains simple and easy to understand. Here are some calls to functions defined in the files, which we will see below.
But, in summary, in the setup we initialize WiFi and MQTT communication. On the other hand, in the ‘loop’, we handle messages received via MQTT, while sending the value of ‘millis()’. Simple.
#include <WiFi.h>
#include <SPIFFS.h>
#include <PubSubClient.h>

#include "config.h"  // Replace with your network data
#include "MQTT.hpp"
#include "ESP32_Utils.hpp"
#include "ESP32_Utils_MQTT.hpp"

void setup(void)
{
  Serial.begin(115200);
  SPIFFS.begin();

  ConnectWiFi_STA(true);

  InitMqtt();
}

void loop()
{
  HandleMqtt();

  PublisMqtt(millis());

  delay(1000);
}
For its part, the file “ESP32_Utils_MQTT.hpp” contains generic functions for MQTT communication. Like the other ‘Utils’ files we have used, it is designed to contain code that you can reuse between projects with little or no modification.
Here we have these functions for InitMqtt(), ConnectMqtt(), and HandleMqtt()
void InitMqtt()
{
  mqttClient.setServer(MQTT_BROKER_ADRESS, MQTT_PORT);
  SuscribeMqtt();
  mqttClient.setCallback(OnMqttReceived);
}

void ConnectMqtt()
{
  while (!mqttClient.connected())
  {
    Serial.print("Starting MQTT connection...");
    if (mqttClient.connect(MQTT_CLIENT_NAME))
    {
      SuscribeMqtt();
    }
    else
    {
      Serial.print("Failed MQTT connection, rc=");
      Serial.print(mqttClient.state());
      Serial.println(" try again in 5 seconds");

      delay(5000);
    }
  }
}

void HandleMqtt()
{
  if (!mqttClient.connected())
  {
    ConnectMqtt();
  }
  mqttClient.loop();
}
Finally, in the ‘MQTT.hpp’ file we have defined the functions that are specific to your project. These functions contain the “meat” of the project, and we will need to adapt them according to its characteristics.
Thus, we first have the definitions of the broker address, the port (by default 1883 is fine), and the client name. Remember that two clients with the same name should not connect to the same broker.
On the other hand, we have the SuscribeMqtt function which is responsible for subscribing the ESP32/ESP8266 to the topics we want to listen to. The PublisMqtt function emits an MQTT message, in this case simply a long number. Finally, the OnMqttReceived function is executed when receiving an MQTT message and, in this example, simply displays the content via serial port.
const char* MQTT_BROKER_ADRESS = "192.168.1.150";
const uint16_t MQTT_PORT = 1883;
const char* MQTT_CLIENT_NAME = "ESP32Client_1";

WiFiClient espClient;
PubSubClient mqttClient(espClient);

void SuscribeMqtt()
{
  mqttClient.subscribe("hello/world");
}

String payload;
void PublisMqtt(unsigned long data)
{
  payload = "";
  payload = String(data);
  mqttClient.publish("hello/world", (char*)payload.c_str());
}

String content = "";
void OnMqttReceived(char* topic, byte* payload, unsigned int length)
{
  Serial.print("Received on ");
  Serial.print(topic);
  Serial.print(": ");

  content = "";
  for (size_t i = 0; i < length; i++) {
    content.concat((char)payload[i]);
  }
  Serial.print(content);
  Serial.println();
}
Result
To check that everything is working correctly, we upload all the code to our ESP32/ESP8266. If everything went well, we will see the value of ‘Millis()’ in the Serial console.
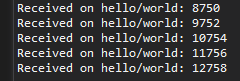
It doesn’t seem very impressive, because we are more than used to seeing the ‘millis’ value, but let’s think for a moment about what is happening. Actually, every second the ESP32 is sending the value of ‘Millis()’ to the broker and it distributes it to the connected clients.
In this mini example we only have one client connected, which is also the sender. It receives the message, processes it, and displays it via serial port. A rather complicated way to show the ‘millis’ value, but a very good way to check that MQTT communication is working.
Now you could connect more ESP32 or ESP8266 boards and they would all receive the value we emitted (almost) simultaneously. And, of course, they could all emit their own messages. A fairly powerful concept, isn’t it? And it wasn’t complicated at all, was it? That is the beauty of notification services.
Of course, sending a number isn’t very interesting. But, now that we know how to send and receive data via MQTT, and we have verified that our MQTT network works, which is the first step before doing something more complicated.
With this we already have an ESP32 or ESP8266 sending and receiving messages via MQTT. From here we can do it asynchronously, send JSON, or integrate it with a web interface or a home automation system.
Download the code
All the code from this post is available for download on Github.

Version for ESP8266: https://github.com/luisllamasbinaburo/ESP8266-Examples
Version for ESP32: https://github.com/luisllamasbinaburo/ESP32-Examples
