What is Node-RED?
Node-RED is a flow-based development tool that allows you to connect devices and services visually through a web browser.
Originally created by IBM, Node-RED is designed to facilitate the integration of IoT services and automation through a drag-and-drop graphical interface.
Node-RED allows us to create our “programs” through visual workflows using a very simple graphical interface. This makes it easier to integrate different services and devices without the need to write extensive code.
Main features of Node-RED,
- Visual Interface: Uses a browser-based graphical interface to design workflows.
- Drag and Drop: Allows dragging nodes and connecting them to define the flow logic.
- Integration: Supports a wide variety of protocols and services, such as HTTP, MQTT, and more.
- Extensible: Offers a wide range of nodes for different purposes and allows the creation of custom nodes.
For more information and resources on Node-RED, you can visit the official Node-RED documentation.
Installing Node-RED on Raspberry Pi
To install Node-RED on our Raspberry Pi, we follow these steps. As always, it is first recommended to update the existing packages on the system.
sudo apt update sudo apt upgrade
Then, we install Node-RED using the official installation script provided by the project. Run the following command to download and install Node-RED:
bash <(curl -sL https://raw.githubusercontent.com/node-red/linux-installers/master/deb/update-nodejs-and-nodered)
This script will take care of installing Node.js (if not already installed) and Node-RED on our Raspberry Pi.
To make Node-RED start automatically when the Raspberry Pi boots, run the following command:
sudo systemctl enable nodered.service
Finally, we can start Node-RED with the following command:
node-red
If you want to try it on a computer, you can install it simply withsudo npm install -g --unsafe-perm node-red
Basic Use of Node-RED
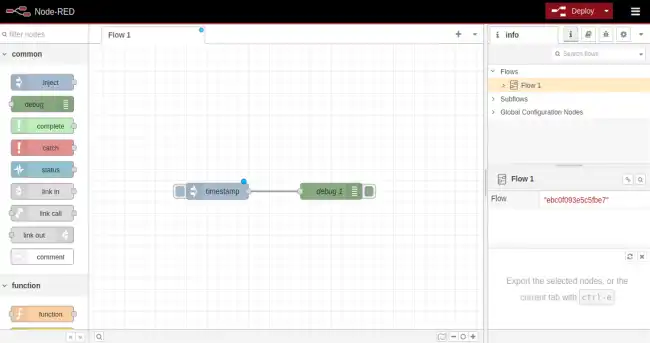
Once installed, you can access the Node-RED user interface from a web browser at the address http://<IP-of-your-Raspberry-Pi>:1880. This is where you will build your workflows.
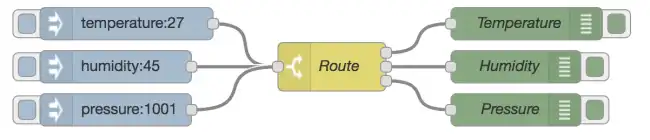
To create a workflow in node-red, we simply drag the nodes we want to use from the node palette on the left side of the screen and connect them together.
Then, we can configure each node to fit our specific needs. To do this, we click on it, and the available options will appear in the palette on the right.
For example, if we want to read the value of a sensor and publish it on a social network, we could drag a sensor node, a social media publishing node, and connect them together.
Then, we would configure the sensor node to read the specific sensor we are using and the social media publishing node to connect to our Twitter or Facebook account.
Finally, once we have created our workflow we can deploy it (run it). To do this, we click the “Deploy” button to implement it and start processing data.
We can also access the processed data and visualize it in graphs and tables using the visualization nodes available in the node palette.
Workflow Example
Let’s create a simple flow that injects a message and displays it in the debug console:
- Drag an “Inject” node, this node allows us to input text
- Drag a “Debug” node, this node allows us to see text in the Debug window
- Connect the “Inject” node to the “Debug” node
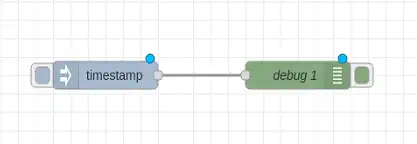
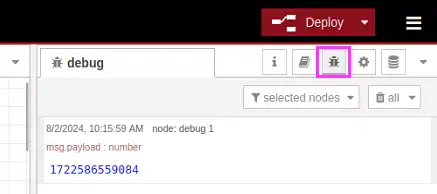
This flow simply uses an Inject node to generate text that we send to Debug for visualization. By default, if we don’t change the configuration, the Inject mode simply generates a Timestamp (the current time).
Now we turn on the Debug tab and click the “Deploy” button to deploy the flow. When we activate the “TimeStamp” node (by clicking the little blue square to its left) we will see the message appear in the Debug tab.
Device Integration
Node-RED is very well integrated with Raspberry PI as it can directly access its GPIO to perform readings or generate outputs.
To do this, we must first install the node library Raspberry Pi GPIO to control the GPIO pins of the Raspberry Pi:
- Open the node menu and search for “node-red-node-pi-gpio”
- Click “Install” to add this node to your Node-RED instance
Once installed.
Add a “GPIO Output” node to your flow
Configure the “GPIO Output” node to control a specific pin on the Raspberry Pi (for example, GPIO pin 17)
Connect the “Inject” node to the “GPIO Output” node
Deploy the flow
Now, when you send a message from the “Inject” node, the GPIO 17 pin will change state, turning an LED connected to it on or off.
