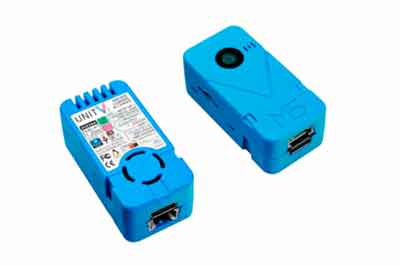
The M5Stack Unit V2 is a device that combines a Linux mini computer and a full HD camera, designed for computer vision and machine learning applications.
We have already seen several devices from the M5Stack family on the blog. Most of the manufacturer’s members are based on our well-known ESP32 SoC, including the Timer X Camera.
However, the M5Stack Unit V2 is somewhat different from most M5Stack products. In this case, we are dealing with a complete mini computer running Linux.
The core of the M5Stack Unit V2 is a Sigmstar SSD202D, a dual-core Cortex A7 processor at 1.2Ghz. This is accompanied by 128MB of DDR3 memory and 512MB of NAND Flash memory.
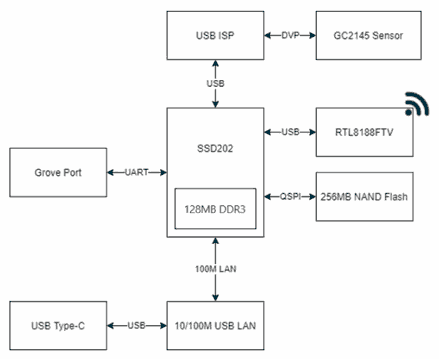
The device includes a camera with a resolution of 2MP (Full HD 1920x1080), with a FOV of 68º and a DOF of 60cm - infinity. The designation is GC2145, but there is not much more information available about the camera or its manufacturer.
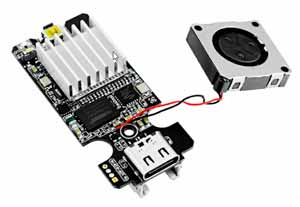
In addition to this, the Unit V2 features 2.4 Ghz WiFi, USB Type C, built-in microphone, SD card reader, and a groove connector for UART. It also has a LAN interface via the USB Type C. It even has its own cooling fan.
All of this in an impressive size of only 4818.524mm and a weight of 62g. Seriously, you can’t imagine how small it is, only slightly thicker than an M5Stick.
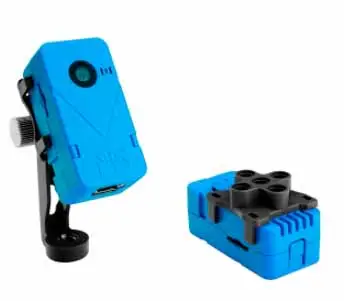
The M5Stack Unit v2 has a plastic casing, which incorporates an LED and a button. The set is completed with two stands, just like with the Timer Camera X. One with a screw thread, for example, to use on a tripod, and one for use with Lego pieces.
Finally, the module is powered at 5V. The maximum consumption is as low as 500mA, again quite impressive for a mini PC.
Logically, we cannot expect a particularly powerful mini PC. Its dual-core ARM processor at 1.2Ghz gets good performance, but it “only” has 128MB of RAM.
In comparison, a Raspberry Pi Zero W has a single-core ARM11 processor at 1Ghz, much more modest. On the other hand, it has 512MB of RAM, shared with the GPU.
Regarding the price, we can purchase it for 70-80€ (with the current chip-shortage situation, I can’t specify much more). Somewhat high, if we compare it with a Raspberry Pi Zero W 2 for example. But, it’s the price of having a mini-pc + Full HD camera in such a small device.
Testing the M5Stack Unit V2
Updating the M5Stack Unit V2
The first thing when using the M5Stack Unit V2 is to update its firmware. This is because the first versions had a bug in the WiFi operation. Later versions corrected this error.
Therefore, it is best to update to the latest version, which we can download from here. Next, we copy the ‘M5UnitV2UpdPackage.img’ file we just downloaded to the SD card.
With the Unit V2 turned off, we insert the SD card. Press the button on the Unit V2 and connect it to power (to USB). The LED should blink, then we release the button and wait for the button light to turn off.
In my case, the LED did not blink. So I crossed my fingers and waited a few minutes for the LED to turn off. And it worked correctly.
Built-in Applications
The M5Stack Unit V2, like all products in the family, comes with a preinstalled demo from the factory. Let’s review these built-in functionalities.
Accessing the video stream
First, we can directly access the camera stream through a web browser. To do this, we connect the Unit V2 to a computer, and it will recognize the device with a LAN network.
Now, we can access using the following URL
10.254.239.1/video_feed
If we have configured the WiFi (we will see this later), we should be able to access without needing to have it connected to a computer (just powered, with a USB charger for example), replacing the IP with the one assigned by the Router.
Factory demo
The Unit V2 comes with a preinstalled Factory Demo, in order to illustrate different functionalities of the device.
This application is quite impressive and complete. It is developed in C++, and its code is available at https://github.com/m5stack/UnitV2Framework.
To access it, we simply connect from a web browser to the device’s IP.
10.254.239.1
Again, if we have already configured the WiFi, we will have to replace the default IP with the one assigned by the router.
The factory demo includes fully functional applications for Audio FFT, face detection or recognition, line tracking, motion detection, shape classifier, or object recognition, among others.
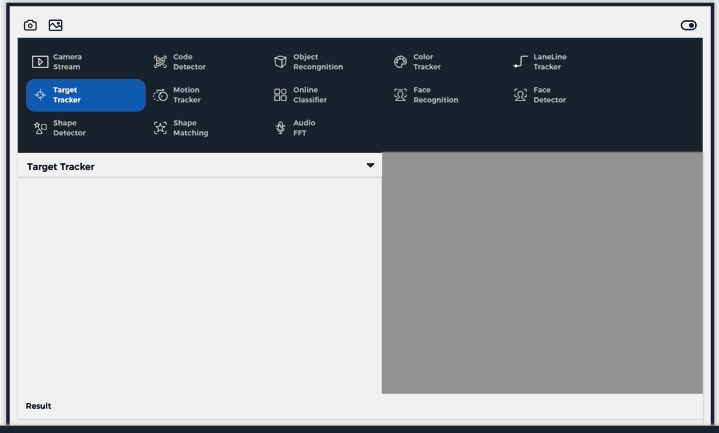
All examples provide a UART output of a JSON file, indicating the relevant events of each one. For example, motion detection, or recognizing an object. Detailed information for each example is at this address.
This means they can connect with another device, such as an Arduino or an ESP32. This allows us to integrate even these factory demo examples into real projects.
Furthermore, M5Stack provides a web service at this link, which allows us to train the learning models and then introduce them into the Unit V2. It is a simple platform, although not particularly practical (requires too much manual labeling work).
Regarding the performance of these computer vision and Machine Learning applications, I must say it is quite good. The dual-core Cortex A7 processor is noticeable, and the applications run quite smoothly even in FullHD.
Jupyter notebook
The other built-in functionality incorporated in the M5Stack Unit V2 is the Jupyter notebook. For those who don’t know it, Jupyter is an application that is gaining some fame, focused on Python training.
Jupyter allows creating “notebooks”, understood as a file that contains text and code blocks. Code blocks can be executed independently, or all at once sequentially.
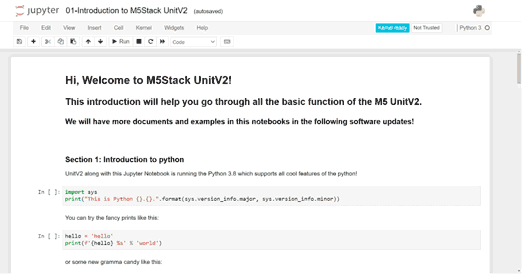
Therefore, it is an interesting tool for creating instructions or tutorials, where the student can check the results as they progress through the text.
In the case of the Unit V2, it includes a few examples that involve controlling the LED, microphone, UART, and camera, available at https://docs.m5stack.com/en/quick_start/unitv2/jupyter_notebook
Accessing the Linux System
The built-in and demo applications of the Unit V2 are quite striking. But, knowing us, we are going to want to access the Linux, to be able to extract all the potential of the device.
However, it must be taken into account that the Linux distro used by M5Stack is, in reality, a very limited and restricted function. We are not talking about a Debian, or Lubuntu, or even an ArchLinux.
Here we have no package manager, hardly any possibility to install software, not even a C++ compiler (something inexplicable, when its own factory demo is made in C++).
This is, in my opinion, the biggest flaw of the device. As if that weren’t enough, the documentation doesn’t particularly help in this regard either.
Nevertheless, there are certain operations we can perform. Let’s see some of them.
Connect via SSH
First, we can connect via SSH to the M5Stack Unit V2. For this, we can use a terminal console (Linux or WSL on Windows).
Although I recommend using mRemoteNG that we saw in this post, and WinSCP to manage files as we saw in this post.
The device’s users and passwords are as follows.
user: m5stack pwd: 12345678
user: root pwd: 7d219bec161177ba75689e71edc1835422b87be17bf92c3ff527b35052bf7d1f
Configure WiFi
To configure the WiFi of the M5Stack Unit V2, first we must generate a password for our network’s ssid and password. To do this, we execute the following command, substituting the data for our network.
sudo wpa_passphrase ssid password
It will give us a result like the following,
network={
        ssid="ssid"
        #psk="password"
        psk=44116ea881531996d8a23af58b376d70f196057429c258f529577a26e727ec1b
}
After this, we edit the wpa_supplicant.conf file
sudo nano /etc/wpa_supplicant.conf
Here we copy the data we obtained in the previous step, leaving the file as follows,
network={ ssid=“ssid” psk=44116ea881531996d8a23af58b376d70f196057429c258f529577a26e727ec1b }
Done, we now have the device connected to our WiFi network.
Running C++ Applications
Of course, we can run compiled C++ applications on the M5Stack Unit V2. Unfortunately, as we mentioned, it does not include any compiler by default.
However, we can compile an application from another computer, as we saw in How to cross compile for ARM from x86/x65. Then, we move the file to the device, change the permissions to allow execution, and we can now run our program.
Running Python Applications
The M5Stack Unit V2 distro comes with the Python interpreter preinstalled, as well as the OpenCV library. In fact, it is necessary for Jupyter, which we saw earlier, to work.
Therefore, it is possible to run Python scripts directly on the Unit V2. I take this opportunity to remind you of the posts Our first program in Arduino and How to use Arduino and the PySerial library.
Conclusion
The M5Stick Unit V2 is a real hit by M5Stack. It’s amazing to have a complete Linux computer in a device of that size, and also with a Full HD camera and UART output.
It is often said of something “it’s so small it fits in your pocket.” But in this case, two or three can fit, depending on the pocket. It’s impressive what they have achieved at the hardware level.
The main purpose of the Unit V2 is computer vision and machine learning. However, even without these two components, it would still be an interesting product in itself.
The only “but” is that, and I’m sorry to say it, this time the software and documentation are not up to the level that M5Stack has accustomed us to.
A real shame, because with a better distro, or if the bootloader allowed booting an OS from the card, we would be looking at one of the most interesting machines of the moment.
Despite this, the Unit V2 is a very interesting machine for training functions in computer vision and machine learning, or in home or #maker projects.
For example, we can think of incorporating it into a robot for line following or marker recognition, into a robotic arm to pick up a ball, and many other projects that require a camera.