What is a digital HMC5883 compass?
A digital compass is a sensor that measures the value of the magnetic field in three axes. With this measurement, it is possible to estimate the orientation of the device with respect to the earth’s magnetic field.
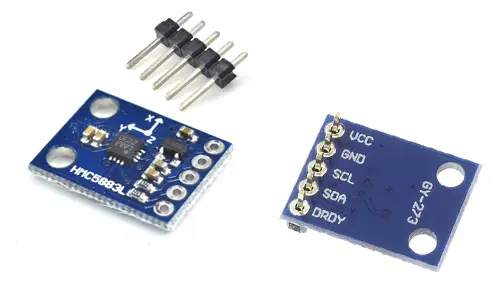
The Honeywell HMC5883 chip is a surface-mount chip that incorporates three magnetoresistive sensors, offset cancellation, and 12-bit converters, providing an accuracy of ±2ºC.
Communication with the Honeywell HMC5833 chip is done through the I2C bus, making it easy to obtain the measured data. The supply voltage is low voltage from 1.8 to 3.3V.
They are frequently integrated into modules such as the GY-273 which incorporate the necessary electronics to connect it easily to an Arduino. In most modules, this includes a voltage regulator that allows direct powering at 5V.
Magnetic compasses are devices widely used in the navigation systems of robots and other vehicles, such as rovers or quadcopters.
However, the measurement of these sensors is affected by the presence of magnetic fields and metals. Therefore, for navigation applications, it is necessary to combine these sensors with accelerometers and gyroscopes, or IMUs.
Price
The Honeywell HMC5883 digital compass is a really cheap sensor. We can find boards that mount it, such as the GY273 model, for €1.10 from international sellers on Ebay and AliExpress.
Assembly diagram
The connection is simple, we simply power the module from Arduino using GND and 5V and connect the SDA and SCL pins of Arduino with the corresponding pins of the sensor.
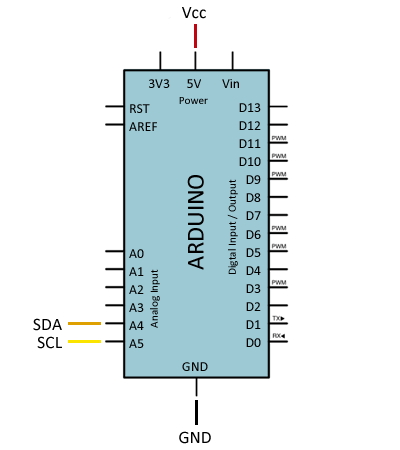
While the connection seen from the Arduino side would look like this.
On Arduino Uno, Nano, and Mini Pro, SDA is pin A4 and SCK is pin A5. For other Arduino models, refer to the corresponding pinout diagram.
Verify that your board is compatible with 5V before connecting it to Arduino. If not, you will need to use a level shifter.
Code examples
To read the HMC5883, we will use the library developed by Jeff Rowberg available at this link. We will also use the I2Cdev library developed by the same author, which improves I2C communication.
The library provides code examples, which it is advisable to review. The following examples are modifications based on those available in the library
//GND - GND
//VCC - VCC
//SDA - Pin A4
//SCL - Pin A5

#include "Wire.h"
#include "I2Cdev.h"
#include "HMC5883L.h"

HMC5883L compass;

int16_t mx, my, mz;

void setup()
{

    Serial.begin(9600);
    Wire.begin();
    compass.initialize();
}

void loop()
{
    //Get magnetic field components
    compass.getHeading(&mx, &my, &mz);

    Serial.print("mx:");
    Serial.print(mx);
    Serial.print("tmy:");
    Serial.print(my);
    Serial.print("tmz:");
    Serial.println(mz);
    delay(100);
}
Get orientation relative to the north
In this example, we use the measurement of the magnetic field to determine the orientation of the sensor.
The orientation is obtained in degrees relative to the magnetic north. However, the geographic north is not perfectly aligned with the magnetic north. This is called declination, and it depends on the point on the globe where you are located.
Therefore, if you want to obtain the orientation relative to the geographic north, you will need to enter the declination of your position. There are several websites where you can check this value, such as www.ign.es for locations within Spain, or www.ngdc.noaa.gov for locations worldwide.
//GND - GND
//VCC - VCC
//SDA - Pin A4
//SCL - Pin A5

#include "Wire.h"
#include "I2Cdev.h"
#include "HMC5883L.h"

HMC5883L compass;

int16_t mx, my, mz;

//declination in degrees at your position
const float declination = 0.12;

void setup()
{
    Serial.begin(9600);
    Wire.begin();
    compass .initialize();
}

void loop() {
    //Get magnetic field components
    compass .getHeading(&mx, &my, &mz);

    //Calculate the angle of the X-axis relative to the north
    float angle = atan2(my, mx);
    angle = angle * RAD_TO_DEG;
    angle = angle - declination;

    if(angle < 0) angle = angle + 360;

    Serial.print("N:");
    Serial.println(angle,0);
}
Download the code
All the code from this post is available for download on Github. 
