Today I share a personal project with an ESP32 and a 320x240px TFT screen, consisting of creating an avatar to interact with the user using particles, which can express emotions, blink, disintegrate, and reform.
There are many projects to give a robot a face or expressions using some combination of a screen and a processor like Arduino, ESP32, or similar. I have some libraries myself.
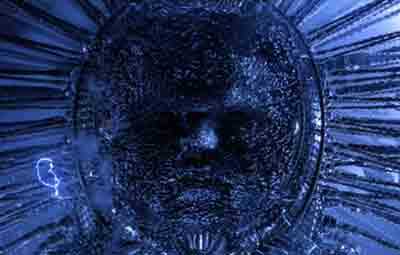
But, tired of “funny libraries,” I wanted to do something different and more impressive. So, inspired by the Deus Ex Machine, the final “enemy” of the movie “Matrix”
This character is the spokesperson for the machines. It consists of a face (in theory, a baby’s face) formed by many individual machines. It can show emotions, speak, move its eyes, etc. And it has the cool effect of being able to form or disintegrate from the machines that make it up.
The goal is to do something similar, within the capabilities of a microprocessor like the ESP32, and make it “real.” Obviously, the face in the movie is an animation made with a lot of work by the artists, and it doesn’t “work” in reality. It’s just a video.
It’s the typical test project, where it’s more difficult to figure out how to achieve an effect like the one we want, than to program it. Here is the final result of the project (which, by the way, looks cooler live than in the video)
So, let’s go with the “making of” the project, with the guidelines and steps to do it. I also share a large part of the code, in case anyone wants to replicate the project or do something similar.
Machine state
The first thing we have to consider is that the machine has three different states.
- Maintain face, corresponds to the formed and animated face
- Forming, the particles are moving to form the face
- Free movement, the particles fly across the screen
For that, we have an enumeration and a state variable. We will see later where it affects the program’s behavior.
enum PARTICLE_STATUS
{
  MANTAIN_FACE,
  FORMING,
  FREE_MOVE,
};

PARTICLE_STATUS particle_status = PARTICLE_STATUS::MANTAIN_FACE;
Basic structure
The basic structure of the program consists of two functions. A render function, which runs on Core 0, and an update function, which runs on Core 1. Therefore, we have something like this.
void taskUpdate(void* pvParameters)
{
    while(true)
    {

        Update();
    }
}

void Setup()
{
    // .. Initialize hardware

    Init();

    xTaskCreatePinnedToCore(taskUpdate, "update", 10000, NULL, 0, NULL, 1);
}
The render function is very simple. For each particle, we draw a small circle at the particle’s coordinates. Something like this.
void Render(MultiSpriteBand& sprite, uint8_t spriteNum)
{
  sprite.clear();
  for (auto i = 0; i < NUM_PARTICLES; i++)
  {
    if (particles[i].Lifetime > 0)
      if (sprite.fillCircle(particles[i].Render.X, particles[i].Render.Y, 1, particles[i].Color);
  }
}
On the other hand, in the loop we only have the function to update the device, which basically reads the button presses on the device.
Then, if we have pressed a button, we change the state of the face. I do this for demo purposes only. In a real robot, these transitions would be triggered when we wanted (when the robot fell, when turned on, when receiving a signal, etc).
void loop()
{
  M5.update();

  if (M5.BtnA.wasPressed())
  {
    if (particle_status == PARTICLE_STATUS::MANTAIN_FACE)
    {
        //..
    }
    else if (particle_status == PARTICLE_STATUS::FREE_MOVE)
    {
      //..
      particle_status = PARTICLE_STATUS::FORMING;
    }
  }

    Render();
}
Particle definition
The fundamental part of the program is going to be a particle. Which is a simple element that has the following definition.
class Particle
{
public:
  Point2D Origin;
  Point2D Position;
  Point2D Render;

  Vector2D Speed;
  Vector2D Acceleration;

  uint16_t Color;
  uint8_t Lifetime = random(5, 20);

  void Update()
  {
    Speed += Acceleration;
    Position += Speed;

    if (particle_status == PARTICLE_STATUS::MANTAIN_FACE)
    {
      if (Lifetime > 0) Lifetime--;
    }
  }
};
As we can see, we have three “positions” represented by 2D points. We will see the function of each one of them later. But, as a summary.
- Origin, is the position it occupies within the face
- Position, the current position it occupies
- Render, the position it will be displayed on the screen
Of course, we also have the speed, acceleration, color, and life of the particle. Finally, we have an Update function, which simply updates the kinematics of the particle.
Creating particles
In the project, we have a vector of 2000 particles. To achieve the effect we want, we must position these particles to form the face.
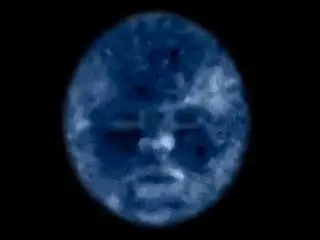
To do this, first I generated a color map, overlaying 5 frames of the video, with 20% opacity. In this way, we calculate the average of the frames. Then, median filter and rescaled to 320x240px. It looks something like this.
On the other hand, we make a similar image in black and white. This image corresponds to the particle density map. Where it is whiter, there will be more particles, and where it is black, none.

I could have used the same image for color and density. But having them separated allows me to play with particle density independently of color.
Now we have to generate the 2000 particles, according to the density map. To do this, we create a function that creates particles randomly across the screen. Then, it generates a random number from 0 to 255. If the value of the density map pixel is higher than the random number, the particle is created. If not, the process is repeated.
void GenerateParticle(int index)
{
  bool generated = false;
  while (generated == false)
  {
    auto x = random(0, 319);
    auto y = random(0, 239);

    auto target = depth_map_data[x + 320 * y];
    auto dice = random(0, 255);

    if (target > dice)
    {
      particles[index].Origin.X = x;
      particles[index].Origin.Y = y;
      particles[index].Position.X = x;
      particles[index].Position.Y = y;
      particles[index].Acceleration = 0;
      particles[index].Color = color_data[x + 320 * y];
      particles[index].Lifetime = random(15, 45);
      generated = true;
    }
  }
}

void Init()
{
  ComputeSpeedMap();

  int count = 0;

  for (auto i = 0; i < NUM_PARTICLES; i++)
  {
    GenerateParticle(i);
  }
}
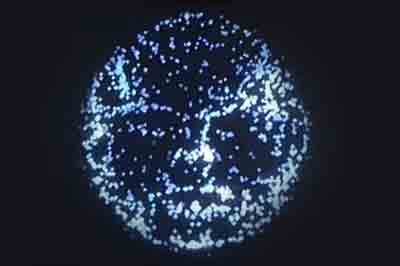
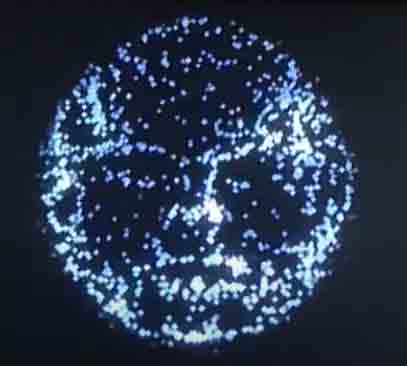
And with this, we manage to draw the original image using particles, whose density is given by the density map (obviously), and the color by the color map (obviously again). It looks something like this.
Calculating particle speed
A part of the effect is that, when the face is formed, the particles must move according to the contours of the face. This way, they give the sensation that the face is formed by particles.
I tried several ways to calculate this movement, which did not imply a great burden for the processor, and at the same time the effect looked good. In the end, the best compromise between effect quality / calculation time was for each particle to move to its neighboring particle with greater density.
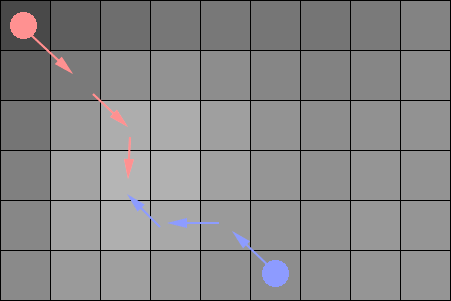
To avoid having to perform this calculation every frame, this speed map is calculated only once when the device starts.
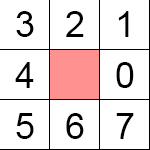
void ComputeSpeedMap()
{
  for (auto x = 1; x < 320 - 1; x++)
  {
    for (auto y = 1; y < 240 - 1; y++)
    {
      uint8_t direction = 0;
      uint8_t max = depth_map_data[(x + 1) + 320 * y];

      if (depth_map_data[(x + 1) + 320 * (y + 0)] > max)
      {
        direction = 1;
        max = depth_map_data[(x + 1) + 320 * (y + 0)];
      }

      if (depth_map_data[(x + 0) + 320 * (y + 1)] > max)
      {
        direction = 2;
        max = depth_map_data[(x + 0) + 320 * (y + 1)];
      }

      if (depth_map_data[(x - 1) + 320 * (y + 1)] > max)
      {
        direction = 3;
        max = depth_map_data[(x - 1) + 320 * (y + 1)];
      }

      if (depth_map_data[(x - 1) + 320 * (y + 0)] > max)
      {
        direction = 4;
        max = depth_map_data[(x - 1) + 320 * (y + 0)];
      }

      if (depth_map_data[(x - 1) + 320 * (y - 1)] > max)
      {
        direction = 5;
        max = depth_map_data[(x - 1) + 320 * (y - 1)];
      }

      if (depth_map_data[(x + 0) + 320 * (y - 1)] > max)
      {
        direction = 6;
        max = depth_map_data[(x + 0) + 320 * (y - 1)];
      }

      if (depth_map_data[(x + 1) + 320 * (y - 1)] > max)
      {
        direction = 7;
        max = depth_map_data[(x + 1) + 320 * (y - 1)];
      }

      speed_map[x + 320 * y] = rst;
    }
  }
}
Now, in each frame, while the face is maintained, each particle takes the speed from the precalculated speed map. (the code is not particularly clean, but hey! it was Sunday, and it wasn’t worth much more)
void SetSpeed(Particle& particle)
{
  int x = particle.Position.X;
  int y = particle.Position.Y;

  auto direction = speed_map[x + 320 * y];

  if (direction == 0)
  {
    particle.Speed.X = 1.0f;
    particle.Speed.Y = 0.0f;
  }
  if (direction == 1)
  {
    particle.Speed.X = 0.7f;
    particle.Speed.Y = 0.7f;
  }
  if (direction == 2)
  {
    particle.Speed.X = 0.0f;
    particle.Speed.Y = 1.0f;
  }
  if (direction == 3)
  {
    particle.Speed.X = -0.7f;
    particle.Speed.Y = 0.7f;
  }
  if (direction == 4)
  {
    particle.Speed.X = -1.0f;
    particle.Speed.Y = 0.0f;
  }
  if (direction == 5)
  {
    particle.Speed.X = -0.7f;
    particle.Speed.Y = -0.7f;
  }
  if (direction == 6)
  {
    particle.Speed.X = 0.0f;
    particle.Speed.Y = -1.0f;
  }
  if (direction == 7)
  {
    particle.Speed.X = 0.7f;
    particle.Speed.Y = -0.7f;
  }
}
The negative part of this is that, after a few frames, the particles will have moved to the local maxima of the density map, leaving the rest of the face without particles.
This is why each particle has a life, with a certain degree of randomness. The particles move according to the speed map, but after a few frames, they are eliminated and reappear in a new position of the face.
With so many particles and random lifetimes, the disappearance and reappearance is not perceived. Instead, the sensation is of a continuous flow of particles along the contours of the face. Here is a detail of the effect.
The Update function
With all that said above, we can already outline the main function of the project’s Update.
void Update()
{
  for (auto i = 0; i < NUM_PARTICLES; i++)
  {
        auto particle = particle[i];

    if (particle_status == PARTICLE_STATUS::MANTAIN_FACE)
    {
      SetSpeed(particle);
    }
    else if (particle_status == PARTICLE_STATUS::FORMING)
    {
      auto vec = particle.Origin - particle.Position;
      auto normalized = vec.Normalize();

      particle.Acceleration = normalized * 0.5f;
      particle.Speed *= SPEED_DISSIPATION;
        }
    else if (particle_status == PARTICLE_STATUS::FREE_MOVE)
    {
      particle.Acceleration = 0.0f;
      centerForce.Apply(particle);
      force.Apply(particle);
      force2.Apply(particle);
      force3.Apply(particle);
    }

    particle.Update();
    if (particle.Lifetime == 0)
    {
      GenerateParticle(i);
    }
  }

  for (auto i = 0; i < NUM_PARTICLES; i++)
  {
    particle.Render = particle.Position;

    ComputerWrapper(particle, MouthLeft);
    ComputerWrapper(particle, MouthRight);
    ComputerWrapper(particle, EyeLeft);
    ComputerWrapper(particle, EyeRight);
  }
}
As we can see, if the face is formed and maintained, we simply update the particle’s speed according to the precalculated speed map.
The two forming and free movement modes are missing, in which the particle’s speed is, to summarize, “whatever the particle feels like” (so to speak).
To achieve the effect of forming the face, the particle is freely moving and attracted to the point it should occupy in the face. However, if it were only attracted to the same point, it would end up orbiting around the point.
So, for it to converge, we introduce a speed dissipation factor. This factor reduces the particle’s speed each frame, while adding a speed pointing to its origin. This way, it “falls” in a spiral towards its final position.
Finally, the free or “undoing” face mode is the simplest. We simply let the particle move at its speed, and attract it with some point forces.
Forces
The force for the free mode is very simple, and we have it in the following class. It’s basically a standard gravity-type attractor.
class ForcePuntual
{
public:
Point2D Origin;
float Force;
bool IsActive;
bool IsVisible = true;
ForcePuntual(float x, float y, float force)
{
Origin.X = x;
Origin.Y = y;
Force = force;
}
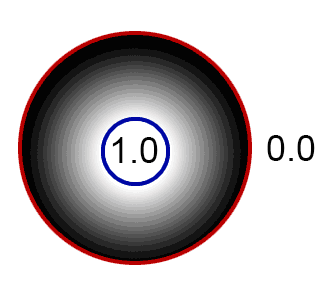
void Apply(Particle& particle)
{
Vector2D vector = particle.Position - Origin;
float dist = vector.Length();
float force_scaler = Force / dist / dist;
particle.Acceleration += vector * force_scaler;
}
};
In the free mode, I have four point forces, three of attraction placed at points “as I felt like” on the screen. The last one is a central point on the face, which favors the disintegration of the face, and made the effect look better.
Wrappers
We need to see one last element, used for the face animation. While the face is formed, we want it to be able to open and close its eyes and mouth to articulate expressions.
For that, we have a Wrapper class, which is the following.
class Wrapper
{
public:
  Point2D Position;

  float RangeNear;
  float RangeFar;

  Point2D Scaled;
  Point2D Displacement;

  void Apply(Particle& particle)
  {
    if (particle_status != PARTICLE_STATUS::MANTAIN_FACE) return;

    float delta = particle.Render - this.Position;
    float dist = delta.Length();

    if (dist < RangeFar)
    {
      auto mix = 1.0f;
      if(dist > RangeNear) mix = (dist - RangeNear) / (RangeFar - RangeNear);
      mix = mix * mix;

      particle.Render = (1 - mix) * (this.Scaled * dist + this.Position) + mix * particle.Render + Displacement;
    }
  }
};
In summary, the Wrapper modifies the position where the particles are represented. The Wrapper has a center, two areas of influence, and scales and/or displaces the particles. Here is a detail of the effect.
The strength of the effect (scaling and/or displacement) is given by the distance of the particle to the center of the Wrapper, and the ranges. Below RangeNear
