Material Design Lite lets us serve an interface with a Material Design look from a web page hosted on an ESP32.
So far we have served very simple pages, enough to check that everything works, but quite ugly. That is fine for testing, but as soon as we want to make a control panel that is even a little usable, it helps to take minimal care of the interface.
In this article we will see how to add Material Design Lite to a page served from the board, both from a CDN and from files stored in SPIFFS.
The example is oriented to ESP32. In many cases it can also be adapted to ESP8266 by changing libraries and a few pin details.
We have dedicated several entries to see how to serve web pages from the ESP8266, and how to connect the frontend with the backend through AJAX or Websockets calls.
But, let’s admit it, the web pages we have served so far are quite ugly. That is about to change! and we will start with the simple Material Design Lite library we already saw in this entry.
So let’s get to work! Regarding the backend part, that is, the ESP8266 code, it is identical to the one we have been using. That is,
#include <WiFi.h>
#include <ESPAsyncWebServer.h>
#include <FS.h>

#include "config.h"  // Replace with your network data
#include "Server.hpp"
#include "ESP32_Utils.hpp"

void setup(void)
{
	Serial.begin(115200);
	SPIFFS.begin();

	ConnectWiFi_STA();

	InitServer();
}

void loop(void)
{
}
AsyncWebServer server(80);

void InitServer()
{
  server.serveStatic("/", SPIFFS, "/").setDefaultFile("index.html");

  server.onNotFound([](AsyncWebServerRequest *request) {
    request->send(400, "text/plain", "Not found");
  });

  server.begin();
  Serial.println("HTTP server started");
}
The real difference in this example is in the ‘index.html’ file and in the files we will upload to the SPIFFS memory. Until now our html code would have been like this,
<!doctype html>
<html class="no-js" lang="">

<head>
  <meta charset="utf-8">
  <meta http-equiv="x-ua-compatible" content="ie=edge">
  <title></title>
  <meta name="description" content="">
  <meta name="viewport" content="width=device-width, initial-scale=1">
</head>

<body>
  <div>
    <div>
      <form action="#">
        <div>
          <input type="text" id="sample3">
          <label for="sample3">Text...</label>
        </div>
      </form>
    </div>
  </div>

  <div>
    <div>
      <button>
        <i class="material-icons">add</i>
      </button>
    </div>
    <div>
      <button>Button</button>
    </div>
  </div>

  <div>
    <div>
      <input type="range" min="0" max="100" value="25" tabindex="0">
    </div>
  </div>

  <div >
    <div>
      <label or="checkbox-1">
        <input type="checkbox" id="checkbox-1" checked>
        <span>Checkbox</span>
      </label>
      <label for="checkbox-2">
        <input type="checkbox" id="checkbox-2">
        <span>Checkbox2</span>
      </label>
      <label for="checkbox-3">
        <input type="checkbox" id="checkbox-3">
        <span>Checkbox3</span>
      </label>
    </div>
  </div>

  <div>
    <div>
      <label for="option-1">
        <input type="radio" id="option-1" name="options" value="1" checked>
        <span>First</span>
      </label>
      <label for="option-2">
        <input type="radio" id="option-2" name="options" value="2">
        <span>Second</span>
      </label>
      <label for="option-3">
        <input type="radio" id="option-3" name="options" value="3">
        <span>Third</span>
      </label>
    </div>
  </div>

  <div>
    <div>
      <label or="switch-1">
        <input type="checkbox" id="switch-1" checked>
        <span>Switch</span>
      </label>
    </div>
  </div>
</body>

</html>
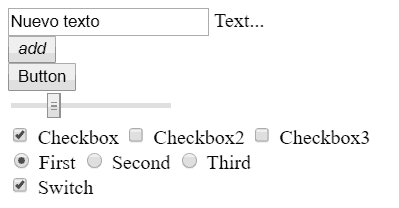
Which would give this terribly ugly result.
And now it is going to become
<!doctype html>
<html class="no-js" lang="">

<head>
   <title>ESP8266 Material Lite</title>
   <meta charset="utf-8">
   <meta http-equiv="x-ua-compatible" content="ie=edge">

   <meta name="description" content="">
   <meta name="viewport" content="width=device-width, initial-scale=1">
</head>

<body>
  <link rel="stylesheet" href="vendor/google-fonts.css">
  <link rel="stylesheet" href="vendor/material.css">
  <!--<link rel="stylesheet" href="https://fonts.googleapis.com/icon?family=Material+Icons">
  <link rel="stylesheet" href="https://cdn.jsdelivr.net/npm/[email protected]/dist/material.indigo-pink.min.css">-->

   <div class="mdl-grid">
      <div class="mdl-cell mdl-cell--4-col">
         <form action="#">
            <div class="mdl-textfield mdl-js-textfield mdl-textfield--floating-label">
               <input class="mdl-textfield__input" type="text" id="sample3">
               <label class="mdl-textfield__label" for="sample3">Text...</label>
            </div>
         </form>
      </div>
   </div>

   <div class="mdl-grid">
      <div class="mdl-cell mdl-cell--1-col">
         <button class="mdl-button mdl-js-button mdl-button--fab mdl-js-ripple-effect mdl-button--colored">
            <i class="material-icons">add</i>
         </button>
      </div>
      <div class="mdl-cell mdl-cell--1-col">
         <button class="mdl-button mdl-js-button mdl-button--raised mdl-js-ripple-effect mdl-button--colored">Button</button>
      </div>
   </div>

   <div class="mdl-grid">
      <div class="mdl-cell mdl-cell--4-col">
         <input class="mdl-slider mdl-js-slider" type="range" min="0" max="100" value="25" tabindex="0">
      </div>
   </div>

   <div class="mdl-grid">
      <div class="mdl-cell mdl-cell--4-col">
         <label class="mdl-checkbox mdl-js-checkbox mdl-js-ripple-effect" for="checkbox-1">
            <input type="checkbox" id="checkbox-1" class="mdl-checkbox__input" checked>
            <span class="mdl-checkbox__label">Checkbox</span>
         </label>
         <label class="mdl-checkbox mdl-js-checkbox mdl-js-ripple-effect" for="checkbox-2">
            <input type="checkbox" id="checkbox-2" class="mdl-checkbox__input">
            <span class="mdl-checkbox__label">Checkbox2</span>
         </label>
         <label class="mdl-checkbox mdl-js-checkbox mdl-js-ripple-effect" for="checkbox-3">
            <input type="checkbox" id="checkbox-3" class="mdl-checkbox__input">
            <span class="mdl-checkbox__label">Checkbox3</span>
         </label>
      </div>
   </div>

   <div class="mdl-grid">
      <div class="mdl-cell mdl-cell--4-col">
         <label class="mdl-radio mdl-js-radio mdl-js-ripple-effect" for="option-1">
            <input type="radio" id="option-1" class="mdl-radio__button" name="options" value="1" checked>
            <span class="mdl-radio__label">First</span>
         </label>
         <label class="mdl-radio mdl-js-radio mdl-js-ripple-effect" for="option-2">
            <input type="radio" id="option-2" class="mdl-radio__button" name="options" value="2">
            <span class="mdl-radio__label">Second</span>
         </label>
         <label class="mdl-radio mdl-js-radio mdl-js-ripple-effect" for="option-3">
            <input type="radio" id="option-3" class="mdl-radio__button" name="options" value="3">
            <span class="mdl-radio__label">Third</span>
         </label>
      </div>
   </div>

   <div class="mdl-grid">
      <div class="mdl-cell mdl-cell--4-col">
         <label class="mdl-switch mdl-js-switch mdl-js-ripple-effect" for="switch-1">
            <input type="checkbox" id="switch-1" class="mdl-switch__input" checked>
            <span class="mdl-switch__label">Switch</span>
         </label>
      </div>
   </div>

  <script src="vendor/material.js"></script>
  <!--<script src="https://cdn.jsdelivr.net/combine/npm/[email protected],npm/[email protected]"></script>-->
</body>

</html>
With which we will achieve this aesthetic.

Regarding the files used by the Material Design Lite framework (JS and CSS) we can either load them from a CDN, or upload them compressed to the ESP8266’s memory.
In the example you have both options, with the CDN option commented out.
In principle we will always prefer the CDN whenever possible, that is, when the end client has an Internet connection to download the files. This way we free the ESP8266 from the work of having to serve the files.
But this is not always possible. For example, we will have to serve them ourselves when the ESP8266 is acting in AP mode because the client will not have Internet access to download the files from the CDN.
It was that simple! Of course, we are using the Material Design Lite framework but you can use any other framework or template you want to serve the web pages following the procedure we have seen to load the files.
No more excuses for serving “ugly” pages from our board. With a lightweight library and a few changes, we can get a much cleaner interface without making the project much more complicated.
Download the code
All the code from this entry is available for download on Github.

Version for ESP8266: https://github.com/luisllamasbinaburo/ESP8266-Examples
Version for ESP32: https://github.com/luisllamasbinaburo/ESP32-Examples
