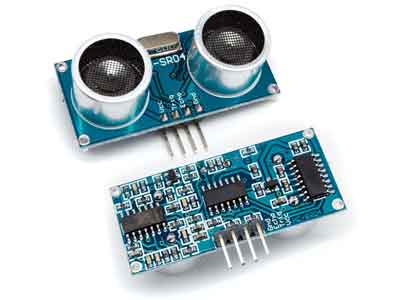
What is an ultrasonic sensor?
An ultrasonic sensor is a device for measuring distances. Its operation is based on sending a high-frequency pulse, not audible to the human ear. This pulse bounces off nearby objects and is reflected back to the sensor, which has a microphone suitable for that frequency.
By measuring the time between pulses, knowing the speed of sound, we can estimate the distance of the object against whose surface the ultrasonic impulse hit.
Ultrasonic sensors are cheap and easy to use. The theoretical measurement range of the HC-SR04 sensor is from 2cm to 400cm, with a resolution of 0.3cm. In practice, however, the actual measurement range is much more limited, around 20cm to 2 meters.
Ultrasonic sensors are low-precision sensors. The orientation of the surface to be measured can cause the wave to reflect, falsifying the measurement. In addition, they are not suitable in environments with a large number of objects, as the sound bounces off surfaces, generating echoes and false measurements. They are also not suitable for outdoor and open-air operation.
Despite this low precision, which prevents knowing the distance to an object accurately, ultrasonic sensors are widely used. In robotics, it is common to mount one or more of these sensors, for example, for obstacle detection, determining the position of the robot, creating environment maps, or solving mazes.
In applications that require higher precision in distance measurement, they are usually accompanied by infrared distance meters and optical sensors.
There are other sensors to detect distances. For medium and long distances, we have the Sharp GP2Y0A02YK0 optical sensor and for very short distances the infrared obstacle detector.
Price
The HC-SR04 ultrasonic sensor is an inexpensive sensor. We can find units for €0.65 on AliExpress.
How does an ultrasonic sensor work?
The sensor is simply based on measuring the time between sending and receiving a sound pulse. We know that the speed of sound is 343 m/s under conditions of 20 °C temperature, 50% humidity, and sea-level atmospheric pressure. Converting units results in
That is, sound takes 29.2 microseconds to travel one centimeter. Therefore, we can obtain the distance from the time between the emission and reception of the pulse using the following equation.
The reason for dividing the time by two (in addition to the speed of sound in the appropriate units, which we calculated before) is that we have measured the time it takes for the pulse to go and come back, so the distance traveled by the pulse is twice the distance we want to measure.
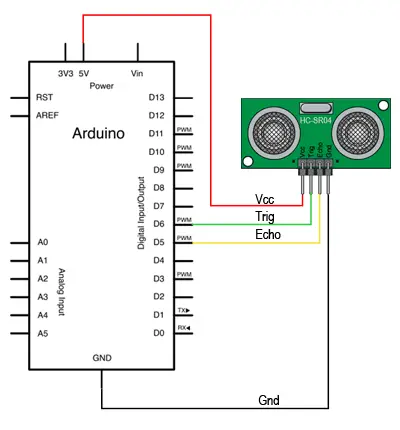
Electrical schematic
The electrical schematic we need is as follows.
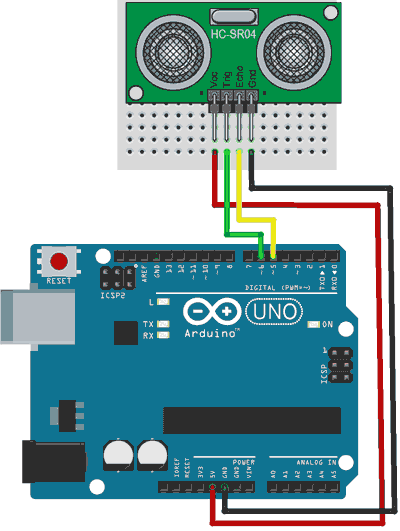
Assembly diagram
While the assembly on a breadboard would be as follows.
Code example
Without libraries
To activate the sensor, we need to generate an electrical pulse on the Trigger pin for at least 10us. Previously, we will set the pin to Low for 4us to ensure a clean trigger.
Subsequently, we use the “pulseIn” function to obtain the time required for the pulse to return to the sensor. Finally, we convert the time into distance using the corresponding equation.
Note that we always try to use integer arithmetic, avoiding the use of floating-point numbers. This is because floating-point operations slow down the processor and require loading a large number of libraries into memory.
const int EchoPin = 5;
const int TriggerPin = 6;

void setup() {
  Serial.begin(9600);
  pinMode(TriggerPin, OUTPUT);
  pinMode(EchoPin, INPUT);
}

void loop() {
  int cm = ping(TriggerPin, EchoPin);
  Serial.print("Distance: ");
  Serial.println(cm);
  delay(1000);
}

int ping(int TriggerPin, int EchoPin) {
  long duration, distanceCm;

  digitalWrite(TriggerPin, LOW);  // to generate a clean pulse we set it to LOW for 4us
  delayMicroseconds(4);
  digitalWrite(TriggerPin, HIGH);  // generate a 10us Trigger
  delayMicroseconds(10);
  digitalWrite(TriggerPin, LOW);

  duration = pulseIn(EchoPin, HIGH);  // measure the time between pulses, in microseconds

  distanceCm = duration * 10 / 292/ 2;   // convert to distance, in cm
  return distanceCm;
}
With NewPing library
Another option is to use a library to facilitate the process, such as the NewPing library available in the Arduino IDE library manager.
The NewPing library provides additional functions, such as the option to perform a median filter to eliminate noise, or use the same pin as both trigger and echo, which allows us to save many pins in the case of having multiple ultrasonic sensors.
The library provides various examples to illustrate its use. The following example, based on them, shows the operation with a single pin for trigger and echo.
#include <NewPing.h>

const int UltrasonicPin = 5;
const int MaxDistance = 200;

NewPing sonar(UltrasonicPin, UltrasonicPin, MaxDistance);

void setup() {
  Serial.begin(9600);
}

void loop() {
  delay(50);                      // wait 50ms between pings (29ms minimum)
  Serial.print(sonar.ping_cm()); // get the value in cm (0 = out of range)
  Serial.println("cm");
}
Download the code
All the code in this post is available for download on Github. 
