The BH1750 is a digital light level sensor that can be easily connected to a microcontroller or processor like Arduino to create a luxometer.
Unlike other light level measurement systems, such as LDR resistors, the spectral response of the BH1750 is designed to be similar to that of the human eye, so it is capable of providing lux measurements.
Remember that lux is the unit of the International System for illuminance. Illuminance is the relationship between luminous flux (the amount of light emitted by a light source) and the surface on which it is measured.
As a reference, here are some typical examples of illuminance levels.
| Scenario | Lux |
|---|---|
| Night | 0.001-0.02 |
| Full moon | 0.2-0.6 |
| Cloudy day, indoors | 5-50 |
| Cloudy day, outdoors | 50-500 |
| Sunny day, indoors | 100-1000 |
| Direct sunlight | 100,000 |
| Room, living room | 150-300 |
| Office/desk | 500-700 |
| Supermarkets/exhibitions | 750-1000 |
| Drawing/work tables | 1000-1500 |
The BH1750 has a wide adjustable measurement range from 0.11 to 100,000 lux, so it is capable of measuring in almost any lighting situation. It incorporates a 16-bit ADC that provides a resolution of 65,535 levels.
The BH1750 sensor has low influence on the infrared spectrum, 50/60 Hz noise rejection (artificial light), and high independence from the light source origin (natural light, halogens, LED, incandescence).
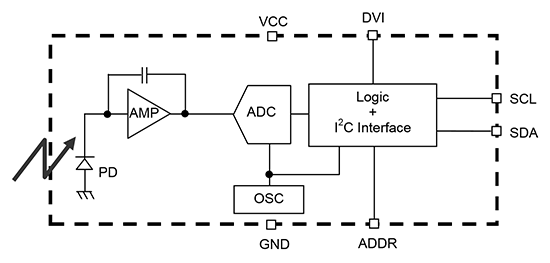
Communication is done through the I2C bus, making it easy to obtain the measured data. The operating voltage is low, between 2.4 and 3.6V.
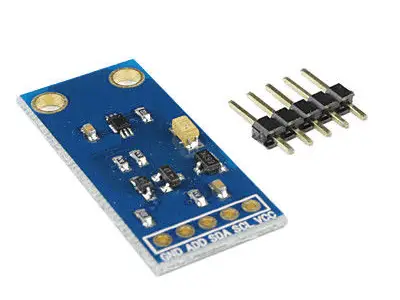
They are often integrated into modules that incorporate the necessary electronics to connect it easily to an Arduino. In most modules, this includes a voltage regulator that allows direct power to 5V.
The BH1750 is mainly used to regulate the backlight of LCDs and Keypads in mobile devices, as well as to regulate lighting in digital cameras.
We can use it in our projects, for example, to create a low-cost luxometer, control the operation of blinds or awnings in home automation, or regulate a lighting system.
Price
The BH1750 is a very cheap sensor. We can find modules with this luxometer for €0.85, searching on international sellers on eBay and AliExpress.
Connection diagram
The connection is simple, we simply power the module from Arduino using GND and 5V and connect the SDA and SCL pins of Arduino with the corresponding pins of the sensor.
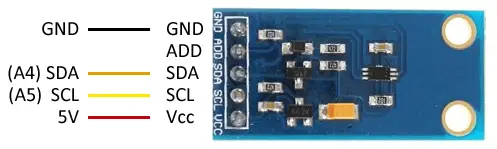
While the connection seen from the Arduino side would look like this.
Verify that your board is compatible with 5V before connecting it to Arduino. If not, you will have to use a logic level adapter.
Code examples
To read the BH1750, we will use the library developed by Christopher Laws, available at this link.
The library provides code examples, which is advisable to review. The following examples are modifications based on those available in the library.
The sensor has 3 resolution modes, with the default being “High Resolution Mode”.
| Mode | Resolution | Measurement time |
|---|---|---|
| High resolution Mode2 | 0.5 lx | 120 ms |
| High Resolution Mode | 1 lx | 120 ms |
| Low Resolution Mode | 4 lux | 16 ms |
Additionally, there are 2 trigger modes, “Continuous” and “One Time”. In continuous mode, the BH1750 constantly takes measurements, while in one-time trigger mode, it takes measurements on demand, switching to low energy mode between requests.
Display lux level
In this example, we use the BH1750 to obtain the illuminance level and then display the lux amount through the serial port.
#include <Wire.h>
#include <BH1750.h>

BH1750 luxometer;

const byte luxMode = BH1750_CONTINUOUS_HIGH_RES_MODE;

void setup() {
  Serial.begin(9600);
  Serial.println(F("Initializing sensor..."));
  luxometer.begin(luxMode); // Initialize BH1750
}

void loop() {
  uint16_t lux = luxometer.readLightLevel(); // Reading from BH1750
  Serial.print(F("Illuminance:  "));
  Serial.print(lux);
  Serial.println(" lx");
  delay(500);
}
Turn on a device with the luxometer
In this example, we use the reading of the lighting level along with two upper and lower thresholds to turn on and off a device.
In the example, we use the LED integrated into the board to verify the operation, for example, covering the BH1750 with the hand and checking that the LED turns off and on correctly.
However, in a real example, we would use the digital output to perform an action such as deploying an awning or closing a blind, for which we can use BJT transistors, MOSFET transistors, or relay outputs.
#include <Wire.h>
#include <BH1750.h>

BH1750 luxometer;;
const byte luxMode = BH1750_CONTINUOUS_HIGH_RES_MODE;

const uint16_t lowThreshold = 20;
const uint16_t highThreshold = 50;

const int pinOut = LED_BUILTIN;

void setup() {
  Serial.begin(9600);
  Serial.println(F("Initializing sensor..."));
  luxometer.begin(luxMode); // Initialize BH1750
  pinMode(pinOut, OUTPUT);
  digitalWrite(pinOut, LOW);
}

void loop() {
  uint16_t lux = luxometer.readLightLevel();  // Illuminance reading

  if (lux < lowThreshold)
  {
    digitalWrite(pinOut, HIGH);
  }
  else if (lux > highThreshold)
  {
    digitalWrite(pinOut, LOW);
  }
  delay(500);
}
Download the code
All the code from this post is available for download on Github. 
